Our social:

Latest Post

Wednesday, October 26, 2016

The 20 best cake recipes: part 3

Nigel Slater’s carrot cake, Emma Clark’s banana bread and more great dishes chosen by Observer Food Monthly

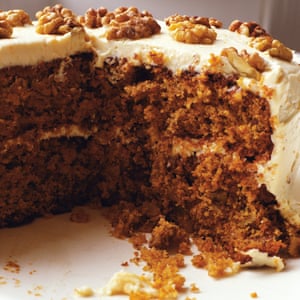
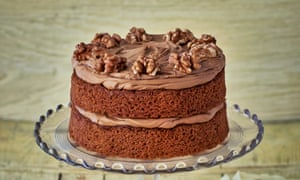
Nigel Slater’s carrot cake with a frosting of mascarpone and orange

You could measure my life in health-food shops. It is to them I turn for the bulk of my store-cupboard shopping, from parchment-coloured figs and organic almonds to sea salt and cubes of fresh yeast. Their shelves are a constant source of inspiration and reassurance. It is also where I first came across organic vegetables, long before the supermarkets saw them as a money-spinner or the organic box schemes would turn up at your door. It was these pine-clad shops, with their lingering scent of patchouli, that introduced me to the joys of the organic swede.

To this day I wouldn’t go anywhere else for my lentils and beans, though I can live without the crystals and self-help manuals. These is something endlessly reassuring about their rows of cellophane-encased dates and haricot beans, their dried nuggets of cranberry and jars of organic peanut butter. And where else can you get a joss stick when you need one?

Health-food shops rarely used to be without a carrot cake on the salad counter, usually next to the blackcurrant cheesecake and the deep wholemeal quiche. Good they were, too, with thick cream-cheese icing and shot through with walnuts. I never scorned them the way others did, finding much pleasure in the deep, soggy layers of cake and frosting. This was first published in the Observer many years ago, and rarely does a week go by without an email asking for a copy to replace one that has fallen apart or stuck to the bottom of a pan. Few things make a cook happier than someone asking for one of your recipes.

Enough for 8-10
eggs 3
self-raising flour 250g
bicarbonate of soda ½ tsp
baking powder 1 tsp
ground cinnamon 1 tsp
salt a pinch
sunflower oil 200ml
light muscovado sugar 250g
carrots 150g
lemon juice of ½
walnuts 150g

For the frosting
mascarpone cheese 250g
Philadelphia cream cheese 200g
unrefined icing sugar 150g
orange grated zest of 1 medium
walnut halves a handful

Set the oven at 180C/gas mark 4. Lightly butter two 22cm cake tins, then line each with a disc of baking parchment.

Separate the eggs. Sift together the flour, bicarbonate of soda, baking powder, cinnamon and salt. Beat the oil and sugar in a food mixer until well creamed, then introduce the egg yolks one by one. Grate the carrots into the mixture, then add the lemon juice. Roughly chop the walnuts and add them too.

Fold the flour into the mixture with the machine on slow. Beat the egg whites till light and stiff, then fold tenderly into the mixture using a large metal spoon (a wooden one will knock the air out).

Divide the mixture between the two cake tins, smooth the top gently and bake for 40-45 minutes. Test with a skewer for doneness. The cakes should be moist but not sticky.

Remove from the oven and leave to settle for a good 10 minutes before turning the cakes out of their tins on to a wire cooling rack.

To make the frosting, put the mascarpone, Philadelphia cheese and icing sugar into an electric mixer and beat till smooth and creamy. It should have no lumps. Mix in the orange zest.

When the cake is cool, sandwich the halves together with about a third of the frosting. Use the rest to cover the top and sides of the cake. I don’t think you need be too painstaking; a rough finish will look more appropriate here. Cover the top with walnut halves.
From Tender: Volume I by Nigel Slater (Fourth Estate, £30). Click here to order a copy from Guardian Bookshop for 24.60

Glenegedale House’s banana bread
Glenegedale House’s banana bread Photograph: Jean Cazals for the Observer

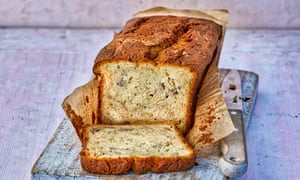
Emma Clark’s Glenegedale House banana bread

I have made this banana bread at least twice a week for three and half years for the guests in our guesthouse. The scent fills the house and wakes up the senses before you are even properly awake. This recipe was my grandmother’s and I have adapted it slightly. I usually use butter for all my baking as my theory is always use the best produce and you will get the best results. However, this is the only recipe in which I use margarine, simply because it works so well. The recipe handed down to me says not to beat the bananas and to leave them in chunks – I don’t. I believe it works better when beaten and smooth.

Makes 6 good slices when hot, or 8 slices when cold
caster sugar 170g
margarine 113g
self-raising flour 170g
ripe bananas 2 small
free-range eggs 2 large
salt a good pinch

Preheat the oven to 180C/gas mark 4. First, blend together the caster sugar and the margarine, using a stand mixer or handheld whisk, until fluffy. Then add all the other ingredients making sure to scrape all the butter and sugar from the side of the bowl. Whizz all together for a minute or until it is a smooth batter. Line a 2kg loaf tin with a baking parchment liner, pour in the batter and bake on the top shelf for 45-55 minutes. It is done when a skewer comes out clean. Let it cool in the tin for five minutes. Slice and serve hot or cold.

Emma Clark is the owner of Glenegedale House, Isle of Islay

Hazelnut and raspberry friands.
Hazelnut and raspberry friands. Photograph: Jean Cazals for the Observer

Claire Ptak’s hazelnut and raspberry friands

Friands are little French almond cakes, which we love at the Violet Bakery because they are moist and tasty and also so easy to make. In this version, I substituted hazelnuts for some of the almonds because I had a few left over that I wanted to use up. I really like the way these turned out, because the hazelnut has a lovely light flavour. The nutty base lends itself to a variety of seasonal fruit toppings. Here I’ve used raspberries, but you could use any berries you like or slices of peaches, nectarines, plums, figs, or whatever.

Makes 12-16 friands
butter 115g, melted, plus more for greasing the moulds
plain flour 90g
baking powder ¾ tsp
ground almonds 50g
ground hazelnuts 80g
icing sugar 190g
egg whites 5, slightly whisked
vanilla extract 2 tsp
fresh raspberries 200g (about 40-50)
slivered hazelnuts 50g
icing sugar for dusting

Preheat the oven to 160C/gas mark 3. Butter 12-16 friand moulds or cupcake tins.

Weigh out all the ingredients (except the raspberries and slivered hazelnuts) into the bowl of a food processor and blitz until foamy (about 1 minute).

Spoon the mixture into the moulds, filling them to about three-quarters full, then top each mould with 2-3 raspberries and sprinkle with the slivered hazelnuts.

Bake for about 15-20 minutes, until the tops of the cakes are springy to the touch. Leave the cakes to cool slightly in their moulds, then remove and dust them with icing sugar. They will keep well in an airtight container for a few days.
Adapted from The Violet Bakery Cookbook by Claire Ptak (Square Peg, £20). Click here to order a copy from Guardian Bookshop for £16.40

Pistachio cake.
Pistachio cake. Photograph: Jean Cazals for the Observer

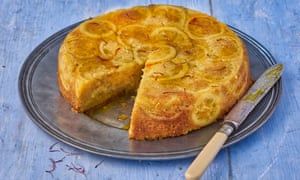
Jeremy Lee’s pistachio cake

Serves 8
For the apricots
apricots 12, plump
water 500ml
white wine 250ml
caster sugar 250g
vanilla pods 2
bay leaf 1
black peppercorns 10
lemon 4 strips of peel, and juice

For the cake
unsalted butter 250g, softened to room temperature
caster sugar 250g
whole almonds 100g, blanched and peeled
pistachios 150g, shelled
eggs 4 large
plain flour 40g
baking powder 1 level tsp
lemon 1

Place all the apricot ingredients except the apricots in a wide heavy bottomed pan. Bring to a boil and simmer for 5 minutes. Carefully lay the apricots in the liquid and return to a boil. Cover with a disc of greaseproof paper, remove from the heat and leave to cool for several hours or overnight.

Butter and line a deep 28-32cm round cake tin then heat an oven to 180C/gas mark 4.

Beat the butter and the sugar together until pale and fluffed. Grind the nuts in a food processor until quite fine but not powdered.

Crack the eggs into a jug and mix them well with a fork. Add this to the butter and sugar in small parts and whisk until a smooth batter is achieved. Sift the flour and baking powder into the batter, then gently fold in the almonds and pistachios. Juice the lemon and add this to the cake batter. Pour into the prepared cake tin.

Bake for 45-55 minutes until golden brown. To check if it is cooked through, the age-old skewer test is best. Insert a skewer in the middle of the cake: if clean when withdrawn it is done, if not, return to the oven for another 5-10 minutes.

When the cake is cooked, gently spoon a few ladlefuls of the apricot syrup on to it. Place the cake on a handsome plate. Spoon the apricots and some syrup into a pretty bowl. Some cream is most welcome.

Jeremy Lee is head chef of Quo Vadis, London W1

Oswaldo Oliva
Tres leches Photograph: Jean Cazals for the Observer

Oswaldo Oliva’s tres leches

Super easy to make and extra delicious, tres leches is a sponge soaked in three dairy products (milk, condensed milk and evaporated milk), which became popular in Mexico and Latin America after the New York Condensed Milk Company was founded in 1857. The key to “the perfect cake” is controlling the amount of liquid the cake absorbs. It should be moist and oozy, but still able to hold its shape when sliced. In this recipe, I add a boozy note to the mix that can be replaced with your drink of choice.

Serves 10-12
For the cake
fine sponge flour 350g
baking powder 1 tsp
caster sugar 400g
salt 1½ tsp
eggs 2
vegetable or grapeseed oil 240ml
whole milk 240ml
vanilla extract 2 tsp

For the tres leches soak
milk 250ml
evaporated milk 170ml
condensed milk 170ml
vodka 2 tbsp
vanilla extract 2 tsp

To finish
double cream 500ml
caster sugar 75g
strawberries 250g

Heat the oven to 170C/gas mark 3. Butter and line a 23cm round tin with butter or non-stick cooking spray. Dust the sides of the cake tin with flour, tapping out any excess.

To make the cake, sift the flour and baking powder twice.

In a separate bowl, whisk the sugar, salt and eggs together until pale. Whisk in the oil. If using a mixer, use the whisk attachment on medium speed until you get a homogenous liquid.

Sift the dry ingredients into the liquid mix. Do it slowly and one large spoonful at a time. Mix well but only until the ingredients are combined. Overmixing will result in a tougher cake. Finally, whisk in the milk and vanilla extract.

Pour the batter in the floured cake tin and bake on the centre of the heated oven for 55-65 minutes. Prick with a toothpick to make sure that the batter is cooked (the toothpick should come out clean) and remove from the oven. Allow the cake to cool completely on the counter or a wire rack before removing from the tin.

To make the tres leches mix, combine the milks in a saucepan and set over a low heat, stirring constantly so that the condensed milk does not burn on the bottom. Remove from the heat and add the vodka and vanilla extract. Mix well and allow to rest for 10 minutes. Pour over the sponge to soak. Allow this to cool in the fridge for 30 minutes.

For the cream, combine the cream and sugar in the bowl of a mixer and whip until soft peaks are formed. Top the soaked cake with the whipped cream and strawberries.

Traditionally, tres leches is eaten as a sandwich cake. For this, cut the cake in half horizontally (after the cake has cooled and before soaking the sponge). Soak the cakes with the milk mixture and refrigerate (as above). Use half of the cream to sandwich the soaked cakes together and top with the remaining cream and the strawberries.

Oswaldo Oliva is head chef at Lorea, in Mexico City

The 20 best cake recipes: part 1

The best of baking, including Nigella Lawson’s devil’s food cake and Elizabeth David’s madeleines, selected by Observer Food Monthly The 20 best cake recipes: part 2

Elizabeth David’s madeleines

Madeleines are among the lightest and most beguiling of all French petits fours or small cakes. At one time they were made in a variety of sizes and in decorative moulds of different shapes. Nowadays, the name is mainly associated with the scallop shell characteristic, originally, of the madeleines of Commercy in Lorraine. These were the madeleines immortalised by Proust. Whatever small mould is used, the French madeleine mixture is extremely simple to cook. (French madeleines are not to be confused with the English coconut-decorated castle-pudding shaped cakes of the same name.)

To make 20-24 madeleines (the number will depend upon the dimensions of the moulds, which vary quite a bit) ingredients are 125g each of plain flour, butter and sugar; 2 eggs; a teaspoonful of baking powder; 2 of orange flower water or fresh lemon juice; the grated zest of half a lemon; a pinch of salt.

Have the oven turned on to 200C/gas mark 6.

Put the flour in a bowl. Sprinkle in the baking powder and and salt. Add the sugar and grated lemon rind. Separate the eggs. Stir the yolks into the flour mixture. Add the orange flower water or lemon juice.

Put the butter in a small saucepan or bowl over very low heat until it has softened. Do not let it melt or oil. Keeping back a tablespoon or so for coating the moulds, stir the butter into the main mixture. With a pastry brush dipped in the reserved butter, paint the moulds. (These can be bought in sheets of six or twelve.) Now whisk the egg whites to a stiff snow. Amalgamate them swiftly with the cake batter.

Using a dessert spoon, put the mixture into the moulds. Each mould should be half filled, no more. This is the only difficult moment in the cooking of the madeleines – difficult because it is so hard to believe that the little spoonful of the mixture lying rather sadly in the mould will rise, swell and take on the beautiful shape and markings of the shell mould. At this moment faith is essential; should the moulds be overfilled, the mixture will spread sideways; the result will be a failure.

As soon as the moulds are filled, put them into the oven, on the centre shelf, and preferably on an iron baking sheet. In 14-15 minutes the madeleines should be cooked.

While they are baking, butter and fill a second sheet of moulds with the rest of the mixture. If you have only one sheet, you have to wait until the first batch is cooked. For the cook this slows up the proceedings, but the short wait does not affect the mixture.

When, after the prescribed 14 minutes, you see that the cakes have risen and are a very pale gold, remove from the oven. Let them rest for just a few seconds before turning them out – using a small palette knife – on to a cooling rack. The underside of the madeleines should be a delicate golden sand colour. As soon as they are cool they are ready to eat, and at their best. They can, however, be reheated, extremely gently and for a few minutes only.
From Is There a Nutmeg in the House? By Elizabeth David, compiled by Jill Norman (Grub Street, £14.99). Click here to order a copy from Guardian Bookshop for £12.29

Devil’s food cake
Devil’s food cake: ‘It never quite dries to the touch, but this is, in part, what makes the cake so darkly luscious’. Photograph: Jean Cazals for the Observer

Nigella Lawson’s devil’s food cake

Forget the name, this cake is heavenly. The crumb is tender, the filling and frosting luscious. When I made it one Friday, I expected my children, resident food critics much in the mould of The Grim Eater, to find it too dark, too rich, not sweet enough: you get the gist. Instead, I came down on Saturday morning to find nothing but an empty, chocolate-smeared cake stand and a trail of crumbs.

You may prefer to prepare this the other way round from me, and get the frosting under way before you make the cakes. Either way, read the recipe through before you start cooking to get the shape of things in your head, not least because the frosting is softer, stickier than you may be used to. While you’re making it, don’t panic. The mixture will seem very runny for ages once the chocolate has melted and you will think you have a liquid gleaming glaze, beautiful but unfit for purpose; leave it for about an hour, as stipulated, though, and it will be perfect and spreadable. It never quite dries to the touch, but this is, in part, what makes the cake so darkly luscious. Goo here is good.

Serves 10-12
For the cake
cocoa powder 50g, best quality, sifted
dark muscovado sugar 100g
boiling water 250ml
unsalted butter 125g, soft, plus some for greasing
caster sugar 150g
plain flour 225g
baking powder ½ tsp
bicarbonate of soda ½ tsp
vanilla extract 2 tsp
eggs 2

For the frosting
water 125ml
dark muscovado sugar 30g
unsalted butter 175g, cubed
dark chocolate 300g, best-quality, finely chopped

Preheat the oven to 180C/gas mark 4. Line the bottoms of 2 x 20cm sandwich tins with baking parchment and butter the sides.

Put the cocoa and 100g dark muscovado sugar into a bowl with a bit of space to spare, and pour in the boiling water. Whisk to mix, then set aside.

Cream the butter and caster sugar together, beating well until pale and fluffy; I find this easiest with a freestanding mixer, but by hand wouldn’t kill you.

While this is going on – or as soon as you stop if you’re mixing by hand – stir the flour, baking powder and bicarb together in another bowl, and set aside for a moment.

Dribble the vanilla extract into the creamed butter and sugar – mixing all the while – then drop in 1 egg, quickly followed by a scoopful of flour mixture, then the second egg.

Keep mixing and incorporate the rest of the dried ingredients for the cake, then finally mix and fold in the cocoa mixture, scraping its bowl well with a spatula.

Divide this fabulously chocolatey batter between the 2 prepared tins and put in the oven for about 30 minutes, or until a cake tester comes out clean. Take the tins out and leave them on a wire rack for 5-10 minutes, before turning the cakes out to cool.

As soon as the cakes are in the oven, get started on your frosting: put the water, 30g muscovado sugar and 175g butter in a pan over a low heat to melt.

When this mixture begins to bubble, take the pan off the heat and add the chopped chocolate, swirling the pan so that all the chocolate is hit with heat, then leave for a minute to melt before whisking till smooth and glossy.

Leave for about 1 hour, whisking now and again – when you’re passing the pan – by which time the cakes will be cooled, and ready for the frosting.

Set one of the cooled cakes, with its top side down, on a cake stand or plate, and spread with about a third of the frosting, then top that with the second cake, regular way up, and spread the remaining frosting over the top and sides, swirling away with your spatula. You can go for a smooth look, but I never do and probably couldn’t.

The cake layers can be baked 1 day ahead and assembled before serving: wrap tightly in cling film and store in an airtight container. An iced cake will keep for 2-3 days in an airtight container in a cool place.

Un-iced cake layers can be frozen on day of baking, each wrapped in a double layer of clingfilm and a layer of foil, for up to 3 months. Defrost for 3-4 hours on wire rack at room temperature.
From Kitchen by Nigella Lawson (Chatto & Windus, £26). Click here to order a copy from Guardian Bookshop for £21.32

Seed cake and a glass of madeira
Seed cake and a glass of madeira: ‘This will see you safely through until lunch’. Photograph: Jean Cazals for the Observer

Fergus Henderson and Justin Gellatly’s seed cake and a glass of madeira

Eleven o’clock and still two hours until lunchtime. Something to keep you steady – nothing finer than a slice of seed cake, washed down with a glass of madeira. This will see you safely through until lunch.

Serves 6
unsalted butter 260g, softened
caster sugar 260g
caraway seeds 1 tsp
eggs 5 large, lightly beaten
self-raising flour 320g
full fat milk 150ml

Grease a 16cm x 10cm x 8cm loaf tin with butter and line the base and sides with baking parchment.

Cream the butter, sugar and caraways together either with an electric mixer or in a bowl with a wooden spoon until they are white and fluffy. Gradually mix in the beaten eggs, adding them little by little to prevent curdling. Then sift in the flour and mix until incorporated. Lastly add the milk.

Transfer the mixture to the prepared tin and bake in an oven preheated to 180C/gas mark 4 for 45 minutes or until it is golden brown and a skewer inserted in the centre comes out clean. Serve with a glass of madeira.
From The Complete Nose to Tail by Fergus Henderson (Bloomsbury Publishing, £30). Click here to order a copy from Guardian Bookshop for £24.60

Pine nut and rosewater tropezienne
Pine nut and rosewater tropezienne: ‘keep it nice and ribbony’. Photograph: Jean Cazals for the Observer

Sam and Sam Clark’s pine nut and rosewater tropézienne

This cake is a Moorish version of the famous tarte Tropézienne that we used to buy in St Tropez. The rosewater cream is based on a simple creme patissiere, with rosewater and whipped cream added for aroma and lightness.

Serves 8–10
For the brioche dough
dried yeast 1 tsp (or 10g fresh yeast)
tepid water 120ml
plain flour 300g
caster sugar 50g
salt ½ tsp
organic eggs 2
organic egg yolks 2
unsalted butter 100g, softened at room temperature
pine nuts 150g
icing sugar for dusting (optional)

For the rosewater cream
vanilla pod ½, slit open lengthways
cornflour 25g
organic egg yolks 3
caster sugar 100g
milk 250ml
rosewater 2 tbsp
unsalted butter 40g
double cream 250ml

First make the brioche. Dissolve the yeast in the water and mix with 100g of the flour. Cover and leave in a warm place until doubled in volume. Sift the sugar, salt and remaining flour into a bowl (as this is quite a wet dough, it is easiest to make in a mixer fitted with a dough hook). Make a well in the centre of the flour and put the whole eggs, 1 egg yolk and the yeast mixture in it. Bring the dough together, knead for a few minutes, then slowly start to incorporate the butter. Once the butter is worked into the dough, knead in two-thirds of the pine nuts. Put the dough in an oiled bowl, cover and leave to rise at room temperature (no warmer than 25C, or the butter may melt and separate from the dough) for 2 hours or until doubled in bulk.

Grease a 25cm springform cake tin with oil or butter and line the base with baking parchment. Press the dough into the tin, paint it with the last egg yolk and scatter with the remaining pine nuts. Leave to rise, again at room temperature, this time until trebled in bulk – just over 2 hours.

Preheat the oven to 175C/gas mark 4.

Bake the brioche for 30 minutes, until the nuts and crust are a rich golden brown. Leave to cool before assembling the cake, but bear in mind that this brioche is best eaten on the day of baking.

Next make the rosewater cream. Scrape the seeds from the vanilla pod, reserving the pod, and put them in a mixing bowl with the cornflour, egg yolks and sugar. Beat to a thick paste. Bring the milk to the boil with the vanilla pod, remove the pod, then slowly beat the boiling milk into the egg mixture. Return the mixture to the sauce pan and slowly bring back to a simmer, stirring constantly – the mixture will thicken dramatically. Decant the mixture into a bowl, stir in the rosewater and let it cool slightly. When it is about 50-60C (when you can put your finger in for a second, but not hold it there), stir in the butter. Cover and leave to cool, then chill for a few hours in the fridge.

Whip the cream until firm. Stir the custard to loosen it (it will have set solid), then fold in the whipped cream.

To assemble the cake, cut the brioche horizontally in half to make 2 discs. Pile all the rosewater cream on to the lower disc and replace the top. Chill the cake for 30 minutes if the cream seems a bit oozy, and serve dusted with icing sugar, if you like.
From Moro East by Sam and Sam Clark (Ebury Press, £17.50). Click here to order a copy from Guardian Bookshop for £14.35

Chocolate brownies
Chocolate brownies Photograph: Jean Cazals for the Observer

The Little Bread Pedlar’s chocolate brownies

This is one of our original products, made for markets before we started wholesaling croissants. As it is a simple recipe, the ingredients should be the best you can afford.

Makes 9 good-sized brownies or 12 daintier offerings
dark chocolate 150g, minimum 70% cocoa solids
butter 185g
cocoa powder 60g
plain flour 50g
sea salt a pinch
baking powder ½ heaped tsp
eggs 3
caster sugar 185g
demerara sugar 75g

Preheat your oven to 175C/gas mark 3½. Line a rectangular baking tray, roughly 16cm x 22cm with baking parchment. For best results you want the mix to be about 2½cm deep in the tin.

Put the chocolate, broken into small pieces, into a bowl and the butter into a saucepan. The chocolate bowl needs to be large enough to fit the butter in as well once it has melted. Start gently heating the butter until it is fully melted and just begins to boil.

Sift the cocoa powder, flour, sea salt and baking powder together into a separate bowl.

Put the eggs and both the sugars into a large mixing bowl. Beat them with a hand whisk just for a couple of minutes until they turn a little more pale and golden. You don’t need to get too much air in as the brownies by nature want to be fudgy and dense.

Once the butter is starting to froth pour it over the chocolate and use the whisk to combine the two until you have a uniform chocolate gloss.

Pour this into the egg mixture and whisk together but not too much – keep it nice and ribbony.

Tip the dry mix – flour, cocoa, et al – into the egg and chocolate mix and gently fold all together until it is uniform.

Tip this into your lined tin, push it into the corners using a spoon or spatula and bake in the middle of the oven for around 15-18 minutes, turning once if you think it needs it.

Achieving the combination of slightly cakey corners and a squidgy middle means everyone is happy!
The Little Bread Pedlar supplies cafes and shops across London; lbpedlar.com

This article has been amended: the amounts for ingredients in the final brownie recipes have been reduced by a third at the request of the author. Using the original amounts would have made 30 brownies.

The weekend cook: the wonder of lemon – Thomasina Miers’ recipes

Bring some zing to your autumn cooking with a squeeze or three of citrus, be that in a bowl of pasta with smoked mussels or a comforting chicken biryani

I have a real thing for autumn’s apples and pears, though when I’m cooking with them, I need regular fresh inspiration. Happily, almost as soon as these have lost their novelty, the citrus fruits come into their own. Lemons and limes are especially useful in cooking, adding a bright, vibrant zing to all sorts. This week, I’m using lemons in a ridiculously simple pasta dish, and as the final flourish to an all-in-one biryani that never fails to comfort.

Linguine with smoked mussels, lemon and capers

This dish plays with textures and taste, from the crunchy, garlicky crumbs to the smoky mussels and sharp lemon. Serves four to six.

200g smoked mussels (drained weight)
The zest and juice of ½ lemon
2 tbsp capers in brine, drained
Salt and freshly ground black pepper
200g dark sourdough bread (choose one with a good crust)
3 tbsp extra-virgin olive oil
1 large clove garlic, peeled and crushed
1 handful picked flat-leaf parsley, roughly chopped
400g linguine

In a bowl, combine the mussels, lemon juice and zest, and capers, season and put to one side.

Whizz the bread in a food processor for a few minutes, until you have a mixture of fine and chunky crumbs. Toss these in two tablespoons of oil, to coat, then season generously.

Heat a frying pan on a medium-high flame, then tip in the breadcrumbs and fry, tossing or stirring regularly, for seven to 10 minutes, until golden and crisp. Add the garlic after three or four minutes, so it fries a little and loses its raw flavour. Once the crumbs are golden, turn off the heat and stir in the parsley.

Bring a large pan of salted water to a boil and cook the linguine until al dente. Drain, then toss with the remaining glug of oil, the mussels, lemon, capers and a good grind of pepper. Serve at once topped with the toasted breadcrumbs.

Chicken biryani

Thomasina Miers’ chicken biryani.
Thomasina Miers’ chicken biryani. Photograph: Louise Hagger for the Guardian. Food styling: Emily Kydd. Prop styling: Jennifer Kay

I always buy chicken from a source I can trust, for reasons of taste and welfare. Get the best you can afford: it makes a world of difference to this dish. Serves four to six.

1 free-range chicken, jointed (ask the butcher to do this, if need be) or 8 skin-on, bone-in thighs, each cut in half
350g basmati rice (white or brown)
800ml hot chicken stock
3 tbsp ghee (or butter)
Salt and freshly ground black pepper
2 large onions, peeled and finely sliced
2 tsp coriander seeds
1 tsp cumin seeds (if you can find it, use black cumin here – it’s glorious stuff)
1 tsp fennel seeds
5 black peppercorns
2 black cardamom
5 green cardamom pods, seeds removed, husks discarded
1 thumb-sized knob fresh ginger, peeled and thinly sliced
4 garlic cloves, peeled
50g ground almonds
8 tbsp Greek yoghurt (not low-fat)
½ tsp turmeric

To serve
60g slivered almonds, gently toasted
1 handful chopped parsley leaves
1 lemon, cut into wedges

Heat the oven to 180C/350F/gas mark 4 (190C if you don’t have a fan oven). If you have a whole jointed chicken, cut each joint in half and cut each breast into quarters. Put the rice in a saucepan, pour on half the stock, cover and bring to a boil. Cook for eight minutes, then take off the heat and keep covered, so the rice steam dries and par-cooks.

Heat a tablespoon of ghee in a large casserole. Generously season the chicken pieces, then brown all over in batches, cooking them for about five minutes a side, until golden; if required, add a tablespoon of ghee to the pot. Transfer the browned chicken to a plate and cover with foil.

Melt the remaining ghee in the casserole, add the onions, season well and fry for 15 minutes, until they’ve softened and absorbed the meat juices.

While the onions are cooking, gently heat all the spices in a dry frying pan, then crush using a pestle and mortar (or spice grinder). Add the ginger, garlic and half a teaspoon of salt to the ground spices, and crush again until you have a paste. Add this to the frying onions, and cook for three or four minutes more, stirring regularly so the garlic doesn’t catch and burn (which will make it taste bitter).

Stir in the almonds, yoghurt and turmeric, then tip everything into the par-cooked rice pot and stir to combine. Spread a third of the rice over the base of the casserole. Top with the bonier pieces of chicken, then follow with another third of rice. Cover this with the breast meat and finish with the final third of rice. Sprinkle over the rest of the stock (make sure it’s hot), cover with both a tea towel and a lid, and bake for 20-25 minutes, until the chicken is cooked and the rice tender.

Take the pot straight from the oven to the table, and sprinkle the biryani with almonds and parsley. Serve with lemon wedges and some greens (chutney won’t go amiss, either), or follow with a sharp green salad.

And for the rest of the week…

Sourdough has endless uses. When a loaf has gone stale, break it up into small pieces, whizz into crumbs, then spread out on a plate and leave in a warm place to dry. You can then store the crumbs in a jar, to use as a coating for chicken or fish, say, or to turn into crispy fried crumbs whenever you fancy adding some lovely crunch to a dish. Tinned smoked mussels are a great store cupboard standby, not only for rice and pasta dishes, but also for a classy snack/canapé: drain and fry in a light tempura batter, and serve with lemon aïoli. If you come across black cumin, be it in a specialist Asian food store or online, do buy some of this wonderful spice: it livens up everything from scrambled eggs to hot flatbreads topped with salt and extra-virgin olive oil.

Claire Ptak’s recipe for peanut and coconut tres leches sheet cake

The sweet notes really sing in these sheet cakes. First up is a gorgeously moist Latin American ‘three milk’ cake, then a nostalgic sponge glowing with egg yolks – a rectangular tin makes both a breeze to cut into party-perfect portions

Sheet cakes are the best cakes. A single layer of sponge baked in a rectangular tin and frosted with plenty of icing is simple, unfussy, and democratic. Easily divided into equal parts and shared at family gatherings or brought to a school cake sale, a sheet cake is always a winner. So, this week, I’m sharing the recipes for two of my favourites.

The tres leches, or three milks, cake is probably from Nicaragua, although reports vary. It’s a cross between a strawberry shortcake and a trifle, popular across Latin America from where it migrated to my native California. In hot countries, where refrigeration can be more challenging, dairy is often ultra-heat-treated (UHT) or sweetened, evaporated and tinned. For its signature flavour, tres leches cake relies on these processed milks, both for their distinctive sweet creaminess and gorgeous, gloopy thickness.

The three milks in this cake are traditionally sweetened condensed milk, evaporated milk (also a reduced milk, but without added sugar), and media crema (a long-life product similar to America’s half-and-half and Britain’s single cream). The recipe combines these milks, which are then poured over an absorbent sponge cake and topped with meringue or whipped cream and sometimes fruit.

I have refined my version of tres leches by making a classic American chiffon cake which I’ve then soaked in a combination of tinned milks and also coconut milk instead of the media crema. I then top this all with freshly whipped double (heavy) cream, toasted coconut and peanut powder. Oh yeah. It’s best served stone-cold straight from the fridge.

The second recipe for “yellow” sheet cake is essentially a buttery sponge enriched with egg yolks. It is the simplest type of sheet cake and the one that makes me feel gloriously like a kid again. The key is to slather it with sour cream chocolate frosting.

Peanut-coconut tres leches cake

It is worth seeking out fine sponge flour, which you can find in most supermarkets, because it will give you a lighter sponge, but you can also use plain flour.

Serves 8-10
For the chiffon
160g fine sponge flour
1 tsp baking powder
150g caster sugar
½ tsp salt
65g vegetable oil
5 eggs, separated
5 tbsp water
1 tsp vanilla
A few grates of a nutmeg
¼ tsp cream of tartar

For the coconut soak
200g whole coconut milk, well shaken
170g evaporated milk
170g condensed milk
2 tbsp rum
2 tsp vanilla extract

For the topping
500g double or heavy cream
25g desiccated coconut
50g peanuts, crushed

1 Preheat the oven to 150C/300F/gas mark 3. Grease the bottom only of a 20x30cm rectangular tin. Do not grease the sides.

2 Sift the fine sponge flour and baking powder together in a bowl, then whisk in 50g of the caster sugar and the salt. Set aside.

3 In another bowl, whisk together the oil, egg yolks, water, vanilla and nutmeg. Make a well in the centre of the dry ingredients and gradually add the wet to form first a paste and then a consistency much like pancake batter.

4 In the bowl of an electric mixer, whisk together the egg whites, the remaining 100g of the caster sugar and the cream of tartar. Whisk into firm, meringue-like peaks. Stir one-third of this mixture into the cake batter, then gently fold in the remainder. Pour the cake mix into the prepared tin and bake until set, golden and springy to the touch.

5 While the cake cools, prepare the soak. Combine the milks in a saucepan over a low heat, stirring constantly so that the condensed milk does not burn on the bottom. Remove from the heat and add the rum and vanilla extract. Stir well and allow the mixture to rest for 10 minutes. Then pour it over the sponge to soak it. Cool in the fridge for 30 minutes.

6 Lightly whip the cream for the topping. Remove the cake from the fridge. Cover it with the cream then sprinkle with coconut and crushed peanuts. Serve right away or chill until ready to serve.

Yellow sheet cake

For the cake
250g unsalted butter
400g caster sugar
3 eggs, plus 4 egg yolks
160g whole milk
1 tbsp vanilla extract
320g plain flour
2 tsp baking powder
½ tsp fine salt

For the icing
170g dark chocolate
120g unsalted butter, cut into small pieces
1 tsp vanilla extract
1 tbsp golden syrup
200g icing sugar
200g sour cream
1 tbsp boiling water
A pinch of salt

1 Preheat the oven to 170C/335F/gas mark 3½. Grease and line a 20x30cm tin with baking paper.

2 In the bowl of an electric mixer, cream the butter and sugar until light and fluffy and almost white in colour. Add the eggs and yolks one at a time, mixing well after each addition.

3 Combine the milk and vanilla, then set aside.

4 Whisk together the flour, baking powder and salt. Add half the flour mixture to the egg mix, then half the milk, then the other half of the flour followed by the remaining milk, whisking after each addition.

5 Bake for 30-40 minutes, or until the cake is springy and a skewer inserted comes out clean. Cool completely in the pan.

6 To make the icing, melt the chocolate, butter, vanilla and golden syrup in a bowl over barely simmering water. Scrape into a food processor and process until cool. Add the remaining ingredients and beat until smooth. Transfer to a stand mixer, and beat with a paddle until creamy and of a spreadable consistency.

7 Spread the icing all over the cooled cake and serve.

  • Claire Ptak is a pastry chef, author and food stylist and owns Violet Bakery in London. She is the author of the Violet Bakery Cookbook (Square Peg); @violetcakeslondon

Cocktail of the week: House pink gin and tonic recipe

Pour us one of Gymkhana’s jolly fine gin cocktails, there’s a good sport

This is our signature aperitif at Gymkhana restaurant in London. The citrus makes it a very refreshing palate-cleanser that helps take the edge off the working day. One is never enough, three perhaps too many. Serves one.

60ml London dry gin
8 dashes Angostura bitters
120ml tonic water (we use Fevertree)
1 good-sized wedge each fresh lime, lemon and grapefruit

Pour the gin, bitters and tonic into a tall glass over lots of ice, squeeze in the juice from all the fruit and serve at once.

James Stevenson, group head bar manager, JKS Restaurants.

The 20 best cake recipes: part 2

Delia’s coffee and walnut sponge, Ottolenghi’s fig, yougurt and almond cake, and other baking classics selected by Observer Food Monthly The 20 best cake recipes: part 3

Yotam Ottolenghi’s fig, yogurt and almond cake with (or without) extra figs

Serve this on its own, with a cup of tea, but do also make a fully fledged dessert dish with the figgy accompaniment – it doesn’t take much extra effort.

Serves 8 -10
unsalted butter 200g
caster sugar 200g, plus 1 tsp extra
free-range eggs 3 large
ground almonds 180g
plain flour 100g
salt ½ tsp
vanilla pod scraped seeds of ½
star anise 1 tsp, ground
Greek yogurt 100g
figs 12

For the extra figs
caster sugar 3 tbsp
red wine 6 tbsp
figs 6 ripe, quartered
Greek yogurt

Heat the oven to 200C/gas mark 6. Line the bottom and sides of a 24cm loose-based cake tin with baking parchment. Put the butter and sugar in an electric mixer bowl, and use a beater to work them well until they turn light and pale. Beat the eggs lightly, then, with the machine on medium speed, add them gradually to the bowl, just a dribble at a time, adding more only once the previous addition is fully incorporated. Once all the egg is in, mix together the almonds, flour, salt, vanilla and anise, and fold into the batter. Mix until the batter is smooth, then fold in the yogurt.

Pour the batter into the lined tin and level roughly with a palette knife or a spoon. Cut each fig vertically into four long wedges, and arrange in circles on top of the cake, just slightly immersed in the batter. Bake for 15 minutes, then reduce the temperature to 170C/gas mark 3 and continue baking until it sets – about 40-45 minutes longer. Check this by inserting a skewer in the cake: it’s done if it comes out clean. Remove the cake from the oven and allow it to cool down before taking it out of the tin and sprinkling with a teaspoon of caster sugar.

You can eat the cake just as it is, but the addition of warm, syrupy figs turns it into something very special. Once the cake is cool enough, divide it into portions. Put three tablespoons of caster sugar in a medium saucepan and put on a high heat until the sugar starts to caramelise. Remove from the heat, carefully add the wine – it will spit a bit – then return to the heat and let the caramel dissolve in the wine. Add the fig quarters and quickly toss them around just to warm them up. Spoon a generous dollop of Greek yogurt over each slice of cake, plus a few warm figs and their juice.
Yotam Ottolenghi is a restaurateur and food writer

Warm date cake with gelato
Warm date cake with gelato: ‘It’s impossible not to like this combination.’ Photograph: Michael Graydon and Nikole Herriott

Travis Lett’s warm date cake with ginger gelato

This sticky, date-sweetened cake is ridiculously moist. Adding a bourbon-spiked toffee sauce and a scoop of ginger gelato pushes it right over the top. It’s impossible not to like this combination.

Serves 12
For the date cake
Khadrawy dates 455g, pitted, or another type of fresh soft date
baking soda 2 tsp
very hot water 550ml
vanilla pod 1, halved lengthwise
granulated sugar 300g
egg 1, plus 1 egg yolk
plain flour 270g
baking powder 2 tsp

For the whiskey sauce
unsalted butter 70g
dark brown sugar 400g
double cream 240ml
bourbon 2½ tbsp

For the ginger gelato (makes about 480ml)
vanilla pod ¼, halved lengthwise
whole milk 120ml
double cream 240ml
fresh ginger 130g piece, peeled and sliced 6mm thick
sea salt a pinch
egg 1, plus 1 egg yolk
sugar 100g
buttermilk creme fraiche 120ml (see below)
honey 2 tbsp

For the buttermilk creme fraiche (makes 960ml)
double cream 960ml
buttermilk 1 tbsp

To make the cake, preheat the oven to 180C/gas mark 4. Butter a 25cm x 35cm glass or metal baking dish or pan.

In a small bowl, combine the dates and baking soda. Pour the hot water over the dates and mix with a fork until they have mostly dissolved and are pulpy, about 5 minutes.

Scrape the seeds from the vanilla pod into a large bowl. Whisk in the granulated sugar, egg and egg yolk until the mixture is pale yellow and falls in smooth ribbons when lifted with a spoon. Stir in the date mixture, incorporating it completely.

In a small bowl, sift together the flour and baking powder. Gently fold the flour into the date mixture until just incorporated.

Pour the batter into the prepared baking dish and bake until a skewer inserted in the centre comes out clean, 35 to 40 minutes. Leave the cake in the pan for about 40 minutes before serving.

To make the whiskey sauce, in a large, heavy-bottomed saucepan, melt the butter with the brown sugar. As soon as the sugar has dissolved, gradually add the cream, pouring in a steady stream while whisking constantly. Remove from the heat and whisk in the bourbon.

Pierce the cake all over 12 to 20 times with a butter knife or a skewer. Pour half of the sauce over the top of the cake, guiding it into these holes, and set aside the rest. (The cake can be stored at room temperature in the baking dish, covered with cling film, for 1 day and in the refrigerator for up to 3 days. Bring back to room temperature before serving.)

To make the buttermilk creme fraiche for the gelato, in a 1 litre jar, combine the cream and buttermilk. Partially cover and let stand in a warm spot (about 28C) until the cream tastes slightly sour and has thickened to a pudding like consistency, 24 hours to 3 days.

To make the gelato, scrape the seeds from the vanilla pod into a small saucepan. Add the pod, milk, cream, ginger and salt. Stir over medium-high heat until steaming and bubbles begin to form around the edges. Turn off the heat and let steep for at least 20 minutes, or up to 2 hours.

In a medium bowl, whisk together the egg, egg yolk and sugar until the mixture is pale yellow and falls in smooth ribbons when lifted with a spoon. Transfer to a large liquid measuring cup or jug, and set a fine-mesh sieve over the top.

Discard the bean pod. Pour the warm milk-ginger mixture into a blender and puree on high speed until smooth, about 10 seconds. Pour the mixture through the fine-mesh sieve into the liquid measuring cup. Gradually pour the strained milk-ginger mixture into the egg base, whisking constantly. Whisk in 120ml of the creme fraiche (the rest can be stored in an airtight container in the fridge for up to 2 weeks) and the honey.

Refrigerate the mixture for at least 4 hours, or overnight. Churn according to your ice-cream maker’s directions until frozen. It can be stored in an airtight container in the freezer for up to 2 weeks.

Cut the cake into squares and drizzle with the remaining whiskey sauce. Serve on dessert plates, accompanied by scoops of gelato.

From Gjelina: California Cooking from Venice Beach by Travis Lett (Chronicle Books, £21.99). Click here to order a copy from Guardian Bookshop for £18.30

Coffee and walnut cake
Coffee and walnut cake. Photograph: Jean Cazals for the Observer

Delia Smith’s coffee and walnut sponge cake

This is a revised, more contemporary, version of one of the original sponge cakes in Delia’s Book of Cakes. I am still very fond of it and have continued to make it regularly over the years. Now, though, since the advent of mascarpone, the icing is a great improvement.

Serves 12
self-raising flour 115g
baking powder 1 level tsp
spreadable butter 115g
eggs 2 large
golden caster sugar 115g
instant espresso coffee powder 1 rounded tbsp
walnuts 50g, very finely chopped

For the filling and topping:
mascarpone 250g
instant espresso coffee powder 1 rounded dsp
golden caster sugar 1 tbsp
milk 1-2 tbsp
walnut halves 8

Lightly butter and line the bases of two 18cm x 4cm sponge tins. Preheat the oven to 170C/gas mark 3.

Start off by sifting the flour and baking powder into a roomy mixing bowl, holding the sieve quite high to give the flour a good airing as it goes down, then add the butter, eggs, caster sugar and coffee powder. Now, using an electric hand whisk, mix to a smooth, creamy consistency for about 1 minute. After that take a tablespoon and fold the chopped nuts into the mixture.

Next, divide the mixture between the two prepared tins, level off using the back of a tablespoon and bake near the centre of the oven for about 25 minutes. The sponges are cooked when you press lightly with your little finger and the centre springs back. Remove them from the oven and after about 30 seconds loosen the edges by sliding a palette knife all round then turn them out onto a wire cooling tray. Now carefully peel back the lining by gently pulling it back. Then lightly place a second cooling tray on top and just flip them both over so that the tops are facing upwards (this is to prevent them sticking to the cooling tray).

While the cakes are cooling, make up the filling: in a small bowl combine the mascarpone, coffee powder and caster sugar with 1 tablespoon of milk – what you need is a smooth spreadable consistency. As some mascarpones are wetter than others it’s impossible to be precise, but add a bit more milk if you think it needs it.

When the cakes are cold, spread half the filling over one, sandwich them together, then spread the rest over the top using a palette knife and making a swirling pattern. Then finish off by placing the walnuts in a circle near to the edge. Store in a polythene box in the fridge.
From Delia’s Cakes by Delia Smith (Hodder & Stoughton, £25). Click here to order a copy from Guardian Bookshop for £20.50

Saffron and lemon syrup cake
Saffron and lemon syrup cake: ‘a good cake for the dead of winter’. Photograph: Jean Cazals for the Observer

Sarit Packer and Itamar Srulovich’s saffron and lemon syrup cake

This makes a 24cm cake because I think it looks amazing as a large cake, but if you want, halve the recipe (and the baking time) and bake in 6 muffin tins. It is a good one for the dead of winter. The lemon rounds glow in saffron like little suns, lighting up your palate with their bright flavour.

Serves 12
For the syrup and topping
lemons 2, really thinly sliced
water enough to cover the lemon slices x 2, plus 400ml
caster sugar 250g
turmeric a pinch
saffron a pinch

For the cake
butter 200g
caster sugar 270g
eggs 4
ground almonds 200g
turmeric a pinch
semolina 140g
plain flour 2 tbsp
lemon 1, juice and zest
salt a pinch
baking powder ½ tsp

Preheat the oven to 180C/gas mark 4. Grease and line a 24cm diameter cake tin with greaseproof paper.

Place the lemon slices for the syrup and topping in a small saucepan, cover with water and bring to the boil over a high heat. Drain the slices, re-cover with water and bring to the boil again. Drain for a second time (by now all the bitterness should be gone), then cover with 400ml of fresh water. Add the sugar, turmeric and saffron and bring to the boil, reduce the heat to low and simmer for 6-8 minutes until the peel is soft and the syrup has thickened. Remove from the heat.

Use a fork to lift the slices of lemon out of the syrup and layer them, just slightly overlapping, all over the base and a little way up the sides of the lined baking tin; the sugar will help them to stick in place. Pour over 2 tablespoons of the syrup and reserve the rest for later.

For the cake, cream the butter and sugar together in a mixer, or with a wide spoon in a bowl, until they are well combined but not fluffy, as you do not want to aerate the mixture. Stir in the eggs, ground almonds and turmeric, then fold in the semolina, flour, lemon juice and zest, salt and baking powder. Mix well and pour into the cake tin. Bake in the centre of the oven for 20-25 minutes, then turn the cake around to ensure that it bakes evenly and bake for a further 10-15 minutes. The cake should be golden and firm. Remove from the oven and pour over all the remaining syrup to soak in. Allow to rest for 20 minutes before turning out.

The cake needs to be turned on its head to serve, so place a plate on top of the tin and flip it over so the bottom-side is uppermost. Gently remove the tin and the paper. Now, turn off the lights and watch it glow.
From Honey & Co: Food From the Middle East by Sarit Packer and Itamar Srulovich (Saltyard Books, £25). Click here to order a copy from Guardian Bookshop for £20.50

Ginger molasses cake
Ginger molasses cake: ‘the order of things is crucial for it to turn out correctly’. Photograph: Kristin Perers

Claire Ptak’s ginger molasses cake

The Violet Bakery ginger cake is made with freshly grated ginger, cloves, earthy molasses and cinnamon. I love the taste of cloves but only when you can barely detect it, as a subtle supporting act. This cake is simple but the order of things is crucial for it to turn out correctly.

Makes one 23cm cake or two 15cm cakes, serving 8-10
For the sponge
fresh ginger 150g
plain flour 300g
ground cinnamon ¾ tsp
ground cloves ¼ tsp
sugar 150g
vegetable oil 200g
molasses 250g
boiling water 225g
bicarbonate of soda 2 tsp
eggs 2
butter for greasing the tin

For the lemon glaze
icing sugar 250g
fresh lemon juice 2-3 tsp

Preheat the oven to 150C/gas mark 2. Butter a 23cm cake tin (or two 15cm sandwich tins) and line with parchment paper.

Peel and cut the ginger into 2mm slices. Blitz the ginger in a food processor and set aside.

In a bowl, weigh out the flour, cinnamon and cloves. Whisk to combine and set aside.

In a separate bowl, weigh out the sugar, oil and molasses and whisk well.

Pour the boiling water into a glass jug and stir in the bicarbonate of soda. Pour this into the sugar mixture and whisk well (the mixture should start to get foamy on top). Add the blitzed ginger and mix until evenly combined. Add the flour mixture, making sure you mix in the same direction (eg clockwise) the entire time. Don’t change direction or you will get flour lumps. Don’t overmix or the cake will be tough and dense.

Whisk the eggs in a separate, clean bowl and add to the cake batter until just combined. Pour into your prepared cake tin (or tins) and bake for about 1 hour, until an inserted skewer comes out clean and the top of the cake springs back to the touch. Leave to cool in the tin for about 10 minutes, then turn out on to a wire rack to cool completely.

Whisk together the icing sugar and lemon juice until smooth and drizzle over the top. This cake keeps well for up to 5 days in an airtight container.
From The Violet Bakery Cookbook by Claire Ptak (Square Peg, £20). Click here to order a copy from Guardian Bookshop for £16.40

Reader’s recipe swap: elevenses

A chai caramel shortbread, umami biscuits and coffee cake have Jeremy Lee’s pro chef posse fighting for a slice with their morning cuppa

In a bid to bolster my kitchen skills – and because we thought you might get a kick out of having pros taste your bakes – I asked Quo Vadis chef Jeremy Lee to join me in testing your elevenses recipes. “I would kill for a pile of scrumptious cookies,” he replied. I donned chef’s whites and an apron and set up shop at his baking station. Karol the baker, James the pastry chef and Jeremy’s line-chef posse tucked in, suggesting tweaks and additions to your ideas and eating the lot with their post-lunch service tea. If you’re up for another masterclass, let us know and we’ll rope in more pro kitchens.

The winning recipe: Chai caramel shortbread

Everyone loved ColonialCravings’s spiced take on millionaire’s shortbread. They suggested thicker layers – so use a small tin – and a darker caramel. Mine, as you can see, was so soft it squelched every time a slice was cut –messy, but oh so moreish.

Makes 16-20
For the biscuit layer
120g butter
50g sugar
150g plain flour
20g cornflour
½ tsp ground ginger
½ tsp ground cinnamon
¼ tsp ground cardamon
¼ tsp ground cloves
A pinch of ground coriander

For the caramel layer
270g condensed milk
40g soft brown sugar
130g butter
1 tsp vanilla paste
1 tsp sea salt

For the topping
200g dark chocolate
A pinch of cayenne pepper

1 Set the oven to 150C/300/gas mark 2 and lightly grease a small baking tin.

2 Cream together the butter and sugar, then sift in the flour, cornflour and spices. Rub it together to create a fine breadcrumb texture. Press this firmly into the base of your prepared tin, bake it for 15 minutes, then leave to cool.

3 Combine the condensed milk, brown sugar and butter in a medium pan and melt on a low heat. Stir and increase the heat a little to bring it to a gentle boil. It should have thickened a little and darkened in colour a bit when it’s ready. Stir in the sea salt and vanilla.

4 Pour the warm caramel over the cooled shortbread and set in the fridge – up to 40 minutes.

5 Melt the chocolate with the cayenne pepper, then spread over the caramel layer. Leave to set before slicing.

Miso, white chocolate and sesame biscuits

Anna Thomson’s cookies were pastry chef James’s first choice. He suggested slicing them as thinly as possible, for something truly delicate.

Makes 15-20
80g sugar
20g sweet white miso
100g butter, softened
1 egg, beaten
200g plain flour
20g flaked almonds
10g black sesame seeds, toasted
45g white chocolate chips

1 Beat the sugar, miso and butter together. Add the egg and mix well. Sift the flour into the bowl, add the almonds, sesame seeds and chocolate. Mix with your hands into a dough.

2 Roll into logs, wrap in clingfilm and chill in the fridge for 30 minutes. Meanwhile, preheat the oven to 180C/350F/gas mark 4 and line two baking trays with baking parchment.

3 When chilled, take the dough logs out of the fridge and cut into 5mm slices. Bake for 15-20 minutes, or until golden brown.

Coffee cardamom cake

My fellow testers were keen to add a garnish of candied peel or caramelised orange slices to Fadime Tiskaya’s cake, and James suggested serving it with something creamy – jersey cream, ice‑cream, custard or whipped cream, Quo Vadis pudding-menu style.

Serves 8-10
50g strong, hot espresso
3 tsp ground cardamom
225g butter
225g caster sugar
Zest of 1 orange
3 large or 4 medium eggs
320g plain flour
2 tsp baking powder
100g ground almonds
50g whole milk
100g plain sesame halva, crumbled

1 Preheat the oven to 180C/350F/gas mark 4. Grease a 23cm cake tin and set aside.

2 Mix together the prepared hot coffee and cardamom and set aside until cold. (You can mix the cardamom with dry coffee then make the coffee in the usual way).

3 Beat the butter, sugar and orange zest until fluffy. Mix in the eggs one by one, if it starts curdling add some flour after each egg. Sieve together the flour, baking powder and ground almonds and fold into the butter mixture. Mix in the milk, coffee, and crumbled halva. Pour into the tin and bake for about 40 minutes.

4 Sprinkle with icing sugar and extra orange zest to serve.

Anna Jones’ recipes for whole roast squash and baked cauliflower

Serve up whole veg, crisp, golden and straight from the oven, for a wonderful meat-free centrepiece. Try a selection of squash stuffed with cereals or a savoury cauliflower baked in turmeric and coconut

There is something grand about vegetables roasted whole. All the food I make celebrates vegetables in some way, but cooking them whole takes it a step further. A complete vegetable, served up all golden and crackling, its colour intensified, makes a wonderful centrepiece that can be lacking in some meat-free cooking.

These recipes find their way into our kitchen on most weeknights with a simple salad, or at weekends as the focus of a lazy lunch or dinner with lemon and coriander-seed roast potatoes, steamed lemon-dressed greens and honeyed parsnips with a few cumin seeds.

Whole, roasted cauliflower has been a mainstay on restaurant menus for the past couple of years. It looks and tastes brilliant – burnished and browned, its buttery clean white inside offers a sharp contrast to the crisp and highly flavoured exterior. It’s so easy to do at home and is a really pleasing thing to put on the table with a sharp knife for everyone to cut big wedges for themselves.

Roast squash is something that I have returned to after a few years of doing without. Along with the other vegetarian stalwarts of mushroom risotto and stuffed peppers, there was a time when roast squash was the offering of choice and we all overindulged. But it’s time to welcome it back – it’s an amazing, nurturing veg, generous in flavour, and comes in a ton of varieties. And now is the time to get your hands on more unusual specimens. I used onion and kabocha squash here, stuffed with plump grains and sweet roast fennel, some good sharp cheddar and topped with toasted buttery oats. A butternut would work too, though you won’t get quite as much of a hollow for stuffing.

Whole roast squash

I used a mixture of two, bright-orange onion squash, big enough to serve two, plus two smaller green kabocha or acorn squash each big enough for one. Both roast in about the same time, though huge pumpkins would take longer.

Serves 4
A mixture of whole squashes: about 750g squash per person (I used 2 onion squash and 2 smaller kabocha squash)
4 fennel bulbs
1 garlic bulb
Olive oil
Salt and black pepper
250g freekeh or pearl barley
125g sharp cheddar or other cheese
1 lemon, zested
1 bunch fennel tops or dill
1 red chilli, deseeded if you like
A knob of butter
50g rolled oats or barley flakes
1 tsp fennel seeds

1 Preheat the oven to 180C/350F/gas mark 4. Use a big, heavy knife to cut off the base of each squash, so they sit upright on a tray. Cleanly cut the top off each one in a single piece (you are going to put the tops back on) about 3-4cm from the top. Use a metal spoon to scoop out the seeds and the fibres until you have a neat hollow.

2 Trim the fennel, removing any tough outer leaves, then cut the bulb into a few big wedges.

3 Put the squash in a large roasting tray or two. Scatter the fennel wedges around and put the bulb of garlic on too. Drizzle the lot with olive oil, making sure you get inside the squash, and season with salt and pepper. Pop the tops back on the squash. Roast for 45-60 minutes, or until the squash are tender and the fennel has started to soften and brown. If your squash take a little longer, you can remove the fennel once it’s nicely soft and brown around the edges, as you don’t want it to overcook.

4 Put the freekeh or pearl barley in a medium pan and cover with cold water. Add a big pinch of salt, then bring to the boil and simmer until al dente (about 12 minutes for freekeh and 25 minutes for pearl barley). Drain and transfer to a large bowl.

5 Remove the garlic and fennel from the roasting dish. When cool enough to handle, squeeze the roasted garlic into the freekeh. Roughly chop the fennel and add it to the bowl along with the cheese, lemon zest, salt and pepper. Chop the fennel tops and chilli and add these too. Taste the mixture and adjust the seasoning, if you like.

6 Divide the mixture between the squash and return them to the oven for 10 minutes. Meanwhile, heat some butter in a small pan, add the oats, fennel seeds and a little salt and pepper. Stir to coat in the butter, then toast the flakes until golden (this will take about 5 minutes). Drain on a plate lined with kitchen paper.

7 Once the squash and freekeh are out of the oven, sprinkle over the toasted oats and put in the middle of the table for everyone to dig in.

Turmeric and coconut baked cauliflower
There are few things as friendly in the way they soak up flavour as a cauliflower. Photograph: Issy Croker for the Guardian

Turmeric and coconut baked cauliflower

This is my favourite way to eat cauliflower, the sweet note of coconut milk, the punch of ginger and green chilli, earthiness from mustard seeds and the clean, spiced note of turmeric are soaked up by the vegetable. Other days I roast it with lemon, bay and saffron or cover it in a green herb pesto.

Serves 4-6
2 large cauliflowers
4 tbsp coconut oil
A thumb-sized piece of ginger
4 green chillies
4 garlic cloves
1 tbsp black mustard seeds
2 tsp ground turmeric
Salt and black pepper
400ml tin of coconut milk
1 lemon, halved

To serve
Thick Greek or coconut yoghurt
Almond flakes, toasted
Small bunch of coriander, leaves picked

1 Set the oven to 200C/400F/gas mark 6. Boil the kettle. Cut the large leaves and stalks away from the cauliflower. Leave the little ones close to the florets – they will go nice and crisp when roasted. Turn the cauliflowers upside down. Using a small paring knife, carefully cut hollows in the stalks, so they cook evenly. Take a saucepan big enough to hold both cauliflowers, otherwise do them one at a time. Half fill the pan with water from the kettle, then bring to the boil. Add salt, then immerse the cauliflowers and simmer for 6 minutes. Drain. Put the lid back on. Let the cauliflower steam in the residual heat for a further 10 minutes.

2 Take an ovenproof dish or pan (that can go on the hob and in the oven) large enough to take the cauliflowers, with just enough room for you to get a spoon in to baste. Spoon in the coconut oil, and grate the ginger into the oil. Finely chop the chillies, discarding the seeds if you wish, then add to the pan. Peel, crush and add the garlic, then put the pan over a moderate heat and let the spices and aromatics cook for a few minutes, until fragrant. Stir in the mustard seeds. Cook until the garlic has softened, then add the turmeric and a big pinch of salt.

3 Pour the coconut milk into the spice mixture, stir well and season with a little ground black pepper. When it starts to bubble gently, turn off the heat, put the drained cauliflower in the dish, then baste it with the coconut-spice mixture. Throw the lemon halves into the side of the dish too.

4 Bake the cauliflower, basting now and then with the spiced sauce in the roasting tin, for 40-45 minutes. You want it to catch a little on top. To test if the cauliflower is cooked, insert a small sharp knife into the middle: it should be really tender. Once it’s perfect, take it out and squeeze over the roasted lemons. Serve in the middle of the table with spoonfuls of yoghurt, almonds and green herbs for sprinkling on top of your plate.

  • Anna Jones is a chef, writer and author of A Modern Way to Eat and A Modern Way to Cook (Fourth Estate); annajones.co.uk; @we_are_food

Two raw fish dishes to serve on top of the perfect bowl of rice

New residents Ana Gonçalves and Zijun Meng were brought together by chef Nuno Mendes and a shared love of rice. The grain is now the basis for all their cooking, served here with two raw fish dishes

“Bread or potatoes?” I have sometimes been asked, in reference to which carb I would keep for the rest of my life and which I would lose. For many in my adopted home of the UK, this is a painfully difficult question, but I would choose neither. For me, it’s rice – always rice.

My partner Ana and I share a love of rice. I am Chinese, she is from Portugal; rice is ingrained in our cultures, so it is something of a staple for us both, much how others see bread or potatoes. In northern China, where I grew up, rice is served plain and is very much a vessel for other dishes. Usually medium or short-grained, it is offered at the end of a meal, when you’d typically expect dessert.

Ana’s first rice memory is of eating her mother’s arroz de cabidela (chicken and blood rice), with its addictive, velvety sauce and topped with plenty of fresh coriander and vinegar. This is a Portuguese classic, and her family ate it whenever her grandparents, who lived in a little village called Azere near the former capital of Coimbra, killed a chicken. When she moved to London, Ana was well-versed in Portuguese rice varieties, like carolino – used for the wet, loose and saucy rice dishes typical in Portuguese cuisine – and agulha, a more structured grain akin to basmati used for oven-baked dishes – but Asian rice was a new world to her, something different altogether. In China, rice is steamed with just enough water, which eventually all evaporates, while the Portuguese way is to boil it in generous quantities of liquid. We often exchange stories, memories and, of course, recipes; and although rice remains a common thread, the types of rice and ways we grew up eating it in Portugal and China are vastly different, as you’d expect.

We met in 2009 at Nuno Mendes’s The Loft Project, where people could experience fine dining in a home setting – probably the first initiative of its kind. Cooking was never the plan for either of us: Ana was a graphic designer “with the cooking bug” and I’d been studying fine art at Falmouth. It was only when working on a final project that I fell upon Ferran Adria’s Food For Thought: Thought For Food, which totally changed my trajectory. Cooking called us both. Seven years into our friendship, we got together.

Our love of rice runs so deep that we decided to build our first project, Tata Eatery, around it, showcasing innovative cooking served over bowls of it. Our food doesn’t belong to any one cuisine, nor is it a Chinese-Portuguese fusion. I’d say it is based loosely on don, the Japanese way of eating bowls of short grain rice – shiny after cooking, slightly chewy, and full of aroma – with different types of topping. It’s a mish-mash of everything we’ve been exposed to in the kitchen to date, things we like to eat ourselves: aubergine and rice, rice with seafood (like the two raw fish recipes below), or leftover rice from the night before, fried up for breakfast the following morning. We draw on many influences, but wanted to create a homeliness we feel to be emblematic of traditional Chinese dining – a table full of little things to be eaten over rice and a meal that brings people together around the table.

Grão a grão enche a galinha o papo (“grain by grain, the hen fills her belly”) is a food proverb fondly recited by Ana; she takes this to mean that, with patience, we can make our dreams reality. In our case, the grain that started our dream is rice. So that seems a sensible place to begin.

Ana Goncalves and Zijun Meng
Ana Goncalves and Zijun Meng created Tata Eatery, which offers bowls of rice with various toppings, inspired partly by the Japanese don method of serving food. Photograph: Elena Heatherwick for the Guardian

A perfect bowl of rice

This is how we cook rice at home.

Serves 2
200g short grain rice
200g water

1 Put the rice in a bowl. Fill up the bowl with cold water and gently rub to wash off the starch. Tip out the water and refill it with fresh water. Repeat this process several times until the water comes out clear. As the rice begins to absorb some water it becomes fragile, so you need to be gentle with it.

2 Put the pot you are going to cook the rice in on to the kitchen scales, then set it to zero. Put the washed rice in the pot and top it with water until it comes up to 400g in total.

3 Once you have the measurement right, cover with a lid and bring it to the boil, reduce the heat to minimum and cook until all the water has disappeared and you can see some holes on the surface of the rice.

4 Turn off the heat and let it steam for 10 minutes with the lid on. Take off the lid. Mix the rice to separate the grains and release the remaining steam.

Shime saba with marinated daikon

Shime saba – “cured mackerel” – is very popular in Japan. The mackerel fillets are cured with sugar first, salt on the second stage and then pickled/cooked again in rice vinegar. It is an old method for keeping the fish longer. Our version is more like a sushi, as you don’t really pickle it – you use the vinegar for 2 minutes to help remove the thin skin.

For the dressing
3½ tbsp light soy
1 tbsp sugar
2 tbsp yuzu or lime juice
2 tbsp dashi stock (you can buy hon dashi powder and dilute with water)
150g water
½ green chilli, minced
1 tsp sesame oil
200g daikon, grated

For the fish
300g sugar
200g salt
4 mackerel fillets, skin on, deboned
Rice wine vinegar

1 Combine the dressing ingredients and pour these over the daikon in a small bowl an hour before serving.

2 Mix the sugar and salt together. Put the fillets skin-side down on a baking tray, rub in the cure and leave for 45 minutes. Then wash, dry and set aside.

3 Pour enough rice wine vinegar into the tray to just cover the bottom. Put the cured mackerel fillets skin-side down to pickle the skin for 2 minutes, then gently remove the first translucent skin layer – not the actual grey skin. Dry and reserve the fish fillets.

4 Pop the mackerel under the grill briefly to sear the skin, then, to serve, add some dressed daikon to each plate with slices of fish on top.

Prawn tartare

A dish of good things: seafood, fermented veg and fish roe. Ferment the cabbage a week in advance.

For the fermented cabbage
1 head of hispi cabbage
Mineral water, to cover
Salt: 3% of the total weight (so if you have 1kg cabbage, you need 30g salt)

For the dressing
½ tsp wasabi paste
1 egg yolk
2 tbsp extra virgin olive oil
1 tsp light soy sauce

For the prawns
10 prawns, preferably amaebi
60g caster sugar
40g fine salt

To serve
Tobiko roe, 1 tsp per person
Extra virgin olive oil
Sesame seeds and mint leaves

1 Make the fermented cabbage in advance. Separate all the leaves, add the water and weigh the lot, then add 3% of the total weight in salt. Store the cabbage and salt solution in a mason jar somewhere warm for a week. Check after 3-4 days, then taste the brine – it should be starting to taste acidic. Taste every day if this is your first time doing it. The finished product should have a very subtle acidity with hint of umami at the back of the tongue. Keep in the fridge it should last a good few weeks.

2 Combine the dressing ingredients in a mixing bowl and set aside.

3 Mix the prawns, sugar and salt. Set aside for 10 minutes, then rinse under cold water until clean.

4 To serve, mix the prawns with the dressing, fold in the tobiko roe, add one finely chopped fermented cabbage leaf. Splash olive oil over generously, and sprinkle with sesame seeds and mint leaves.

  • Tata Eatery are Ana Goncalves and Zijun Meng. They are currently collaborating on Curio+Tata, a pop-up concept with Curio Cabal in east London. @tata_eatery

Nuno Mendes's braised chicken with shiitake mushrooms

A simple and savoury supper packed with flavour and bite, make it a day before to really get the most from the marinade. Serve with rice or a green salad

The longer you marinade the chicken, the better this dish will be.

(Serves 2-4)
6-8 chicken thighs
125g dried shiitake mushrooms, stemmed
3-4 rashers of streaky, smoky bacon
3-4 tbsp sherry vinegar
2 tbsp caster sugar
700ml water or light chicken stock
1 cucumber, thinly sliced
Handful of mushrooms, raw, thinly sliced
Extra virgin olive oil
(For the marinade)
8 tbsp Japanese light soy sauce
4 tbsp sugar
4 tbsp rice wine
Juice of half a lemon
Mix all the ingredients for the marinade and heat to dissolve the sugar. Keep half aside to season the broth, and marinade the chicken with the other half for at least 20 minutes.

Remove the chicken and sear skin side down, being careful not to burn. Once the skin has a nice colouring, turn it and sear the underside.

Add the shiitake caps for a couple of minutes, then add the bacon, sherry vinegar, sugar and the remaining marinade. Top up with water or chicken stock until it the meat is covered. Bring to a boil, put on a lid, then reduce the heat to cook gently over a low heat until the chicken is very soft.

Remove the mushrooms and bacon from the pot, slice and add them back in. Remove the chicken, reduce the liquid and season. Serve the chicken in a deep bowl with the sauce, garnish with raw mushrooms and cucumber, and drizzle with olive oil.

Wednesday, October 19, 2016

Nigel Slater’s yogurt recipes

Salty or sweet, Middle Eastern labneh is yogurt’s cultured cousin

There’s a white china bowl in the fridge and over it a sieve lined with new muslin in which thick yogurt has been sitting overnight. The yogurt has released its thin, silvery whey and has thickened to a point where you could spread it like cream cheese. Sometimes I put salt in it, on other occasions I leave it as it is. Unsweetened, I take full advantage of that mound of curds at breakfast, slathering it thickly over toast then piling it with berries.

Salted (I use ½ tsp per 500g of yogurt), the flavour has sharpened overnight, too, a lively, spirited sourness similar to how natural yogurt used to taste before commerce turned it into a sweet, bland dessert. This strained yogurt, the labneh beloved of the Middle East, is easy enough to make at home, though probably cheaper to buy if you live near a Middle Eastern food shop.

I stirred pomegranate molasses through some recently, letting the syrup lend its curious mixture of sweetness and sourness to the creamy labneh. We ate it with lamb cutlets hot from the grill.

Like its softer, more liquid ancestor, labneh likes fresh herbs, especially mint leaves and dill. Roughly torn, crisp-crusted bread, spread with labneh then scattered with chopped parsley, dill and basil, is both gorgeous and humble.

At the other end of dinner this thick yogurt can be served with a glossy dollop of honey, a spoonful of rose-petal jelly or apricot jam, or with a bowl of berries. It can also be flavoured. Lemon curd produces a bracing cream for sponge cake. Vanilla seeds, the stickier the better, will turn your labneh into a dessert as tempting as a bowl of ice cream.

Grilled lamb with labneh and blackberry sauce

The labneh will take a little more of the molasses if you like: just keep tasting as you go. This recipe works well with pork chops, too, and blueberries instead of the blackberries.

For the labneh:
yogurt 400g
pomegranate molasses 1 tbsp
mint 10 leaves
feta 100g

For the cutlets:
lamb cutlets 6
olive oil
coriander seeds 1 tsp
black peppercorns 8
thyme a few sprigs

For the sauce:
cassis 5 tbsp
caster sugar 2 tbsp
red wine vinegar 2 tsp
blackberries 150g

Place a sieve over a mixing bowl, line it with muslin then tip in the yogurt and set aside in the fridge overnight.

To make the sauce, put the cassis, caster sugar and vinegar in a stainless steel or enamel saucepan and bring to the boil. Stir in the blackberries and continue cooking for 2 or 3 minutes until the fruit softens a little and gives up its juices. Season very lightly with salt and set aside.

Warm a grill or griddle. Rub the cutlets with a little olive oil. Grind the coriander seeds and peppercorns with a pestle and mortar to a coarse powder, then mix in a couple of generous pinches of sea salt flakes. Remove the leaves from the thyme and add to the spice mixture. Rub the seasoning over the cutlets, then cook them on the griddle or under the grill until they are sizzling and golden, their inside a deep rose pink. Exact times will vary according to your heat and how you like your lamb, but reckon on 3 or 4 minutes per side – maybe a little longer if, like me, you like your fat crisp.

Transfer the strained yogurt to a bowl, then stir in the pomegranate molasses. Finely chop the mint and stir into the mixture together with a little black pepper. Crumble in the feta and gently combine.

Pile a generous spoonful of the pomegranate yogurt on each plate, place the hot cutlets on top then spoon over the warm blackberry sauce.

Sweet and crisp: vanilla yogurt with blueberry sauce and brioche crumbs.
Sweet and crisp: vanilla yogurt with blueberry sauce and brioche crumbs. Photograph: Jonathan Lovekin for the Observer

Vanilla yogurt with blueberry sauce and brioche crumbs

Any sweet bread will do. You could use croissants or panettone if you have them. Failing that, use crumbs from a white loaf and add a little more sugar. The point is to offer a sweet and lightly crisp contrast to the softness of the vanilla bean labneh. Serves 3.

For the yogurt:
yogurt 400g
vanilla pod 1

For the fruit:
blueberries 250g
sugar 3 tbsp
water 250ml
apricot jam 2 heaped tbsp
For the brioche crumbs:
brioche or other sweet bread 75g
butter 50g
caster sugar 1 tbsp

Put the yogurt into a muslin-lined sieve over a mixing bowl and leave overnight. The next day, split the vanilla pod in half lengthways and scrape out the sticky black seeds with the point of a knife. Fold them into the strained yogurt and return to the fridge.

Put the blueberries into a small pan with the sugar and water and bring to the boil. As soon as the water is bubbling, stir in the apricot jam and simmer for 2 or 3 minutes until the berries have burst and you have a deep purple sauce.

Tear the brioche into small crumbs. Melt the butter in a shallow pan. When it sizzles, add the crumbs and the sugar and toss together gently over the heat, stirring for a minute or two until the crumbs smell sweet and buttery and are starting to crisp.

Place spoonfuls of the vanilla yogurt on dishes, spoon over the hot blueberry sauce then scatter with the warm, toasted crumbs.

Email Nigel at nigel.slater@observer.co.uk or follow him on Twitter @NigelSlater