Our social:

Latest Post

Saturday, January 21, 2017

OFM’s classic cookbooks: The Classic Italian Cookbook by Marcella Hazan

Marcella Hazan was responsible for bringing authentic Italian cooking to the British and American public. Here, St John’s Fergus Henderson introduces favourite recipes from her 1973 Classic Italian Cookbook

Marcella Hazan single-handedly changed food as I knew it at home. I’m not saying my mum was not a good cook before the arrival of Marcella, far from it, it’s just that Marcella set new benchmarks in cooking and understanding food. Over the years that followed the book’s appearance in our house, my mother has perfected our particular family favourite, Tomato Sauce III. She is a confirmed recipe follower and this is one of the splendid things about all of Marcella’s recipes: they work.

Having changed eating at the Henderson household, Marcella went on to larger things: teaching America how to cook Italian food. I firmly believe the Cal-Ital thing would not have happened without her rigour. And now to the exciting part of my story (a story that should be exciting already).

When Marcella published her autobiography a few years ago, I received a note from her asking me to write something on the back cover. To me, this was akin to writing a blurb on the Bible. A letter duly returned thanking me, and saying that I must come to Florida to eat her pasta or risotto. Florida is not round the corner, but strangely it seemed to get closer and closer daily, until the point that it really seemed to be just round the corner. I needed to go. Why was I quibbling? Marcella had offered to cook pasta for me. Crazy boy. I stayed in a hotel that felt like the sort of place in which the Mob would take their summer holidays, just down from where she lived. I must admit I was a little surprised by her home, a high-rise gated community, but this seemed to be the favoured school of architecture along this coastline.

We found ourselves outside her front door, someone had rung the bell, and I suddenly felt like turning on my heels and running. It was all too much. I was about to meet Marcella. Then I was embracing Marcella … I was in Marcella’s flat … And it smelled fantastically of cooking.

There I was, eating canapes and drinking with her husband, Victor, and herself. We started with a fresh pasta that had wild mushrooms and roughly chopped spinach running through it. This was pasta you could have eaten for ever, except we were halted by the arrival of two shapely braised veal shins. A little homage from your hero is a giddy mouthful indeed.

When your hero knocks, or says come to lunch, Florida is not far away. These moments come around rarely enough, so I recommend adopting a hero who can cook. Thank you Marcella.

Tomato sauce III

This is the simplest and freshest of all tomato sauces. It has no other vegetables, except an onion. The onion is not sautéed, it is not chopped, it is only cut in two and cooked together with the tomato. Except for salt and a tiny amount of sugar, the sauce has no seasonings. It has no olive oil, only butter. What does it have? Pure, sweet tomato taste, at its most appealing. It is an unsurpassed sauce for potato gnocchi, and it is excellent with spaghetti, penne and ziti.

For 6 servings
Scant 1 kilo fresh, ripe plum tomatoes
110g butter
1 medium onion, peeled and halved
Salt
¼ teaspoon granulated sugar

Wash the tomatoes in cold water. Cut them in half, lengthways. Simmer in a covered stockpot or saucepan for 10 minutes.

Puree the tomatoes through a mouli-legumes back into the pan. Add the butter, onion, salt and sugar, and cook at a slow but steady simmer, uncovered, for 45 minutes. Taste and check salt. Discard the onion.

If using tinned tomatoes: use a 400g tin, and start the recipe at the above step.

Ragu – Bolognese sauce

Ragu
Ragu Photograph: Romas Foord

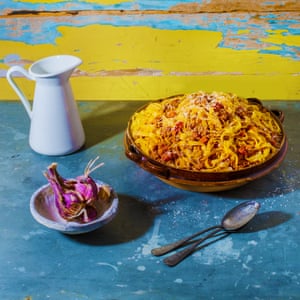
Ragu is not to be confused with ragout. A ragout is a French meat stew, while ragu is the meat sauce the Bolognese use for seasoning their homemade pasta. The only thing they share is a common and justified origin in the verb ragouter, which means “to excite the appetite”. A properly made ragu clinging to the folds of homemade noodles is one of the most satisfying experiences accessible to the sense of taste. It is no doubt one of the great attractions of the enchanting city of Bologna, and the Bolognese claim one cannot make a true ragu anywhere else. This may be so, but with a little care we can come very close to it. There are three essential points you must remember in order to make a successful ragu: the meat must be sauteed just barely long enough to lose its raw colour. It must not brown or it will lose delicacy. It must be cooked in milk before the tomatoes are added. This keeps the meat creamier and sweeter tasting. It must cook at the merest simmer for a long, long time. The minimum is 3½ hours; 5 is better. The union of tagliatelle and ragu is a marriage made in heaven, but ragu is also very good with tortellini, it is indispensable in lasagne, and it is excellent with rigatoni, ziti, conchiglie and rotelle. Whenever a menu lists pasta alla Bolognese, that means it is served with ragu.

For 6 servings
2 tablespoons chopped onion
3 tablespoons olive oil
40g butter
2 tablespoons chopped celery
2 tablespoons chopped carrot
350g minced lean beef, preferably chuck or the meat from the neck
Salt
250ml dry white wine
8 tablespoons milk
⅛ teaspoon nutmeg
400g tinned Italian tomatoes, roughly chopped, with their juice

An earthenware pot should be your first choice for making ragu. If you do not have one available, use a heavy, enamelled cast-iron casserole, the deepest one you have (to keep the ragu from reducing too quickly). Put in the chopped onion, with all the oil and butter, and saute briefly over medium heat until just translucent. Add the celery and carrot and cook gently for 2 minutes.

Add the minced beef, crumbling it in the pot with a fork. Add salt to taste, stir, and cook only until the meat has lost its raw, red colour. Add the wine, turn the heat up to medium high, and cook, stirring occasionally, until all the wine has evaporated.

Turn the heat down to medium, add the milk and the nutmeg, and cook until the milk has evaporated. Stir frequently.

When the milk has evaporated, add the tomatoes and stir thoroughly. When the tomatoes have started to bubble, turn the heat down until the sauce cooks at the gentlest simmer, just an occasional bubble. Cook, uncovered, for a minimum of 3½ to 4 hours, stirring occasionally. Taste and check salt. (If you cannot keep an eye on the sauce for such a long stretch, you can turn off the heat and resume cooking it later on. But do finish cooking it in one day.)

Note: ragu can be kept in the refrigerator for up to 5 days, or frozen. Reheat and simmer for about 15 minutes before using. If you are using fresh tomatoes, peel and deseed them and cook in a little water for 10 to 15 minutes. Then pass through the finest blade of a mouli-legumes, or a sieve, and proceed with the recipe.

Risotto alla parmigiana – risotto with parmesan

Risotto alla parmigiana
Risotto alla parmigiana Photograph: Romas Foord

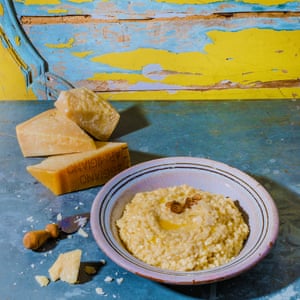
This is the purest and perhaps the finest of all risotto. The only major ingredient added to the rice and broth is parmesan cheese. In Italian cooking, you should never use anything except good-quality, freshly grated parmesan cheese, but for this particular risotto you should make a special effort to obtain authentic, aged, Italian Parmigiano-Reggiano from the best supplier you know.

For 4 servings
2 chicken stock cubes dissolved in 1¼ litres of water
2 tablespoons finely chopped shallots or onion
40g butter
2 tablespoons vegetable oil
300g raw Italian arborio rice
60g freshly grated parmesan cheese
Salt, if necessary

Bring the stock to a slow, steady simmer.

Put the shallots in a heavy-bottomed casserole with 25g of the butter and all the oil, and saute over medium-high heat until translucent but not browned.

Add the rice and stir until it is well coated. Saute lightly, then add 150ml of the simmering stock and stir while cooking, until the rice absorbs the liquid and wipes the sides of the pot as you stir. Add another 150ml of stock as the rice dries out, and stir it very frequently to prevent it from sticking.

When you estimate that the rice is about 5 minutes away from being done, add all the grated cheese and the remaining butter. Mix well. Check salt. Remember, when the cooking nears the end, not to add too much stock at one time. The risotto should be creamy but not runny. Serve immediately, with additional grated cheese, if desired.

Arrosto di agnello al ginepro – casserole-roasted lamb with juniper berries

Arrosto di agnello al ginepro
Arrosto di agnello al ginepro Photograph: Romas Foord

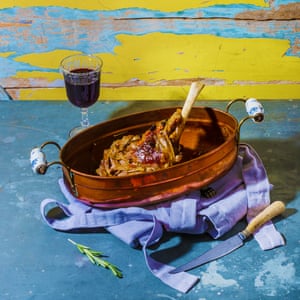
In this recipe the meat is simmered right from the start with the vegetables, wine and flavourings. There is no browning and no liquid or cooking fat to add, because the meat supplies its own fat and juices as it cooks. There is practically nothing to do but watch the pot occasionally.

For 4
1.1kg leg of lamb, preferably butt end, bone in
1 tablespoon chopped carrot
2 tablespoons chopped onion
1 tablespoon chopped celery
250ml dry white wine
2 cloves garlic, lightly crushed with a knife-handle and peeled
½ teaspoon dried rosemary or a sprig of fresh rosemary leaves
1½ teaspoons juniper berries
Salt
Freshly ground pepper, 4 to 6 twists of the mill

Put all the ingredients into a heavy casserole. Cover and cook on top of the stove at low heat for 2 hours, turning the meat every 45 minutes.

At this point the lamb should have thrown off a considerable amount of liquid. Set the lid askew, and cook for another 1½ hours at slightly higher heat. The meat should now be very tender when pricked with a fork. If there is still too much liquid, uncover completely, raise the heat to high, and boil it until it is a little more concentrated. At the end the meat must be a rich brown in colour.

Off the heat, tilt the casserole and draw off as much of the fat as you can with a spoon. If you are not serving the roast immediately, do not degrease until after you have reheated it.

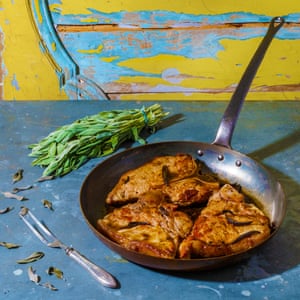
Nodini di vitello alla salvia – veal chops with sage and white wine

Nodini di vitello alla salvia
Nodini di vitello alla salvia Photograph: Romas Foord

For 4
3 tablespoons vegetable oil
4 veal loin chops, cut 18mm thick
90g plain flour, spread on a plate or on waxed paper
12 dried sage leaves
Salt
Freshly ground pepper, about 4 twists
6 tablespoons dry white wine
30g butter

Heat the oil in a heavy-bottomed frying pan over medium-high heat.

Turn the chops over in the flour, coating both sides, and shake off any excess. (Do not coat meat with flour until you are ready to saute it. The flour becomes damp and the meat does not brown properly.)

Slip the chops and the sage into the hot oil. Cook for about 8 to 10 minutes altogether, turning the chops two or three times so that they cook evenly on both sides. (Veal should not cook too long or it will become dry. The meat is done when it is rosy pink on the inside when cut.) When cooked, remove to a warm dish and add salt and pepper.

Tilt the frying pan and draw away most of the fat with a spoon. Add the wine and turn the heat to high. Boil rapidly until the liquid has almost completely evaporated and become a little syrupy. While boiling, loosen any cooking residue in the pan and add what juice the chops may have thrown off in the dish. When the wine has almost completely evaporated and thickened, turn the heat to very low and mix in the butter. Return the chops to the frying pan for a few moments, turning them over in the sauce. Transfer them to a warm serving dish, pour the remainder of the sauce over them, and serve immediately.

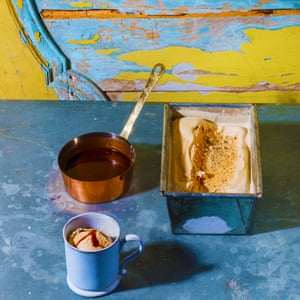
Gelato di caffe con la cioccolata calda – espresso coffee ice cream with hot chocolate sauce

Gelato di caffe con la cioccolata calda
Gelato di caffe con la cioccolata calda Photograph: Romas Foord

For 6
4 egg yolks
130g granulated sugar
325ml espresso coffee, made using milk instead of water
240ml double cream

For the chocolate sauce
170ml double cream
2 tablespoons cocoa
4 teaspoons granulated sugar

Beat the egg yolks and sugar until they become a pale yellow cream.

Combine the espresso coffee and double cream and mix into the beaten egg yolks until uniformly blended. Warm the mixture in a saucepan over low heat, stirring constantly until it swells to nearly twice its original volume.

Pour into freezer trays. When cool, stir thoroughly and place in the freezer for at least 5 hours. Stir every 30 to 40 minutes.

Just before serving, prepare the sauce by combining the double cream, cocoa and sugar in a small saucepan and stirring it over low heat for about 6 minutes, or until it becomes a smooth, thick cream.

Spoon the ice-cream, which should be quite firm but not rock hard, from the freezer trays into individual bowls. Pour the hot sauce over each serving and serve immediately.

The Classic Italian Cookbook by Marcella Hazan is widely available secondhand. To order a copy of The Essentials of Classic Italian Cooking (Boxtree, £30) for £25.50 go to bookshop.theguardian.com or call 0330 333 6846. Free UK p&p over £10, online orders only. Phone orders min p&p of £1.99

Claire Ptak’s recipes for Dutch babies and American popovers

Add a few extra ingredients or change your cooking method and a simple batter can flip the end result from savoury – as in these American popovers – to sweet, like lemony, puffy Dutch babies

Batter is a wonderful thing. Baked, griddled or fried, it can be transformed into dramatically different forms. From crepes and pancakes to Yorkshire puddings and American popovers, the ingredients change very little, but the methods of cooking, and the order in which you incorporate the ingredients, yield gorgeously varied results.

The other appealing quality of batter bakes is the ease with which they can swing back and forth between savoury and sweet. Take crepes: season the batter with salt and pepper and you can fill them with spinach and cheese for a savoury snack, or season it with nutmeg and lemon zest and sprinkle them with caster sugar and lemon juice for a sweeter option.

In my opinion, by far the most exciting batter-based recipe is that for Dutch babies. These American breakfast cakes start with a silky batter that’s prepared, rested and then poured into a piping hot frying pan generously coated with melted butter. Baked in less than half an hour, the whole thing puffs up into a monolith of crisp, eggy deliciousness. I love them served with loads of freshly squeezed lemon juice and icing sugar, but you could add the zest of an orange or vanilla sugar, if you like.

Puffy, buttery popovers are my second-favourite batter-based bake, America’s answer to the Yorkshire pudding. There is a well-known restaurant in my home town, Point Reyes, California, called The Station House Cafe. It has been there as long as I can remember, serving up baskets of warm freshly baked popovers to every diner as soon as they sit down. They are legendary. I hope my version does them justice.

Dutch babies (main picture)

You will need a 25cm cast-iron frying pan or a similarly sized ovenproof pan to cook these puffy pancakes.

Serves 4-6
3 large eggs
150ml whole milk
100g plain flour
1 tsp vanilla extract
A pinch of freshly grated nutmeg
¼ tsp flaky sea salt
55g unsalted butter
Zest of 1 lemon
25g icing sugar, for serving
2 large lemons, cut into wedges

1 In a large bowl, whisk together the eggs, milk, flour, vanilla, nutmeg and salt. Strain into a jug and let the batter rest for 45 minutes in the fridge.

2 Heat the oven to 220C/425F/gas mark 7. Put the skillet in the middle of the oven for 10 minutes to heat it up.

3 Drop in the butter and swirl it around to melt it. Pour in all of the batter and return to the oven for 20-25 minutes until puffed at the edges and golden brown.

4 Zest a lemon right over the top of the baby and serve immediately dusted with icing sugar alongside plenty of lemon wedges.

American popovers
Puffy, buttery popovers are America’s answer to the Yorkshire pudding. Prop Styling: Claire Ptak Photograph: Kristin Perers for the Guardian

Popovers

Popovers are typically made in a special tray that has deep cups. If you can’t find one, just use the deepest muffin tray you can find.

Makes 12
450ml whole milk
6 large eggs
140g plain flour
1 tsp fine sea salt
A generous grating of nutmeg
A generous grating of black pepper
100g unsalted butter, melted, then cooled
12 tsp vegetable oil, plus more for greasing

1 Use a pastry brush or paper towel to grease a 12-cup muffin tray with oil. Be sure to coat the top of the tray as well as the cups. Add 1 tsp of oil to the bottom of each cup. Set aside.

2 In a large bowl, whisk together the eggs and milk. In a separate bowl, whisk together the dry ingredients. Slowly add the wet to the dry until it all comes together and there are no lumps. Add the melted and cooled butter, then strain the whole mixture. Let the batter rest for at least 1 hour, but preferably longer, if possible.

3 Put the oiled muffin tin into the oven over a baking dish to catch the drips. When the oil is hot, divide the batter between the cups and bake for 35-45 minutes, or until golden and puffed. They should have tripled in size. Remove the popovers from the tin and put on a paper towel for a few minutes before serving. Serve piping hot.

  • Claire Ptak is a pastry chef, author and food stylist and owns Violet Bakery in London. She is the author of the Violet Bakery Cookbook (Square Peg); @violetcakeslondon

Nigel Slater’s aubergine ragu with cream and parmesan lentils recipe

Good everyday cooking is often a matter of scrabbling together something tasty from what you’ve got

It never occurs to me not to cook. Putting a meal together for myself is as much a part of my day as getting out of bed in the morning. The alternatives are delicious, I’m sure: a phoned-for pizza in a box the size of coffee table; sushi by the trayful – a jewel box of raw fish and shiso leaves; a supermarket korma on the table in a minute. But the truth is that the idea never crosses my mind.

None of which means I always think about dinner in time to shop. Many a meal is the result of a hopeful scrabble through the fridge. A game that involves sniffing rather than reading a sell-by date. Sometimes the results astound me, other times not so much. I don’t expect to eat something dazzling every day of my life, just something that makes me feel I have looked after myself and those I cook for.

This week has seen more than the usual amount of cupboard rummaging and fridge foraging. It has been a clearing out, a tidying up. A week when the fridge was down to its last wrinkled aubergine, its final paper bag of not-quite- past-it mushrooms. Yes, I popped out for cream and parsley, but the shops have barely had a penny from me these past few days.

The best dish of the lot, and the one I think worth telling you about, was what I will loosely call an aubergine ragu. By which I mean the spongy flesh of the eggplant was cooked slowly with mushrooms and onions and a few somewhat less-than-perky herbs to a woodsy, herb-freckled sauce. In place of rice, the sort of just-tender slate-green lentils that introduce a little texture into the business. Not earth-shatteringly original, gasp-out-loud gorgeous, just something truly worth cooking. Understated, frugal, everyday stuff. The sort of food that quietly makes the world go round.

Aubergine ragu, cream and parmesan lentils

Serves 4
aubergine 1, small to medium
olive oil 6 tbsp
onions 2, medium
garlic 4 cloves
thyme sprigs 8
rosemary 6 twigs
chestnut mushrooms 200g
puy or other small lentils 400g
double cream 250ml
parmesan 75g, grated
parsley 3 tbsp, chopped
zest of a small lemon finely grated

Cut the aubergine into 2cm cubes and place in a large, deep casserole together with 3 tbsp each of olive oil and water. Put the casserole over a moderate heat and cook for 5 minutes or so, till the aubergines are starting to turn golden, lower the heat slightly and cover with a lid.

Peel and roughly chop the onions. Warm the remaining olive oil in a shallow pan then add the onions, stir, and leave them to cook over a moderate temperature. Peel and crush the garlic, then stir into the onion. Pull the leaves from the thyme sprigs. Remove the needles from the rosemary, chop finely, then stir, together with the thyme leaves into the softening onions.

Quarter the mushrooms, combine with the onions and leave to soften and colour. Season the onion and mushroom mixture with salt and a little black pepper then stir into the aubergine. Leave to simmer, very gently, over a low heat, partially covered with a lid.

Cook the lentils in a saucepan of boiling water for about 15 minutes until tender but with a slight nuttiness to them, adding salt about 5 minutes from the end of cooking. Drain the lentils, then return to the pan, pour in the cream, bring to the boil, then fold in most of the grated parmesan and check the seasoning. It might need a little ground pepper.

Serve the lentils in shallow bowls or plates, with some of the aubergine on top. Mix together the chopped parsley, lemon zest and the remaining parmesan and scatter over the top before eating.

Baked apple mascarpone fool

Sweet reason: baked apple mascapone fool.
Sweet reason: baked apple mascapone fool. Photograph: Jonathan Lovekin for the Observer

A rather nice touch is to finish this soft and creamy dessert with a couple of slices of apple – something sweet and firm like a Cox – that you have fried for 2 minutes in a little butter and sugar until they start to caramelise.

Serves 4
sharp apples, such as Bramley 850g
caster sugar 100g
double cream 250ml
sweet Marsala 4 tbsp
mascarpone 125g

Heat the oven to 200C/gas mark 6. Core the sharp apples, score a line around the circumference of each fruit, piercing just below the skin, then place them snugly in a roasting tin. The purpose of the scoring is to stop the fruit exploding as they cook.

Bake the apples for about 20-25 minutes, taking an occasional peep to check their progress. The apples are ready when they are risen and the top has fluffed up like a soufflé. If they have collapsed into a puddle of froth, no matter.

Remove the fruit from the oven then scrape the flesh into a bowl using a small spoon, discarding the skins as you go. If there are any caramelised juices in the tin, combine them with the apple then set aside.

Put the sugar, cream and Marsala in the bowl of an electric mixer and beat till thick and creamy, but not so stiff that the mixture can stand in peaks. Fold in the mascarpone then combine with the crushed apple, taking care not to overmix.

Email Nigel at nigel.slater@observer.co.uk or follow him on Twitter @NigelSlater

Nigel Slater’s vegetable rice recipe

A healthy, spicy, nourishing veggie treat

The recipe

Rinse 200g of brown basmati rice in warm water and drain. Put the rice into a small, deep saucepan, pour in enough water to cover by a couple of centimetres, then add 8 whole black peppercorns, 2 bay leaves and a couple of cloves. Bring to the boil, then lower the heat so the water simmers and cover with a tight-fitting lid. Leave to cook for about 10 minutes, till the water has evaporated and small holes have appeared on the surface of the rice. Set aside, covered with the lid, for 5 minutes.

Slice 2 large leeks into pieces about the size of a wine cork, then wash them thoroughly under cold water. Melt 40g of butter over a moderate heat, add the leeks and 4 tbsp of water and cook over a lowish heat for 10 minutes, taking care they soften but do not colour.

Peel and very thinly slice a large clove of smoked garlic. Wash and finely shred a large handful of kale. In a frying pan, sizzle the kale in a little butter, add the sliced garlic and cook for a couple of minutes until bright and tender.

Boil 2 eggs till they are as you like them, then carefully remove their shells. Check the rice, then run a fork through it to separate the grains and stir in 1 tsp of garam masala. Toss together the rice, kale, garlic, leeks and their butter, then divide between 2 plates. Top with the peeled eggs. Serves 2.

The trick

Rinsing the rice 2 or 3 times or until the water runs clear will prevent the grains from sticking together. To keep the leeks from browning, add a disc of greaseproof paper on top of the leeks, butter and water, then cover with a lid, so they steam rather than fry.

The twist

You could comfortably use this recipe for leftovers, such as roast meat, torn into large shreds, or pieces of cooked salmon or smoked mackerel. You could also warm crème fraîche in a saucepan, then spoon it over the hot, spiced rice as you eat.

Email Nigel at nigel.slater@observer.co.uk or follow him on Twitter @NigelSlater

Peter Gordon's oyster and beer batter fritters recipe inspired by New Zealand

Fresh fish for breakfast, canned oysters from the pharmacy and his dad’s fritters make up Peter Gordon’s nostalgic meal de choix.

When I was growing up, my father Bruce wanted us all to like oysters. In New Zealand, you get special bluff oysters from the south of South Island: lovely specimens with the creamiest flavour.

When I was little, though, for some reason you could only get them in a can. Which you bought in a pharmacy. Not sure why. New Zealand was strange in those days. Olive oil was another thing you could only ever get in pharmacies.

So we weren’t at all convinced about oysters. The texture was too much for us. We’d watch our dad shove one in his gob and think “that is so disgusting”. So he decided to cut stale white bread into cubes and pour the juice from a can of oysters (which he ate) over them, then dip those into a fish-and-chips-style beer batter. He’d fry them – a delicious oyster-flavoured crunch – and that’s how he got us all hooked. We’re all great oyster fans now.

We grew up in a coastal town called Whanganui, on the west coast of North Island. There’s a black sandy beach, where New Zealand’s longest navigable river, dark and muddy, spills into a very cold ocean. It’s not the tropics.

We lived in Castlecliff, a part of town with a romantic name. Our house was really well known on our street and beyond as the Zigzag House – you can see the colourful roof-tile pattern from which it got its name on Google Earth. It sits on a half-acre plot, a big hunk of land. We had a swimming pool that my father built, and an electric merry-go-round based on a washing machine motor that he knocked together, too. All the kids were given a bit of land, and we’d compete to see who’d grow the best beans, tomatoes, pumpkin …

In the summer, my dad and his mates would go down to the shoreline and drop fishing nets. Before school, we’d be roped in to fillet and salt fish, then go home and have fresh fish, battered and fried, caught a mere 30 minutes earlier. Even though we lived in town, we learned about growing our own produce – and eating our pets. We had a pet sheep we called Lambchops that Dad gave us for fun. And initially it was, but then it became a chore. One day, when she was about 18 months, we were eating and Dad said: “Do you remember your little pet? You’re having her for lunch.” My sister spat her lamb out and ran from the table. She became a veggie. These days, she posts the most delicious meaty shots on Instagram, so that didn’t last. At the time, though, I wasn’t shocked. I was just thinking: “God, this is delicious.”

We weren’t foodies. We ate simple food. No chilli, very little garlic, no risotto or balsamic. Pasta came out of a can. We had a supermarket-size freezer in the living room, which was always hilariously full of dead things: half a sheep, shoulders … It’s still there.

Oyster and beer batter fritters
‘Eat them with a beer, like my dad,’ says Peter Gordon. Photograph: Jill Mead for the Guardian

Oyster and beer batter fritters

Serves 4-6
200g flour
½ tsp smoked paprika (optional – Dad would never have heard of it!)
1 tsp salt
2 tsp sugar
1 tsp baking powder
230ml beer, at room temperature (lager is best; dark ale overpowers the oysters)
2 tbsp chives, chopped
8 oysters
2 tbsp oyster sauce
3-4 thick slices of slightly stale white bread, cut into largeish cubes (if the bread is fresh the fritters will become soggy)
Oil, for deep-frying
Lemon wedges, to serve

1 Heat the oil to 180C/350F.

2 Make the batter by sieving the flour, smoked paprika, salt, sugar and baking powder. Whisk in half the beer slowly, making sure there are no lumps. Whisk in the chives then the remaining beer.

3 Open the oysters, put in a small blender with the oyster sauce and 3 tbsp cold water, and pulse to a smoothish puree.

4 Lay the bread cubes in a wide bowl and drizzle the oyster puree over. Gently toss the bread to coat evenly – it will suck up the juice, so work quickly. Give the batter a gentle whisk, then add the bread, 6-8 chunks at a time, and gently toss to coat them evenly.

5 Deep-fry in the oil until golden, shaking off excess batter to form what we called “crunchies”, and turning them a few times so they cook evenly. Put on to kitchen paper, sprinkle with salt, and keep them in a warm oven while you cook the rest.

6 Eat while hot and still crunchy.

  • Peter Gordon is executive chef and co-owner of The Providores and Tapa Room, London

Cocktail of the week: the bloody shame recipe

It’s blood orange season, so fill your boots with this aromatic pre-dinner thirst-quencher

With the fleeting blood orange season now upon us, make the most of this wonderful fruit whenever you can. Serves one.

25ml vodka
75ml fresh blood orange juice
35ml rosemary syrup (make a standard sugar syrup with 250ml water and 250g sugar, then add 4 rosemary sprigs and simmer for 20 minutes; it will keep in the fridge for at least a week)
100ml champagne (Chandon Brut is my fizz of choice for this)

Stir the vodka, juice and syrup in a jug, top with the bubbles and pour over ice into a wine glass. Garnish with a slice of blood orange and a rosemary sprig.

Dan Munt, beverage director, Gaucho restaurants.

Nigel Slater’s winter root veg recipes

Winter is the time to dig deep for root vegetables. Perfect for parsnip and chicken soup, salsify and bacon or a kohlrabi citrus salad

Deepest winter, and the knobbly roots, the glowing carrots and pink-skinned artichokes, the fat frost-sweetened parsnips and cool green kohlrabi can all have their 15 minutes. Along with the brassicas, root vegetables are the stars of cold-weather cooking, but to my mind are still too often relegated to the side of the plate. This season, they have appeared in my kitchen as a creamy sauce, a hot terrine, a crisp salad, a main course soup and a fry-up. It is high time roots came out of the dark.

Cauliflower and jerusalem artichoke bake

A surprising amount of comfort and bonhomie here. It is worth letting the artichokes cook till they are thoroughly soft, so they collapse into a velvety sauce in the blender. Long cooking renders them more digestible too. And that can only be a good thing.

Serves 4
lemon 1
jerusalem artichokes 1kg
milk 1 litre
bay leaves 3
cauliflower 1 medium, about 700g
butter 50g
olive oil 2 tbsp
fresh breadcrumbs 50g
poppy seeds 1 tbsp
tarragon leaves 2 tbsp chopped
parsley 50g, leaves and stalks, 3 tbsp leaves reserved

Finely grate the lemon and set the zest aside. Squeeze the juice into a bowl of cold water. Peel the artichokes, dropping each into the acidulated water to prevent them discolouring.

Drain the artichokes then bring them to the boil in the milk. Add the bay, a little salt and coarse black pepper. Lower the heat and simmer for about 30-40 minutes till very soft.

Cut the cauliflower into large florets, then steam them till tender to the point of a knife, or cook in deep, boiling water for 15 minutes or until approaching tenderness.

While the cauliflower cooks, warm the butter and olive oil in a shallow pan, add the breadcrumbs and cook till crisp and golden. Stir in the lemon zest, poppy seeds and chopped tarragon, then set aside.

Process the artichokes and their milk (without the bay) and the parsley leaves and stalks, reserving the 3 tbsp of leaves, until you have a smooth, green sauce. Check and correct the seasoning. Drain the cauliflower thoroughly and place in a baking dish. Spoon the artichoke sauce over the cauliflower. Scatter the surface with the reserved parsley and poppy-seed crumbs and serve.

Carrot, parsnip and freekeh chicken soup

Carrot, parsnip and freekeh chicken soup
Carrot, parsnip and freekeh chicken soup. Photograph: Jonathan Lovekin for the Observer

A deeply satisfying soup that is good as a light main dish. The pomegranate lifts and brightens the deep, smoky flavours going into the bowl.

Serves 4
olive oil 3 tbsp
chicken wings 12
smoked garlic 6 cloves
rosemary sprigs 4
bay leaves 3
thyme sprigs 12
water 2 litres
freekeh 100g
small carrots and parsnips 250g
pomegranate 1
chopped parsley a handful

Pour the oil into a deep casserole over a moderate heat and brown the chicken wings on both sides. Peel and crush then flatten the garlic cloves, then add them to the chicken together with the whole rosemary sprigs, bay, thyme and the water. Bring to the boil, lower the heat and simmer gently for an hour.

Rinse the freekeh then tip it into the chicken stock and continue simmering for 20 minutes. Halve the carrots and parsnips and add them to the pan, then leave to cook for 20 minutes till tender. Cut the pomegranate in half and take out the seeds. Remove the sprigs of herbs from the soup, they have done their work. Ladle into bowls, then spoon the chopped parsley and pomegranate seeds on top.

Kohlrabi and grapefruit salad

Kohlrabi and grapefruit salad
Kohlrabi and grapefruit salad. Photograph: Jonathan Lovekin for the Observer

Crisp, bittersweet and refreshingly simple, a salad for a winter’s day.

Serves 4 as a side dish or first course
kohlrabi 2 small-medium
pink grapefruit 2
orange 1
fennel ½ bulb
walnut halves a handful
chicory 1 head, or other crisp, bitter salad leaf
sprouted seeds a handful

For the dressing
walnut oil 1 tbsp
olive oil 2 tbsp
lemon juice 2 tbsp
sugar a pinch

Make the dressing by combining the oils, juice and a little sugar to taste. Season with salt and pepper. Slice the kohlrabi very thinly, then mix with the dressing and set aside in the fridge for a good hour.

Peel the grapefruits and the orange, then remove any white pith. Slice the fruits thinly, then toss with the dressed kohlrabi. Very finely slice the fennel, then toss with the other vegetables and fruits. Add any tufts of fennel fronds you may have. Toast the walnuts, taking care to just warm them through – they go bitter if toasted too far.

Separate the chicory into leaves and toss them with the rest of the salad, the walnuts and the sprouted seeds. Divide between plates and serve.

Salsify and bacon

Salsify and bacon
Salsify and bacon. Photograph: Jonathan Lovekin for the Observer

Not the easiest root to track down, but one of my favourites. My soil is too heavy to grow them, so I snap them up whenever I see them. They discolour within seconds of peeling, and you do need to peel them, not just scrub, so have a bowl of acidulated water to hand.

Serves 2-3
lemon 1
salsify 500g
streaky bacon 200g
rosemary 3 tbsp
butter 40g
breadcrumbs 60g
finely chopped parsley 3 tbsp
goat’s cheese 250g

Squeeze the lemon into a bowl of cold water. Peel the salsify and cut each one into short, cork-length pieces, putting each into the lemon water to stop them discolouring.

Cook the salsify in a steamer, or in a colander over boiling water, for 15-20 minutes till you can easily insert the point of knife through each piece.

Finely chop the bacon and rosemary and fry them in the butter. As soon as the bacon turns crisp, add the breadcrumbs, cook till golden, then add the drained salsify and chopped parsley. Toss to coat the roots with the crumbs then serve with thick slices of goat’s cheese.

Swede and spinach loaf

Swede and spinach loaf
Swede and spinach loaf. Photograph: Jonathan Lovekin for the Observer

Take a little care with this, blanching the roots first then weighing them down during baking so they squish firmly together. The loaf doesn’t need to be to be turned out to serve it. But should you wish to, then be sure to let it rest, weighted, for a good 30 minutes before flipping onto a serving dish.

Serves 4 as a main course, 6 as an accompaniment
swede 1kg
turnips 500g
spinach 400g
mixed fresh herbs 60g
eggs 3
egg yolk 1
creme fraiche 400g
gruyere 150g

Line the base of the loaf tin with kitchen parchment.

Bring a large, deep pan of water to the boil. Peel the swede and turnip, then slice each thinly, about the thickness of a pound coin. Cook the slices in the boiling water for 7-8 minutes, until there is a hint of tenderness to them. Drain and set aside.

Wash the spinach thoroughly. Return the empty pan to the heat with a small amount of water in it, then add the spinach. Cover tightly with a lid and leave to cook for a couple of minutes, turning the spinach over once or twice with kitchen tongs. When the leaves are soft and bright green, drain and squeeze dry. Roughly chop the spinach and set aside.

Chop the herbs finely. Beat the eggs and egg yolk together in a mixing bowl, just enough to combine the whites and yolks, then stir in the creme fraiche and gruyere. Season generously. Heat the oven to 180C/gas mark 4.

To assemble, scatter a few of the chopped herbs in the base of the loaf tin. Place pieces of swede and turnip, neatly, in one layer then cover with some of the fresh herbs and a little of the creme fraiche mixture. Repeat, several times, layering the root vegetables, spinach and herbs with the creme fraiche mixture until everything is used up. Cover tightly with kitchen foil then place in a roasting tin. Place a board and a heavy weight on top of the loaf tin.

Pour hot water into the roasting tin, coming half way up the sides of the loaf tin then carefully place in the hot oven. Bake for an hour, then test with a metal skewer. It should glide effortlessly through the layers. If not, return to the oven and continue cooking for 20-30 minutes until ready.

Readers’ recipe swap: Tofu

Firm or silken, your recipes prove that proper tofu should be at the centre of a meal, not on the sidelines.

It’s a shame, I feel, that for many people tofu is a tasteless meat substitute, to be overloaded with all the flavour it doesn’t naturally come with. Of course, if you only encounter it in long-life Tetra Paks, I understand why you’d want to amp up the aromatics. Tofu, traditionally, isn’t meant to last longer than the day it’s made. Which is why in Japan you still find itinerant tofu sellers, who ride around with a little copper horn on which they play a two-note tofu tune, and sing a song, to alert customers to their presence. Fresh and properly made, their tofu is a thing of beauty.

Anna Thomson, who sent in the agedashi dofu recipe below, said her tofu dish of choice is hiyayakko and yudofu – cold and hot versions of the same simple dish: fresh silken tofu served neat, with minced ginger, finely sliced spring onion and soy sauce. And I agree. Japanese minimalism works as much life-changing magic on soybean curd as it does in sock drawers, and with a good block of tofu, there’s little else you need to do to enjoy it. But equally, that subtle flavour – nutty, fresh, vegetal – and its light, creamy texture are qualities that shine through even when paired, as in the winning Sichuan recipe, with myriad aromatics and a panful of meat.

When it comes to prepping firm tofu, Rachel Kelly sent in excellent advice, gleaned in a Vietnamese kitchen. Boil lightly salted water in a saucepan, add your block of tofu and remove from the heat. Set aside for about 5 minutes, then drain the tofu and pat dry. Put on a plate or lipped chopping board, cover with another chopping board and weigh down with a couple of tins of beans or a pile of hard-backed books, ensuring the weight is evenly distributed. Leave for at least an hour: preferably overnight.

The winning recipe: Ma po tofu

This is easily my favourite Sichuanese dish, but I never expected to manage it quite so well at home. Kok-Hwa Lie didn’t specify the type of tofu, so I tried it first with firm tofu, which was perfect, then with silken, which was less so, but still delicious. The trick is to try to prevent the blocks from disintegrating. As you can see in the above picture, I did not. So proceed as gently as I will next time. The combo of nuggets of melting bean-curd cream, super-hot chilli oil and richly flavoured pork is superb.

Serves 3-4
400g tofu
250g minced pork
2 tsp Sichuan pepper
1 tbsp oil
Salt and black pepper
2 garlic cloves, minced
2cm piece of ginger, finely chopped
1 red chilli, chopped
2 dried chillies, chopped
2 tbsp doubanjiang (chilli bean sauce)
1 tbsp rice wine
200ml chicken stock
1 tbsp light soy sauce
1 tsp sugar
1 tsp sesame oil
1 tbsp cornflour
2 spring onions, chopped, to serve

For the marinade
1 tbsp light soy sauce
1 tbsp rice wine
1 tsp sesame oil
1 tsp black rice (chinkiang) vinegar
1 tbsp cornflour

1 If using firm tofu, soak and press as explained above, then pat dry and cut into cubes. If using silken tofu, cut the tofu into cubes, then slide into a panful of lightly salted water and cook for 1 minute. Drain very carefully, so as not to break up the cubes. Set aside.

2 Combine the ingredients for the marinade, mix in the pork and set aside for at least 30 minutes.

3 Toast the Sichuan pepper in a dry pan until fragrant. Transfer to a pestle and mortar and crush into a powder.

4 Heat the oil in a frying pan and brown the marinated meat on all sides, then remove from the pan.

5 Saute the garlic, ginger, fresh and dried chilli, plus 1 tsp of the ground Sichuan pepper for 1-2 minutes. Add the chilli bean sauce and rice wine. Cook for a further 2 minutes. Return the meat back to the pan, gently add the tofu and cook for 2 minutes.

6 Add the stock, soy sauce, sugar, sesame oil and season with salt and pepper. Simmer for 2-3 minutes.

7 Mix 1 tbsp cornflour with 1 tbsp water, add to the pan and stir.

8 Garnish with spring onions and the remaining Sichuan pepper. Serve with white rice.

Oven-baked agedashi dofu

Agedashi is another of Anna Thomson’s favourites, but a rare occurrence in her home kitchen due to the deep-frying it traditionally requires. Her oven-baked version is an interesting alternative.

Serves 2-4
1 block of silken tofu
Sunflower oil
3 tbsp potato starch (or cornflour)
225ml dashi
2 tbsp soy sauce
1 tbsp mirin (or use 1 tsp honey)

To serve
2 spring onions, finely sliced
1 tbsp finely grated ginger

1 Wrap the tofu in a tea towel and put on a chopping board with a weight on top for 15 minutes to expel excess water. Pat dry.

2 Set the oven to 220C/425F/gas mark 7 or hotter, if possible. Pour a thin layer of oil in a shallow baking tray and put in the oven.

3 Cut the tofu into cubes. Put the potato starch into a bowl, then add the tofu and coat by shaking around gently.

4 Take the tray from the oven, put the tofu in the tray and return to the oven: be careful of the sizzling oil. Bake for 10 minutes, turning each cube frequently so that all sides are cooked evenly.

5 Meanwhile, mix the dashi, soy sauce and mirin together. Set aside.

6 Put the cooked tofu in serving bowls. Top with the spring onions and ginger, add the sauce and serve immediately.

Maple tofu bao buns

ColonialCravings professes a love for these sweet, soft, fluffy pillows of dough that I can easily echo. So I was excited by her attempt at a vegetarian version. My only addition is mayo on the buns – there’s just no other way to get the tofu up to pork-belly bao-filling fat levels. And more sriracha.

Makes 4-6
5g yeast
150ml warm water
225g strong white bread flour
25g sugar

For the filling
1 garlic clove
25mm fresh ginger
1 tbsp dark maple syrup
1 tbsp dark soy sauce
1 tbsp sesame oil
1 tsp chilli sauce (I use sriracha)
200g firm tofu (cut into slices and pressed for 15 minutes)

To serve
Mayonnaise
Fresh coriander
Sriracha or fresh chilli, finely sliced

Colonial Cravings’ bao buns: fold each oval piece of dough in half over a piece of greaseproof paper to create a taco shape.
Colonial Cravings’ bao buns: fold each oval piece of dough in half over a piece of greaseproof paper to create a taco shape. Photograph: Colonial Cravings for the Guardian

1 Add the yeast to the water and set it aside for 1-2 minutes. Whisk together the flour and sugar in a large mixing bowl and then mix in the water to form a soft dough. If it’s a little dry add a touch more water, a little sticky add a tiny bit more flour. Turn the dough out on to a lightly floured surface and knead it for about 10 minutes, or until it becomes soft, smooth and stretchy.

2 Clean the mixing bowl and lightly oil it before returning the dough to the bowl and covering it with clingfilm. Pop the bowl in a warm place and leave the dough for about an hour to double in size.

3 Meanwhile, grate the garlic and ginger and combine it with the maple syrup, soy sauce, sesame oil and chilli sauce in a baking dish. Cut the tofu into triangles and toss them in the marinade. Leave for 30 minutes to soak up all the flavours.

4 When the dough has risen, knock it back a little, then divide it into 4 or 6 pieces (depending on how big you want your buns). Shape the pieces into balls, then roll them out on a lightly floured surface into an oval shape. Cut squares of greaseproof paper and fold each in half diagonally to make a triangle. To shape your buns, put these on to the dough, then fold each oval in half over the paper to create a taco shape. Put them on a board or tray covered with greaseproof paper. Loosely cover them with oiled clingfilm. Leave them somewhere warm to rise for 30 minutes.

5 Preheat your oven to 180C/350F/gas mark 4 and bake the tofu for 25-30 minutes, turning occasionally, until the pieces are sticky and a little crisp around the edges.

6 Cut up the greaseproof paper under the buns, so each one sits on an individual piece. Set a steamer over a pan of boiling water (a steel one works fine: you don’t have to have a bamboo one) and steam the buns in batches for about 8 minutes, or until the dough is cooked through and the buns are puffy.

7 To serve, spread the inside of the buns with a generous amount of mayo, and fill with a couple of wedges of the tofu. Add a generous garnish of fresh coriander and top with a squeeze of sriracha or a little fresh red chilli.

Vietnamese lemongrass and chilli tofu

Rachel Kelly uses Clean Bean Co tofu to make this, and if you live or work in London, you should track some down. It’s a prime, local example of how good tofu can be, and particularly delicious with these simple flavours.

Serves 4
300g block of firm tofu
Juice of 1 lime
Light soy sauce, to taste
2 fat red chillies, deseeded and finely chopped
2 lemongrass stalks, finely chopped
2 garlic cloves, finely chopped
Salt
Vegetable oil, for frying

1 Boil and press the tofu as described in the introduction at the beginning, then cut into 2cm cubes.

2 Make the dip by combining the lime juice with 2 tsp soy sauce. Taste, add more soy if you like, and set aside.

3 Combine the chillies, lemongrass and garlic into a rough paste by blitzing in a food processor along with ½ tsp salt.

4 Gently toss the tofu in this mixture. Set aside for an hour to allow the flavours to develop.

5 Heat vegetable oil (about 2cm deep) in a large frying pan. Brush off any excess marinade and gently fry the tofu for about 10 minutes, or until lightly browned all over and crisp. Drain on kitchen paper and keep warm.

6 Heat 1 tbsp vegetable oil in a small frying pan and quickly fry the remaining marinade mixture. Pour over the warm tofu and serve immediately with the dipping sauce.


  • After four years and roughly 1100 recipes swapped, Readers’ Recipe Swap comes to a close next week. Thanks to everyone who has contributed over the years. But watch this space for more great recipes and ideas from Cook!

Cocktail of the week: pear and lavender bellini

A wintry take on the bellini, from the drinks maestro at Tonkotsu and Anzu

Everyone loves a bellini, but who wants an out-of-season peach? This takes advantage of a great British fruit that is available in winter. The base keeps in the fridge for a few days, and makes enough for about 10 drinks. Serves two.

2 red william pears, cored and chopped
100g caster sugar
2-3 stalks semi-dried lavender
Champagne (or prosecco), to top

Put the pears in a saucepan with the sugar, lavender and enough water to cover. Bring to a boil, simmer for 10 minutes, then discard the lavender. Blitz the mix with a hand blender and, while it’s still hot, pass through muslin stretched over a colander.

Once cool, pour 50ml of the strained liquid into each of two flutes, top with champagne and serve.

David Wrigley, head of drinks, Tonkotsu and Anzu.

  • This article was edited on 17 January 2017, to clarify that the base of the cocktail makes enough to serve 10.

Bring a golden glow to January with a Victorian classic, and, no matter if you’re looking to be eased into the day or hit with a full-on acid trip, there’s a variation for you Bring a golden glow to January with a Victorian classic, and, no matter if you’re looking to be eased into the day or hit with a full-on acid trip, there’s a variation for you

A ray of sunshine in one of the darkest months of the year, lighter and zingier than marmalade (and considerably quicker to make), lemon curd is guaranteed to brighten up any breakfast or tea, as well as making a great filling for cakes. (You’re back on the cakes, right?) Formerly often known as fruit cheese (curiously, this name survives only in the sugary, dairy-free damson and quince varieties served with actual cheese), according to Laura Mason and Catherine Brown’s meticulous work The Taste of Britain, it probably started life as what the 18th-century cookbook writer Elizabeth Raffald refers to as a transparent pudding. “The thought that this mixture might be bottled and stored for later use, or even for sale, was of a piece with the industrialisation of food production in the late Victorian period.” What did the Victorians ever do for us, eh?

Thomas Keller’s lemon curd.
Thomas Keller’s lemon curd. Photograph: Felicity Cloake for the Guardian

Eggs

One thing all fruit curds have in common, apart from fruit, is eggs. What form those eggs take, however, is a matter of contention. One recipe I see recommended again and again online is from America’s Fine Cooking magazine. The author, Elinor Klivans, writes that she prefers “the lighter, almost custardy results I get from using whole eggs” but, “because the eggs whites cook at a lower temperature, they’re more prone to coagulation. These cooked bits don’t ruin the flavor of the curd, but a smooth texture will require careful straining, and quite a bit of the mixture can get lost in the process.” Mary Berry and Stella Parks of the Brave Tart blog both use only egg yolks, which makes for a very rich, slightly gelatinous consistency, whereas Thomas Keller’s Bouchon Bakery Book and Thane Prince’s Ham Pickles & Jam both stick the whole lot in, which does indeed produce a lighter, creamier result. Testers, however, express a preference for recipes – like the one in Catherine Phipps’ new book, Citrus, and Kylee Newton’s The Modern Preserver – that employ a mixture of whole eggs and yolks, offering the ideal combination of lightness and richness.

Sugar

Sadly, for those of us trying to cut down our sugar consumption, there is no curd without sugar, though it does contain far less of the stuff than most sweet preserves. Keller calls for granulated, and this works fine, though caster dissolves more quickly. But, if you’re after that sunshine-yellow colour, avoid the mistake I made – golden caster sugar will give you a murky-golden result, so white is preferable here.

Stella Parks’ lemon curd.
Stella Parks’ lemon curd. Photograph: Felicity Cloake for the Guardian

The lemon

During testing, the overwhelming preference is for the sharper curds of Newton and Parks: lemon curd, one guinea pig tells me, “should wake you up in the morning”. If you prefer to be eased more gently into the day, however, then feel free to reduce the amount in my recipe.

Not all the recipes I try include the zest, and some recipes recommend sieving it out before bottling the curd (a tedious process given how thick the curd is at that point – I only bother if I think some of the egg may have cooked). We think the odd fleck of zest adds textural interest, however, and miss its bitter perfume in the recipes which leave it out altogether – to make the most of this, copy Dorie Greenspan and rub the zest into the sugar until it releases its aromatic oils.

The dairy

Most curd recipes depend on butter for their characteristic richness of flavour. Parks, however, prefers “doing it the 19th-century way, using nothing but lemon juice, egg yolks and sugar” (though this must be the 19th-century American way, because most Victorian recipes I find are pretty heavy on the butter). It certainly gives her curd an almost shockingly keen acidity and a slightly jellied, rather than creamy, texture that divides testers; I love the flavour, but it’s not a classic curd as we know it. Worth a try, however, particularly if you prefer to avoid dairy.

Prince, interestingly, swaps the butter for double cream, which she says makes “the result a little lighter”. It is indeed very light, though, as cream is sweeter than butter, it blunts the sharpness of the lemon; perfect for sandwiching cakes together with but a bit mild for those chasing an acid trip.

Butter, we conclude, is an essential element of the flavour and texture of the more traditional lemon curd, yet recipes differ on the best time to add it. Newton starts with melted butter, Klivans beats it together with the sugar then adds the eggs, almost as if she’s making a cake, and both Keller and Greenspan beat it in at the end, once the mixture has slightly cooled. Greenspan (who credits the great patissier Pierre Herme for her recipe) writes that, by adding the butter to the mixture at a lower temperature, “instead of melting as it does in curd, the butter emulsifies (just as oil does in mayonnaise), so that the resulting texture is velvety and deceptively light. It is a stroke of culinary magic.”

It’s true that it is hard to avoid a certain subtle graininess in the simpler curd recipes which heat all the ingredients together – possibly because of the fact that, according to a poster on the food site egullet, “the lactose matrix is broken when heated too high” (any thoughts of this from more scientifically minded readers very welcome). Certainly, Greenspan’s “lemon cream” is the smoothest of all, which is more than enough evidence for me.

LM Anstey’s lemon curd.
LM Anstey’s lemon curd. Photograph: Felicity Cloake for the Guardian

The details

I try a very old recipe from one Miss LM Anstey, included in Florence White’s 1932 collection Good Things in England. She writes that, though it was passed down to her by her mother, who was born in 1819, “it is possibly much older than my mother’s dates and may have come from my grandmother”. Quite different from modern versions, it beats sugar, ground rice, grated zest and lemon juice and eggs into creamed butter, and then pots it, no cooking required, though I wish I’d used my common sense and added the eggs more gradually, as this may have stopped it curdling. Anstey recommends it as a filling for a lemon cheesecake (traditionally British cheesecakes contained no actual cheese), and perhaps it would be better for this than as a spread, because it reminds us of a slightly powdery brandy butter, but without the booze.

Prince makes her curd in a shallow frying pan, which I find rather nerve-wracking (overheat the mixture and you’ll end up with scrambled eggs), though I don’t think it’s necessary to mollycoddle it with a bain marie as Greenspan suggests – a medium heavy-based saucepan and a low heat does the trick. Nigel Slater sensible advises that, while “most lemon curd recipes instruct you to stir the mixture with a wooden spoon … I find that stirring lightly with a whisk introduces just a little more lightness into the curd, making it slightly less solid and more wobbly.” It’s also easier to get into the edge of the pan.

Keller adds gelatine to his mixture, which may well be helpful in a patisserie context (he uses it to fill macarons, amongst other things) but serves no purpose if you’re using it to spread on toast. It also, of course, means that the curd isn’t vegetarian – and this is something everyone deserves to enjoy (on which note, has anyone come up with a vegan version?)

Perfect lemon curd

(Makes 400ml)
5 unwaxed lemons
225g white sugar
6 eggs (3 whole eggs and 3 yolks)
Pinch of salt
100g butter, cubed

Zest three of the lemons into a bowl with the sugar and rub together with your fingertips to release the oils, then squeeze enough of them to give 225ml juice.

Whisk the eggs into the sugar followed by the lemon juice, a little at a time, until fully incorporated.

Put in a heavy-based pan over a low heat and stir continuously with a rubber whisk or wooden spoon until as thick as Bird’s custard which should take about 7-8 minutes. Whisk in the salt and pour into a food processor or blender if you have one. Cool for five minutes.

Start the motor and blend on a low speed for 30 seconds (alternatively, beat with a wooden spoon), then start dropping in the butter, a little at a time, still with the motor on, until smooth. Transfer to sterilised jars.

Are you a lemon curd fan, and, if so, what do you like to do with it apart from slathering it on toast? (Or eating it straight from the jar?) Which other fruit curds would you recommend – and does anyone have a vegan version?

Rachel Roddy’s recipe for pasta with broccoli and sausage

A cold snap in Rome has given the broccoli frostbite, but it’s still perfect for the pot. Tossed into some pasta with sausage meat, chilli and wine, it makes a savoury bowlful that’s certain to please

Brocco means “shoot” or “small protuberance”, and broccoli is the diminutive plural: little shoots. A member of the large and botanically puzzling brassica family, broccoli – like cauliflower – is a sort of cabbage that has started to flower, but then stopped growing while still in bud. These buds cluster together, in multiple fractal heads in the case of romanesco, which makes this extraordinary green vegetable sound even more like a band from the 1980s. As the name suggests, broccoli was developed in Italy, during the Roman Empire, and introduced to other European countries in the early 1700s. In her Vegetable book, Jane Grigson suggests it was a garden designer called Stephen Switzer who did most to popularise broccoli in England. He also ran a seed business for which he had a pamphlet printed to advise customers how to grow and cook “foreign kitchen vegetables” such as fennel, cardoons, celeriac and “sprout colli-flower” (broccoli). The best broccoli seeds, he noted, came from the coast of Naples and other Italian places.

Now is the season for broccoli: the familiar dark-green, tree-like Sicilian or Calabrese variety, lime-green fractal romanesco, and sprouting broccoletti, which are actually turnip tops. Or, rather, it was the time for broccoli, up until the moment Rome and other Italian places were struck by uncharacteristic frost. Overnight temperatures dropped, the cascading water in Bernini’s fountain turned to icicles, my neighbour downstairs pulled out her moon-boots and, near the sea-coast of Naples, my vegetable man Filippo’s land was besieged by frost. On Wednesday morning, his stall was like a jigsaw with half its pieces missing. “Guarda,” he said, pinching his cigarette between his lips and telling me to look as he picked up a stem of broccoli, the tip of its fleshy stem frozen to translucent. He was lucky, having some crops semi-buried and others shaded by trees, he still had produce to bring to Testaccio market. Others were not so lucky. A few miles outside Rome, my friend Carla Tomasi and her now quietly famous garden were similarly stuck, artichokes with their great plumes of silvery leaves, fennel and brassicas all frozen until crisp, the ice forever changing their structure. “I could weep,” she wrote in a message, but then finished by saying: “at least I have lemons.”

I took some of Filippo’s frostbitten broccoli, a vegetable I never tire of. More often than not, I cook broccoli twice, first in boiling water, then again – rippassati – in garlic and chilli-scented olive oil. Broccoli cooked in this lively and delicious way is good eaten as a vegetable side dish, topped with an egg, or stirred through pasta, in which case an anchovy or two makes a good addition to the olive oil.

I have written about pasta e broccoli before, and it remains one of my most trusted and dependable dishes – (almost) everyone likes it. Today’s recipe is a variation, one that would have pleased my one-time flatmate, whose answer to every savoury culinary dilemma was “put a sausage and a glass of wine in it”. He took this to an extreme, but it is actually a good bit of advice – many stews, ragus, sauces and people benefit from a crumbled sausage and glass of wine.

For pasta, broccoli and sausages, it is important you cook the broccoli until tender – possibly overcooked by some people’s standards – the reason being that you want it to transform from bouncy and resistant to tender and silky, the buds soft enough to collapse into the oil and create a sort of sauce. The food writer Laurie Colwin’s advice is appropriate here: the broccoli “should give, not fight back”.

Having boiled the broccoli and lifted it from the pan with a slotted spoon – keeping the green-tinted water for the pasta – you fry some garlic and chilli gently in lots of extra virgin olive oil. Alternatively, you could use guanciale (cheek bacon), which is how they do it in the Apennines – where they really do have reason to get out their moon boots. Once the garlic is fragrant, you add the sausage meat, then the wine, which will whoosh and sizzle away, before adding the broccoli, then the cooked pasta. The plentiful olive oil, wine and cooking water clinging to the pasta, and the soft edges of the broccoli and cheese, means that everything should come together into a creamy, unified whole, just the thing for a straightforward weeknight meal during these icy, fountain-freezing days.

Pasta con broccoli e salsicce (pasta with broccoli and sausage)

Serves 4
A large head of broccoli (around 1kg), trimmed and cut into florets
6 tbsp extra virgin olive oil or 60g guanciale
A small red chilli, or a pinch of red chilli flakes
2 garlic cloves
150-200g sausage meat, or sausages squeezed from their casings
100ml red or white wine
500g short pasta (orecchiette, cavatelli, fusilli or penne)
40g pecorino or parmesan, grated
Salt

1 Bring a large pan of water to the boil, add salt, stir and then add the broccoli and cook until tender. Lift the florets from the water with a slotted spoon and set aside. Keep the cooking water for the pasta.

2 In a large frying pan, warm the olive oil or guanciale over a medium-low flame and gently fry the chilli and garlic – peeled and crushed for a mild flavour, chopped for stronger flavour – until fragrant. At this point, you can discard the garlic if you want.

3 Crumble the sausage meat into the pan and stir until the meat is brown all over. Add the wine, raise the heat and let the pan bubble for few minutes until the wine has evaporated away. Add the cooked broccoli and stir.

4 Meanwhile, bring the water back to the boil, add the pasta and cook until al dente. Using a slotted spoon, lift the cooked pasta, and the residual water that clings to it, into the frying pan. Add the cheese and stir again, then serve, passing round more grated cheese for those who want it.

  • Rachel Roddy is a food writer based in Rome, the author of Five Quarters: Recipes and Notes from a Kitchen in Rome (Saltyard) and winner of the André Simon food book award.

This article was corrected on 17 January 2017: the correct name for the recipe is pasta con broccoli e salsicce, not ‘solstice ‘as an eagle-eyed reader pointed out.

How to cook the perfect mulligatawny

It’s a relic of the Raj and sits ignored on many Indian restaurant menus, yet the soup is one of the great gastronomic hybrids. So what’s the best way to get east to meet west?

Mulligatawny is a cornerstone of the classic British Indian restaurant repertoire, always there, yet never ordered. Like kedgeree and mango chutney, it is part of the culinary legacy of the Raj – an Indian dish adapted to suit colonial tastes, in this case a thin, spicy Madrassi broth known as molo tunny, or “pepper water”, intended to be served with rice. Unfamiliar with this soup thing their masters seemed to require with every meal, Indian cooks served the nearest thing to it that they knew, bulking it out with meat and vegetables to suit the extravagant tastes of the British.

According to Lizzie Collingham’s excellent Curry: A Tale of Cooks and Conquerors, “mulligatawny soup was one of the earliest dishes to emerge from the new hybrid cuisine which the British developed in India, combining British concepts of how food should be presented … and Indian recipes”. Madhur Jaffrey describes it as “a classic of the mixed-race, Anglo-Indian community in India” and “an essential part of my childhood”, while Colonel Arthur Robert Kenney-Herbert, author of the 1878 recipe collection, Culinary Jottings for Madras, recommends it as a “really excellent, and at times, most invigorating soup”. Mulligatawny doesn’t deserve to be hidden away at the top of the menu, outshone by samosas and seekh kebabs. Made with care, this unapologetically old-fashioned, gently spiced fusion classic is, as Jaffrey puts it, “really a curry, a meal in itself”.

Wyvern’s mulligatawny
Historically accurate: Wyvern’s ‘mulligatunny’ recipe dates from 1878. Photograph: Felicity Cloake for the Guardian

The meat

Kenney-Herbert, who wrote under the pen name Wyvern, notes that “a very excellent muligatunny [sic] can be made without any assistance from flesh or fowl”, but that generally, as Jaffrey puts it in her Ultimate Curry Bible, “even though there are some recipes for vegetarian mulligatawny in old cookbooks, most often they are made with mutton or poultry”. Rick Stein uses a tiny amount of chicken thigh in the version in his book India: In search of the perfect curry and Jaffrey suggests either chicken or boneless lamb, while Atul Kochhar adds meat in the form of a lamb stock in the recipe collected in Paul Gayler’s Great Homemade Soups, and Julie Sahni’s mulligatawny in Lindsey Bareham’s A Celebration of Soup deploys rich chicken stock.

Atul Kocchar
Atul Kocchar uses lamb stock for his mulligatawny, but it may be too meaty for some. Photograph: Felicity Cloake for the Guardian

From the seven pages given over to the subject by Wyvern, it seems that, traditionally, mulligatawny would have contained “the choicest pieces” of the meat used to make the stock base, and indeed, chicken in particular works well (the breast or neck of mutton or lamb he also suggests take rather longer to cook). Experiments with his vegetarian recipe prove interesting both in terms of flavour and the method he suggests of preparing the consommé base. After frying carrots, onions and celery in a good deal of butter, they are boiled with pepper and peas for three hours to produce a thick mush which proves a robustly flavoured base for his soup. Vegetarians might be interested to try it as an alternative to a more modern vegetable stock.

While preparing a chicken stock from scratch seems likely to discourage most from making this particular soup, said stock does make for a more richly flavoured base than plain water – Kochhar’s lamb does not prove popular (“too lamby” apparently). Substitute a good vegetable alternative if you’d prefer.

Madhur Jaffrey’s mulligatawny
Madhur Jaffrey’s mulligatawny eschews vegetables. Photograph: Felicity Cloake for the Guardian

The vegetables

Jaffrey eschews vegetables, but most recipes start with the traditional European trinity of onion, carrot and celery, with Sahni also adding parsnips and mushrooms, and Stein going for leeks and tomatoes. Though not traditional Indian vegetables, the parsnips and leeks give the soups they grace a pleasant sweetness which means I will need to add less sugary chutney, which can only be a good thing. If you can’t get hold of them, substitute more carrot, or indeed any similar sweet root vegetable instead. Kochhar also throws in granny smith apples for sharpness, but lemon juice seems a simpler option.

Only Stein’s soup contains whole pieces of vegetable in the finished dish, but having already decided to have a little meat in there, I would like to retain a few chunks for balance.

Julie Sahni
Julie Sahni keeps the spicing basic. Photograph: Felicity Cloake for the Guardian

Herbs and spices

Most recipes I try, with the exception of Wyvern’s (no garlic please, we’re British), are flavoured with root ginger and garlic, both of which seem like a must for a well-rounded soup. Sahni and Stein add fresh coriander, which I would prefer to save for the garnish, and Stein mint and, like Kochhar, curry leaves, which are annoyingly hard to get hold of in Britain (and, no doubt, would have been even harder in mulligatawny’s heyday).

My feeling, however, is that this should be a fairly simple recipe, in obedience to its origins; Wyvern calls only for “mulligatunny paste” or curry powder (“Barrie’s ‘Madras’ if possible” – it’s not these days, sadly), and Sahni keeps the spicing similarly basic, adding just black pepper, while Kochhar favours dried red chillies. Jaffrey and Stein employ more complex mixtures, with the latter making a paste from bay leaves, cloves, cinnamon, turmeric, coriander, black pepper and cumin, but I am going to stick with Madras curry powder, which already contains a fair number of those spices, plus some cayenne to add a little heat to proceedings.

Sweet and sour

Wyvern is very keen on the importance of a “pleasant sub-acid” to a mulligatawny, by which he seems to mean a combination of mango chutney, redcurrant jelly and lime juice, and Jaffrey and Kochhar both add lemon juice – whether or not you feel that your soup would benefit from a little more sweetness in the form of chutney, a touch of acidity is rarely unwelcome.

Rick Stein
Rick Stein uses flour to thicken his soup, but others use masoor dal. Photograph: Felicity Cloake for the Guardian

The thickener

Wyvern, Stein and Sahni all thicken their soups with flour, Jaffrey whisks in a mixture of ground almonds and chickpea flour, and Kochhar uses masoor dal, which gives his mulligatawny a heartiness the others lack, though I’m not going to bother sieving it, as my testers prefer a more rustic consistency.

Finishing touches

Almond milk may seem like a very 21st-century phenomenon, but Wyvern believes a homemade version, produced by soaking flaked almonds in milk and then pounding them until smooth, is vital to a good mulligatawny, though he concedes “cocoanut milk” may be substituted. Kochhar and Stein both prefer the latter, and Sahni rounds things off with double cream, which, like Wyvern’s optional egg yolks, is pronounced too rich by the testers. My testers come down in favour of the more subtle sweetness of the almonds, but feel free to use the same amount of coconut milk if you’d prefer.

Serve with flatbreads, or rice, and a heap of coriander to brighten things up – like most of the most delicious foods, mulligatawny is unapologetically brown.

Felicity Cloake’s perfect mulligatawny
Felicity Cloake’s perfect mulligatawny – with corriander and a citrus twist. Photograph: Felicity Cloake for the Guardian

(Serves 4-6)

2 tbsp ghee or coconut oil
1 onion, finely sliced
1 carrot, diced
1 parsnip, diced
1 celery stick, diced
4 garlic cloves, crushed
2 tbsp finely grated fresh ginger
2
½ tsp Madras curry powder
½ tsp cayenne pepper
1.5l good-quality chicken stock (or vegetable if preferred)
1 boneless, skinless chicken thigh (optional)
150g masoor dal (split orange lentils)
4 tbsp flaked almonds
100ml hot milk or water
1 tbsp lemon juice
1-2 tbsp mango chutney (optional)
Small bunch of coriander, roughly chopped, to serve

Heat the fat in a medium saucepan over a medium heat and add the onion. Cook for about five minutes until soft and golden, then add the carrot, parsnip and celery and cook for another five minutes then scoop out a spoonful and set aside.

Add the garlic and ginger and cook for a minute or so, then add the curry powder and cayenne pepper and stir for a minute. Pour in the stock, add the chicken and dal, bring to the boil, then turn down the heat, cover and simmer for 35 minutes. Meanwhile, soak the almonds in the hot milk or water.

Remove the chicken from the pan. Blitz the soup with a hand blender until smooth, then whizz the almonds to a puree and whisk them into the soup. Add lemon juice and salt to taste, then stir in the chutney to taste if you would prefer it sweeter. Pull apart the chicken into strands and stir into the soup along with the reserved vegetables.

Divide between bowls and garnish with coriander.

Mulligatawny: a recipe that deserves relegating along with the Raj, or one of the few good things to have come out of Britain’s colonial past? Are you one of the few people keeping it on Indian restaurant menus – and which other Anglo-Indian favourites would you recommend to other readers?