Our social:

Latest Post

Sunday, February 19, 2017

How to make the perfect fondue

The Swiss cheese fantasia can still melt hearts on Valentine’s Day – but which cheeses make the winning pot? Which wine do you need to cut through the fat? And how do you stop it – and your date – from splitting?

For a small nation, the Swiss have made some pretty big contributions to world culture: muesli, Velcro, the Red Cross … and, perhaps the crowning achievement of this ancient federal republic, the fondue. Originally conceived as a cunning way to turn old ends of cheese and stale bread into a meal (you don’t get that rich by accident), it went global in the 60s, in part, according to author David Sax, “because of the advent of the pill and swinging. Fondue cannot be enjoyed solo.”

Worries about cholesterol, rather than STDs, saw our beloved burner sets stashed in the attic, but believe me, you can still melt a few hearts with a bit of stringy cheese. And for those of us without £42 to spend on a pot at one of Roger Moore’s favourite Alpine restaurants this Valentine’s Day, it’s easy to recreate the magic at home – because nothing says romance like waking up in the middle of the night with heartburn, right?

Cheese at the ready.
Cheese at the ready. Photograph: Felicity Cloake for the Guardian

The cheese

The Swiss are an eminently sensible people. They do not hold with dunking marshmallows in bowls of liquid chocolate, and neither do I. Call it PTSD after one too many bad hen dos if you will, but the idea repulses me. This article will thus be concerned entirely with the original, and only true fondue: the cheese variety.

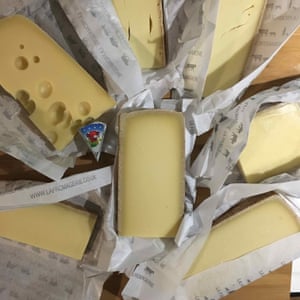
Which cheese, however, is contentious. As the culinary chemist Hervé This explains: “Connoisseurs of fondue know that the success of the dish has to do particularly with proper cheese selection.” Flavour is important, of course, but the age of the cheese will affect how readily it melts. “Well-ripened cheese are best suited to the preparation of fondues because, in the course of ageing, enzymes called peptidases have broken up the casein and the other proteins into small fragments that are more readily dispersed in the water solution.”

The most common version, which originates in the cantons of Vaud and Fribourg –although it’s now found throughout Switzerland – is known as a moitié-moitié, or half and half. It’s made up of almost equal parts gruyère and a local creamy cheese by the name of freiburger vacherin, which according to Swiss resident Makiko Itoh, of the blog Just Hungry, “has a full, distinctive flavour and does not make the sauce stringy”.

Makiko Itoh’s fondue makes use of La Vache Qui Rit.
Makiko Itoh’s fondue makes use of La Vache Qui Rit. Photograph: Felicity Cloake for the Guardian

Indeed, combination-cheese fondues are more common than single-variety: the Valaisan fondue, on the extremely comprehensive Cheeses from Switzerland site calls for raclette and emmental; both cheeses melt extremely well, but lack the savoury, umami notes of gruyère, which is the mainstay of other recipes. The master cheesemonger Pierre Gay calls for a veritable Alpine cheeseboard for his recipe: “Comte as a base, l’etivaz for horse power, beaufort to bind and add richness, and abondance for its characteristic gentian flavour,” while Patricia Michelson of London’s La Fromagerie recommends emmental for its “lovely nutty flavour”, beaufort alpage for its “floral richness” and a well-aged rich, caramel-sweet comte d’estive. Gay’s fondue, which lacks a more supple cheese of the emmental variety, is intensely flavoured, but easily split by the novice fonduer (ie me), so I would recommend making life easier by including something more amenable to melting, such as emmental or freiburger vacherin in the mix.

Itoh’s Swiss mother-in-law had a secret ingredient up her dirndl sleeve: “One block of the spreadable cheese that comes wrapped in foil triangles in a round cardboard box (eg Laughing Cow). The otherwise icky cheese helps all the cheeses melt together and stay together coherently.” Michelson would not approve, given her firm opinion on the importance of quality cheese: “If you are using Alpine cheeses that have a bit of age on them and are lovely raw milk ones,” she writes, “then you have no problem with the flavours and richness coming through. It is only when you skimp on the quality of the cheese that when cooking or melting you will not get the best results.” Yet, thinking along similar lines, she also adds a creamy cheese to her fondue – reblochon may not come in neat little triangles adorned with a jovial cow, but it is indeed rich and wonderfully creamy and it gives her fondue a quite superb consistency.

Her optional extra, blue cheese (for a “a toasty sharp edge”), is less universally popular, however. Testers are split: some feel it simply gives it a shot of savoury flavour, others that it takes over and changes the entire character of the dish. My problem is that for some reason it splits in the pot, too. Perhaps it was too cold when I added it (Michelson recommends the cheese should all be at room temperature), but I’m not risking it again.

Pierre Gay uses a veritable Alpine cheeseboard in his fondue.
Pierre Gay uses a veritable Alpine cheeseboard in his fondue. Photograph: Felicity Cloake for the Guardian

If you’re not lucky enough to live in the vicinity of a great cheesemonger, then many of these Alpine cheeses will elude you. However, I would recommend going with Michelson’s advice: concentrate on quality. Combine one good melting cheese, such as freiburger vacherin (not to be confused with the French vacherin mont d’or) or emmental for texture, with the best member of the gruyère family you can find, whether that be Swiss gruyère or its French relatives beaufort and comté, for flavour, and then add a chunk of creamy reblochon (or raclette, or even taleggio) just before serving to get the perfect texture and flavour.

The acid test

The other vital ingredient in fondue is wine. Preferably a high-acid Swiss or Savoyarde white of the kind kindly described as “rustic” – not for spurious reasons of authenticity, but because, as This writes in his book Molecular Gastronomy: “Wines that are excessively acidic and, if possible, very fruity … have high concentrations of tartaric, magic and citric acids. Malate, tartrate, and especially citrate ions are very good at chelating (or sequestering) calcium ions. The acidic and fruity wines experts prefer help separate the casein micelles and release their constituent proteins, which stabilise the emulsion by coating the fatty droplets.” In other words, the more acid the wine, the less danger there is of your fondue splitting.

Such wines are available in the UK, but not widely, and like so many Swiss things, they don’t tend to come cheap. I would recommend substituting something with high acidity, but not too bold a flavour – picpoul de pinet or Fiona Beckett’s suggested muscadet would be better bets than a very herbaceous sauvignon blanc or a rich chardonnay.

Saveur magazine’s fondue eschews wine for double cream.
Saveur magazine’s fondue eschews wine for double cream. Photograph: Felicity Cloake for the Guardian

The recipe Saveur magazine obtained from a Swiss cheesemaker eschews alcohol altogether in favour of double cream. In combination with l’etivaz, “a fruity, floral, raw cow’s milk cheese”, it’s so rich even I can’t disgrace myself by eating more than a few mouthfuls. Wine is definitely not an optional extra here: you need acid to balance the fat of the cheese. If you don’t drink (the less strict should note that most of the alcohol will be burned off), or you can only find less acid wines, a squeeze of lemon juice works wonders.

Some recipes call for a pinch of bicarbonate of soda, which is supposed to make the fondue lighter and thus easier to digest. I find it makes it fizz alarmingly – call me old fashioned, but fizzy cheese scares me.

To starch or not to starch

This describes stabilising the fondue with flour “or any other ingredient containing starch, such as potatoes” as a “heretical practice” – but it does considerably reduce the risk of it separating. Chef Willie Prutsch, whose fondue so impressed food writer David Lebovitz, uses it, as did Itoh’s late mother-in-law – even Michelson admits it is useful for ensuring a really smooth finish when catering for a crowd.

You don’t need it if you’re careful, but if you’re wooing a perfectionist this winter and want to cut any risk out of the equation, I would recommend adding 2 tsp to the white wine, as Prutsch does, rather than whisking it in at the end as Itoh does. (It’s also worth keeping some on hand, whisked into a little cold water, in case your fondue splits.)

Only good quality cheese in the fondue by Patricia Michelson of La Fromagerie.
Only good quality cheese in the fondue by Patricia Michelson of La Fromagerie. Photograph: Felicity Cloake for the Guardian

The extras

Traditionally, garlic is wiped around the base of the pan to give the entire dish a subtle hint of its flavour, although Prutsch adds it, finely chopped, to the mixture itself, and the recipe from the Valais cooks it with onion and tomato before adding the cheese. This, in combination with the oregano they also recommend, makes their fondue taste like low-carb pizza. As I find it easier to make the fondue in a pan and then transfer it to the fondue pot for serving, I’m going to break with custom and add garlic to the cheese itself, so it doesn’t get lost in the move, but if you keep it in the same pot, by all means do the wipe around instead.

Michelson adds nutmeg to her mixture, which works wonderfully with cheese, especially if you also go for a slug of kirsch, or morello cherry brandy (NB not the sticky pink cherry brandy; the clear kind you might have hanging around after making black forest gateau, for example). The testers argue about its merits: it adds a certain nutty sweetness that most like, but some feel, like Lebovitz, “that to be honest, as much as I love kirsch in lots of things, I preferred the fondue without it”, so it’s very much an optional extra.

Method

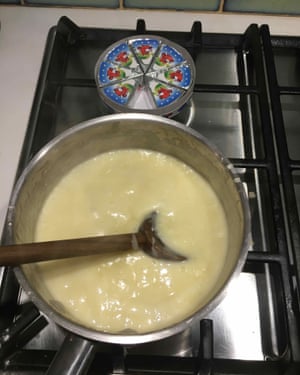
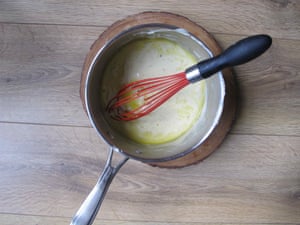
Although fondue isn’t hard to make, it can be temperamental if you don’t show it enough love and attention. Professionals, and native Swiss, may be able to chuck everything in together and end up with perfection, but Michelson’s method, stirring the cheeses in gradually, starting with the good-tempered emmental, is much safer for the rest of us. I also like to use a silicone whisk, rather than a wooden spoon for stirring, as I find it covers more ground and leads to a more successful emulsification.

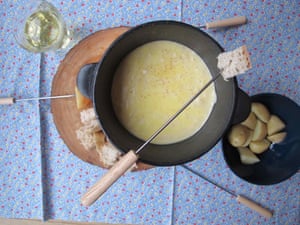
In the case of the Saveur fondue, “chunks of soft white bread are stirred right in, so it’s best eaten with spoons, rather than traditional fondue forks”, but soggy bread makes me feel queasy, especially when it gets lost at the bottom of the pot, so I prefer the more common practice of dipping your own pieces. Men who lose a piece are traditionally supposed to buy a round of drinks; women must kiss everyone at the table. Who said old-fashioned romance was dead?

Cheese fondue is usually served with cubes of bread, boiled potatoes, charcuterie and cornichons or other pickles, alongside white wine, kirsch or hot tea to lessen its leaden effect on the stomach. Milk of magnesia is an optional extra.

The perfect cheese fondue.
The perfect cheese fondue. Photograph: Felicity Cloake for the Guardian

Serves 4

300ml high-acid white wine
1 garlic clove, finely chopped
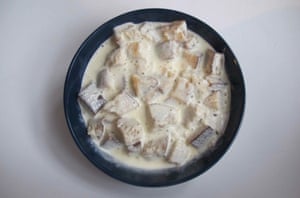
320g emmental or similar, grated
480g good quality gruy
ère, or similar, grated
¼ reblochon (about 150g), or similar, skin removed and cubed
2tsp kirsch (optional)
Nutmeg, to grate
Stale bread, cubed, to serve

Heat the wine and garlic in a deep heavy-based pan over a low heat until it begins to simmer.

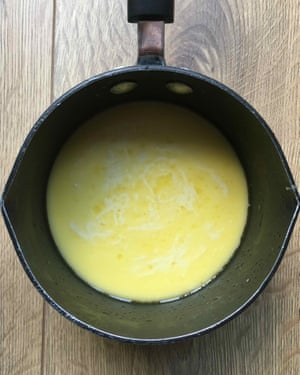
Add the emmental, a little at a time, whisking or stirring vigorously and allowing to melt before adding more. Do the same with the gruyère, followed by the reblochon, and keep stirring until smooth.

Stir in the kirsch, if using, followed by a good grating of nutmeg. Transfer to a fondue set or heatproof pan set over a tea light and tuck in immediately.

Is fondue the world’s greatest cheese dish – or does the very idea make your arteries hurt? Was its popularity in the swinging 60s really a result of the sexual revolution? And which other Swiss dishes deserve to be better known?


This article was changed on 10 February 2017. The original standfirst referred to an “unctuous pot”. That has been amended.

Ride out the crisis with homegrown veg

Blighty’s supermarkets are in crisis. Heavy rains and frost in Spain and Italy mean courgettes and iceberg lettuce are running low. The lesson? To cook with the bountiful produce of Britain’s cold climate: brassicas, roots and alliums

Rationing of any kind is always likely to make people sit up straight – the idea that we can’t buy as much of whatever we’d like causes instant consternation, even if it is iceberg lettuce. It causes some understandable confusion, too, in this case, as being only allowed three heads of the stuff prompts the question why you would ever want that many – of all the veg to pick from, iceberg has got to be up there with the least flavoursome items nature has ever come up with.

And therein lies the solution to the current supermarket vegetable shortage: the best approach to filling your fridge – and eating your fill – is to be guided by flavour. This means scouring the veg aisles for what looks most vibrant. Flavour stems from vibrancy, and locally grown, seasonal produce is always going to be where it’s at. As Jane Scotter of biodynamic farm Fern Verrow puts it: “Things only taste good when grown in the right conditions and climate. I never buy lettuce or tomatoes out of season because they just don’t taste that good.” And what is good in Blighty right now are brassicas, leeks and root veg – swede, potatoes, celeriac, beets … Spring greens are coming into their own and purple sprouting broccoli – infinitely superior in flavour, according to organic farm Riverford’s Guy Watson, to the calabrese variety that the Spanish frosts have depleted – is mere weeks away from hitting our shelves. So it’s all about making do and being creative. And we’ve got the goods for you right here.

Brassicas

First up, there are many, many salads you can make with a good cabbage. “We probably have a raw cabbage salad at least three times a week at the moment,” says Scotter. Similarly, at Spring, which Fern Verrow supplies with fresh produce, Skye Gyngell has a brassica plant in nearly every dish on the menu, not that you’d know it from the variety of shapes and flavours she has wrought from them. Kale is the primary contender: serve it massaged with pear, pine nuts and crisp pecorino, warm with nduja or raw with lemon-baked ricotta. And you can’t wrong with a good slaw – the Hemsleys’ winter one combines cabbages with carrot, celeriac, celery, shallot and radish. Of course, you can bake, roast, braise, char and smother your brassicas, too. Then there’s this.

Rachel Roddy’s cabbage and sausage cake

Rachel Roddy’s cabbage and sausage cake
Cabbage and sausage cake. Photograph: Rachel Roddy for the Guardian

This is inspired by Rowley Leigh’s recipe for chou farci, or stuffed cabbage.

Serves 4
1 large savoy cabbage
20ml olive oil
A small knob of butter, plus extra for greasing and dotting
½ tsp fennel seeds (optional)
500g lean, well-seasoned sausage meat
Salt and black pepper

1 Choose 7 of the largest, nicest outer cabbage leaves and wash them. Bring a large pan of well-salted water to the boil then blanch the leaves for 2 minutes. Use a slotted spoon to lift the leaves out, keeping the water. Rinse the leaves briefly with cold water and blot on a clean tea towel.

2 Cut the rest of the cabbage into quarters and bring the water back to the boil. Cook the cabbage until the leaves are tender, but the stem still firm – about 5 minutes. Drain the cabbage and, once cool enough, squeeze out any excess water. Cut away the stem, chop the leaves roughly, put in a bowl and dress with the olive oil, a knob of butter, salt and pepper and some fennel seeds, if you like. Squeeze the sausage meat from the casing.

3 Butter a 20cm round ovenproof dish. Choose the nicest leaf from the 7 you saved and put it at the bottom of the dish. Now arrange the other 6 so they cover the sides of the dish, overlapping a lot and hanging over the edges.

4 Now, for the layers. Press a third of the dressed cabbage mixture into the bottom of the leaf-lined dish. Then make a layer with half the sausage meat, pressing it down firmly. Repeat the process, ending with a third layer of cabbage. Fold over the overhanging leaves and cover to make a neat parcel.

5 Dot with a little butter and bake at 180C/350F/gas mark 4 for 1 hour. When ready, let it sit for 5 minutes before inverting on to a plate carefully, as there will be hot juices. Serve with rich tomato sauce, buttery mash, or both.

Leeks

Yotam Ottolenghi serves his charred with whipped cheese and walnuts, or roasted with thyme and vermouth. Sarah Britton simmers hers with chickpeas in broth and tops them with dill, lemon zest and feta, while Claire Mazer’s leek and sage croustade is an excellent example of how baking them with butter and cheese can make something superlative. And, of course, you can use them raw.

Fergus Henderson’s butter bean, leek and cauliflower salad

Fergus Henderson
Butter bean, leek and cauliflower salad. Photograph: Yuli for the Guardian

Unusually for a salad, this enjoys sitting, getting to know its dressing. It is inspired by my friend Ellen Hooberman – a master of the caper, garlic and chopped parsley.

Serves 4-6
2 handfuls of dried butter beans
2 heads of garlic
1 cauliflower, taken apart into challenging bite-size florets
4 leeks, sliced across at 5mm intervals
A bunch of curly parsley, finely chopped
A handful of extra-fine capers

For the dressing
300ml extra virgin olive oil
Juice of 1 juicy or 2 not-so juicy lemons
6 garlic cloves, peeled and well crushed
Salt and black pepper

1 Soak the butter beans overnight in cold water, then drain and cook in clean water with the heads of garlic –this can take 2-3 hours.

2 Whisk all the dressing ingredients together and season to taste.

3 Dress the cauliflower and butter beans liberally. Toss then leave overnight.

4 When it’s time to serve, just tease the leeks for a moment in some boiling salted water. The warmth of the leek, added to the cauliflower and butter beans, should awaken the slumbering salad. Once awake, it may need some more dressing. Add the chopped parsley and the capers. Toss vigorously, being careful not to crush the butter beans, then serve.

The Complete Nose to Tail by Fergus Henderson and Justin Piers Gellatly (Bloomsbury)

Root veg

Gill Meller roasts his midwinter celeriac with chilli and thyme, or fashions it into a dauphinoise with garlic, anchovies, rosemary and grated parmesan; Nick Balfe makes a mean celeriac and almond risotto, and – because what’s to stop him? – a parsnip ice-cream. And the Fabulous Baker Brothers’ beetroot tarte tatin – made with freshly cooked beets, thyme and goat’s cheese – is an all-time root veg high. Oliver Rowe’s Food for All Seasons is a great reference when it comes to cooking with what’s at hand, as the below recipes demonstrate.

Oliver Rowe’s mashed swede with baked eggs

Oliver Rowe
Mashed swede with eggs. Photograph: Elena Heatherwick for the Guardian

The classic is, of course, mashed potato, but you can mash lots of root vegetables. Make sure they are still quite hot when you mash and mix them, because cold or undercooked ones may go gluey when mashed. Add herbs or spices, mustard (wholegrain is great for sausages and mash), leeks for champ, spring onions for colcannon, cabbage for bubble and squeak, chorizo, yoghurt or kefir to lighten and sharpen. Celeriac mash is also a winner, great with pork dishes; I use a potato or two in mine for consistency. And then there’s swede …

Serves 4
2 swedes
1 tsp salt
1 bay leaf
50g butter
2 tbsp chives, chopped
6 eggs
Cheddar, for grating

1 Peel and roughly chop the swedes. Put in a saucepan with plenty of water, salt and a bay leaf. Bring to the boil and cook until soft. Drain and spread out on a baking tray for a few minutes. Mash until smooth, then add the butter and chives. Check for seasoning.

2 Heat the oven to 180C/350F/gas mark 4. Spoon the mash into a baking dish in a layer about 3cm or so thick. Make 6 wells and break the eggs into them. Grate some cheddar over the top and place in the oven until the eggs have set and the cheese is golden brown.

Oliver Rowe’s chrain

Oliver Rowe’s chrain
Beetroote and horseradidh chrain. Photograph: Elena Heatherwick for the Guardian

Grate beetroot into salads and dress with a tart vinaigrette, or quick-pickle it and shove it into a cheese sandwich. One of my favourite raw beetroot recipes is one I saw in Claudia Roden’s Book of Jewish Food. Chrain is the name for several horseradish condiments, but the one I like is mixed with finely grated raw beetroot. It is served as a condiment, like mustard, all over eastern Europe.

Makes 1 pot
2 beetroot
3-5cm fresh horseradish, to taste
1 tsp sugar
2 tbsp red wine vinegar
A pinch of salt

1 Peel and finely grate the beetroot and horseradish, then combine in a bowl with all the other ingredients.

2 The flavours mingle over time, so leave it for 1 hour, then check again and adjust seasoning accordingly.

Nigel Slater’s banana and cardamom cake and papaya, persimmon and passionfruit salad recipes

People can be picky about their bananas, but ripeness doesn’t matter when it comes to this sumptuous cake…

I suppose we all have likes and dislikes – foods we eat too regularly or not at all. Take the banana. I love banana bread, banana ice cream and even banana trifle. I have had the odd drop of golden crème de banane and rate banana custard as one of the most happiness-inducing puddings on earth. And yet, you will rarely find a bunch of them in my kitchen. Or a “hand” as a group of bananas always used to be known.

I buy bananas the day I intend to use them. My perfect specimen is a good way from what most people would consider ripe – a condition in which the flavour and, yes, smell, is a mere shadow of itself. I like them under-ripe. There is something about the cloying sweetness and smell of a truly on point banana that makes me queasy. It probably dates back to returning from a four-day school trip to Ludlow and finding a squishy, mashed banana at the bottom of my duffel bag. It made a terrible mess of my socks. Which is probably why this fruit rarely makes it over the threshold.

I find people can be rather picky about them. Tastes can run the line from green, crisp and almost impossible to peel, to one virtually ebony in colour and ripe enough to pour from its charcoal skin.

Ripeness doesn’t really matter for a cake. The old idea that they should be soft and freckled with brown is a bit of a myth really. During testing we used all manner of them and none of them gave a better flavour than the other. This cake differs from the usual in that it is light, and most definitely banana cake, not banana bread. It is crucial that you don’t mash the fruit too much, or mix it into the cake mixture too thoroughly. Do that and you’ll make a bouncy cake.

We ate our slices of cake not with cream or crème fraîche, despite the fruit’s affinity to dairy produce, but with a golden salad. Slices of ripe papaya in a marinade of passionfruit and orange juice. Dazzling.

Banana cardamom cake

Serves 9
bananas 375g (peeled weight)
lemon juice 1 tbsp
plain flour 200g
baking powder 2 tsp
salt a pinch
golden caster sugar 90g
light muscovado sugar 90g
eggs 2
groundnut or vegetable oil 4 tbsp
To finish:
cardamom pods 10
caster sugar 2 tbsp

Set the oven at 170C/gas mark 4-5. Line a square cake tin, 20cm x 20cm, with baking parchment.

Break the bananas into short chunks then put them in a bowl and mash them roughly with a fork. Avoid the temptation to turn them into a purée. Stir the lemon juice into the mashed banana.

Sieve together the flour, baking powder and salt. Break open the green cardamom pods, remove the dark brown seeds inside then crush them to a fine powder using a pestle and mortar. Mix them with the 2 tbsp of caster sugar and set aside for later.

Put the 90g of muscovado and 90g of caster sugar into the bowl of an electric mixer. Break the eggs into the sugar then beat, using the whisk attachment, for 3 or 4 minutes until light and creamy. Pour in the oil, slowly, with the mixer on a moderate speed.

Fold the flour and baking powder into the mixture with a large metal spoon or by changing the whisk attachment to a flat, paddle beater. Fold in the crushed bananas, briefly, and taking care to distribute the bananas evenly but without crushing them any further.

Transfer the mixture to the prepared cake tin, using a rubber spatula. Scatter the surface of the cake mixture with the sugar and cardamom mixture. Bake it in the preheated oven for 35 minutes or until it is lightly firm on top. Remove from the oven and leave to settle, in its tin, for about 20 minutes.

Lift the cake from its tin, then place it on a cooling rack and leave to cool. Cut the cake into 3 equal rectangles, then cut those into 3 to give 9 small pieces. Carefully peel off the paper and place the cake on a serving plate.

Serve with the tropical salad below.

Papaya, persimmon and passionfruit salad

Feel the passion: papaya, persimmon and passionfruit salad.
Peel the passion: papaya, persimmon and passionfruit salad. Photograph: Jonathan Lovekin for the Observer

I have always used lime juice to illuminate the subtle flavour of papaya. But I have found something else. The juice of passionfruit, especially the ripe, wrinkled ones, does the job better.

Serves 4, or 9 as an accompaniment
passionfruit 6
orange 1, small
cardamom pods 4
persimmon 1
papaya 2

Slice the passionfruit in half then squeeze their juice and seedy flesh into a small sieve over a bowl. Press the juice and pulp through the sieve with the back of a teaspoon, then discard the seeds. Cut the orange in half and squeeze its juice into the bowl of passionfruit juice.

Crack open the cardamom pods with a heavy weight, such as a mortar or rolling pin, then drop them, whole, into the juice. Cover and place in the refrigerator.

Slice the persimmon thinly, then add to the passionfruit juice.

Slice the papayas in half, scrape out the seeds with a teaspoon and discard them, then remove the yellow skin from each papaya half using a vegetable peeler. Slice the papaya into thick pieces, about the width of a pencil. Mix the papaya pieces with the persimmon and passionfruit juice, tossing the fruits tenderly together.

Cover and leave for a couple of hours, or overnight, in the fridge.

Remove the cardamom pods – they have done their work – then divide the fruit between 4 small bowls; or serve them with slices of the banana cake.

Email Nigel at nigel.slater@observer.co.uk or follow him on Twitter @NigelSlater

How to make the perfect vegetable biryani

This Indian classic stands or falls on the quality of the rice. Once you’ve got that, there’s a wealth of options for your vegetables, spices, cooking method and even garnish. But can you really have a biryani without meat?

Biryani, the Indian rice dish, is, like so many classics, disputed territory. Traditionally credited to the Mughal court that ruled over much of modern-day India from the 16th century until the British Raj, its popularity in the southern states has given some credence to the idea that it was brought there by Arab traders. Whatever the truth, the dish is now popular nationwide, and the two most famous iterations come from Lucknow, in the north-west, often said to be more delicate, and Hyderabad, further south, which trades in spicier fare. Neither, it must be admitted, specialise in vegetable biryani; mutton is the most common variety, although chicken is also popular – Rajyasree Sen, writing in the Wall Street Journal, cautions visitors not to be “fooled by people who pass off vegetable pulao as biryani. There’s no such thing. It’s as much an oxymoron as chicken steak.” Yet vegetable biryani certainly is a thing among India’s 500 million vegetarians – and if Madhur Jaffrey says it’s a thing, it’s a thing, OK? But … how do you make it?

Soaked rice in Meera Sodha’s biryani.
Soaked rice in Meera Sodha’s biryani. Photograph: Felicity Cloake for the Guardian

The rice

Whether veg or non-veg, a biryani is first and foremost a rice dish that stands or falls on the fluffiness of its rice: every grain should be separate and perfectly cooked. Shabnam Minwalla recommends a simple quality control procedure: “When you’re confronted with a plateful of biryani, toss some on the floor and examine the grains. If even two grains stick together, your biryani has failed the test.”

Soaking, as recommended by Meera Sodha’s Fresh India, and Monir Mohammed and Martin Gray’s Mother India, as well as Dishoom, helps to soften the rice, which means water can penetrate it more easily during cooking, while rinsing it washes off some of the sticky surface starch.

The rice requires some cooking before the biryani is assembled, although cook it completely, as the recipe in Hugh Fearnley-Whittingstall’s River Cottage Veg recommends, and it will be overdone in the finished dish. Leaving it al dente, as Sodha and Dishoom suggest, is a far better idea. In general, I favour the absorption method for the fluffiest rice, but in this case simple boiling is fine as long as you drain it well, as it will fluff up in the oven.

Frying the rice with a masala paste, as Kaushy Patel does in her book Prashad, leaves it a little oily for the panel’s liking, and testers fail to pick up the flavour of the spice-infused water that Mohammed’s rice has been simmered in. Simply popping in a couple of aromatics, such as bay and my own favourite, cardamom pods, will impart a subtle fragrance with less effort.

Mother India suggests cooking the rice in a yoghurt sauce.
Mother India suggests cooking the rice in a yoghurt sauce. Photograph: Felicity Cloake for The Guardian

The vegetables

The choice of vegetables is largely up to you and what you have available. I try recipes using potatoes, sweet potatoes, beetroot (highly recommended: Sodha’s recipe is a visual knock-out), carrot, cauliflower, peppers, peas, tomatoes and mushrooms, but although I would recommend aiming for a good mix of texture and flavour, they all work. My testers find the potatoes a bit bland, and complain that the long cooking time has left the peas looking a bit like they have come out of a tin (fusspots), so I’ve chosen cauliflower for textural interest, squash for sweetness and green beans for crunch and colour. Feel free to make substitutions according to season and taste.

Dishoom offers a more exotic possibility in the form of jackfruit, widely used in Indian cooking, and increasingly used in vegetarian dishes over here for its meaty texture. It can be found fresh in Oriental and Asian grocers (make sure you get the green, unripe type), or bought tinned online, and makes a great addition to the biryani if you would like it to be more substantial. I haven’t included it in the recipe below simply because it’s less easy to get hold of in this country than, say, a cauliflower, but if you do find it, I would highly recommend giving it a try.

Sodha bakes her vegetables before adding them to the biryani, which concentrates the flavour beautifully, and Prashad deep-fries them all (yes, even the peppers) but testers prefer those, such as the Mother India and Dishoom versions, that are cooked in a yoghurt sauce, giving them a more curry-like consistency. According to Lizzie Collingham’s (fascinating) book Curry: A Biography, marinating meat in yoghurt is a Persian technique that came to India with the Mughals, and, although vegetables have no need of its tenderising properties, they can still benefit from its tangy flavour and richness. (If you would prefer a vegan biryani, Sodha’s recipe includes a coconut milk and coriander sauce that makes an excellent replacement for the yoghurt.)

Overcooked rice in Hugh Fearnley-Whittingstall’s recipe.
Overcooked rice in Hugh Fearnley-Whittingstall’s recipe. Photograph: Felicity Cloake for The Guardian

Sodha and Fearnley-Whittingstall both use caramelised onions, which add a lovely sweetness to their dishes, but no one can resist the crispy fried onions served with the Mother India recipe, both for their intense flavour and the textural contrast they offer to the soft vegetables and fluffy rice.

Pulses and paneer

Anything with a pulse floats my boat (insert jokes below the line). Sodha’s chickpeas are great, but the chewiness of Prashad’s masoor dal is even better, although I have used chana dal because that’s what I keep for everyday use. As before, use what you have to hand, although I would steer clear of red lentils or anything else with a tendency to dissolve into mush in the pan.

Sodha puts paneer in her biryani. Cheese is always welcome, even post-fondue, and this makes an great optional extra if, as with the jackfruit, you would like to bulk the dish out a bit.

Dishoom uses butter, cream and saffron.
Dishoom uses butter, cream and saffron. Photograph: Felicity Cloake for The Guardian

Spices and aromatics

Garlic, ginger and green chillies are the holy trinity here, forming the base of every biryani I try (with the exception of the River Cottage one, which uses red chillies for reasons best known to itself). Sodha also sticks in a great big bunch of fresh coriander, which I love, both for its gorgeously aromatic flavour and the wonderfully green colour it lends her dish. If you are less enamoured, feel free to leave it out – I suspect it’s probably not traditional in any case, although I’m sure someone will be able to confirm or deny this.

Spicewise, biryani tends to be a fairly delicate dish: sweet garam masala is common, along with a little turmeric for colour, cumin and a bit of chilli powder. Fearnley-Whittinstall adds ground coriander and cinnamon, but I’m going to keep it fairly simple. However, I do like the saffron used in both his and the Dishoom recipe, which makes the dish feel gratifyingly regal, as well as taste wonderful. Dishoom infuses butter and cream with it and then pours it over the top of the rice before cooking, which adds an extra touch of decadence, although I think in a non-restaurant context, milk will do the same job just fine.

Sodha, Dishoom and Fearnley-Whittingstall all season their curries with citrus juice, which, in Dishoom’s case, accentuates the tangy flavour of the yoghurt in a very pleasing manner.

Kaushy Patel deep-fries all her vegetables.
Kaushy Patel deep-fries all her vegetables. Photograph: Felicity Cloake for The Guardian

Baking and serving

Although it’s perfectly possible to make a great biryani on the stove, as the Prashad recipe proves, it’s easier for the amateur to get good results in the oven, where the heat will be distributed more evenly, reducing the risk of the base layer sticking. The cooking vessel should be tightly sealed to prevent the escape of the steam that’s essential for fluffing up the rice in the proper fashion. Some recipes do this by wrapping the dish in foil, but it’s just as easy to seal it with pastry, as Dishoom recommends, and it looks somewhat more dramatic when cracked open at the table. (You could also go down the Sodha route and add a pastry top, especially if you don’t happen to have a lidded dish of the correct size.)

Once open, I like to scatter the biryani with flaked almonds and sultanas, as the River Cottage recipe suggests, in a nod to its Mughal heritage as well as to the fact that, with the vegetables lurking beneath, it can look a little underwhelming without a garnish. Leave them off if you have traumatic memories of sultana-studded curries of yore, but do include a few sprigs of fresh coriander or mint for colour. Serve with raita and salad.

The perfect vegetable biryani.
The perfect vegetable biryani. Photograph: Felicity Cloake for The Guardian

Serves 6

500g basmati rice
100g chana or masoor dal
2 tbsp grated ginger
4 cloves of garlic, mashed to a paste with a little salt
2 green chillies, finely sliced
2 tsp garam masala
1 tsp ground cumin
½ tsp turmeric
1 tsp chilli powder
200g whole-milk yoghurt
2 tbsp lime or lemon juice
50g fresh coriander, finely chopped (optional)
300g cauliflower, separated into florets
2 carrots, cut into 2cm chunks
300g squash, cut into small cubes
10 green beans, cut into 2cm lengths
25g butter, melted
2 tbsp milk, warmed
Generous pinch of saffron
2 cardamom pods, crushed
1 bay leaf
200g wholemeal flour
2 onions, finely sliced and dried in kitchen paper
vegetable oil, to fry
2 tbsp flaked almonds, to serve
1 tbsp sultanas, to serve
Few sprigs of coriander or mint, to serve

Soak the rice in water for 45 minutes, then drain and rinse until the water runs clear. Meanwhile, put the dal in a large pan of water and bring to the boil, skim and then turn down the heat and simmer for about 30 minutes or until just tender, then drain.

While the lentils are cooking, mix the ginger, garlic, chillies and dry spices together with the yoghurt, lemon juice and chopped coriander and season well. Whizz with a hand blender or in a food processor if you have one, then toss with the vegetables. Leave to marinate. Mix together the melted butter, milk and saffron.

Drain the rice and cook in a pan of boiling, salted water with the cardamom and bay leaf for 6-8 minutes until al dente, then drain well and mix with the dal. Heat the oven to 200C/400F/gas mark 6.

Put a lidded casserole dish over a medium-low heat and cook the vegetables and their marinade (if your yoghurt is very thick, add a splash of water to make a sauce) for 5-7 minutes until starting to soften. Check the seasoning. Gently pile the rice on top and pour over the saffron-infused milk.

Mix together the flour with just enough cold water to make a dough. Line the rim of the casserole dish with it and then put the lid on top to make an airtight seal. Bake for 30 minutes.

Meanwhile, heat a deep pan a third full of oil until bubbles form around a chopstick or similar dipped in, then fry the onion in batches until golden and crisp. Drain on kitchen paper.

Serve the biryani with the crispy onions, flaked almonds, sultanas and coriander or mint scattered on top.

Biryani: the world’s greatest rice dish? Is a biryani without meat still worthy of the name? And for those of us who do eat it on occasion, which meaty recipes do you recommend trying?

Nigel Slater’s black pudding, baked apples and celeriac mustard mash recipe

Vienna’s much-loved classic ‘heaven and earth’ dish is the inspiration for a delicious winter warmer

Late last year I took a trip to Vienna. I ate well enough – simply, heartily even – choosing my daily restaurant purely by the length of its queue. The most memorable meal of all was a straightforward plate of black pudding with mashed potato and apple sauce. It was a Viennese version of the much-loved German himmel und erde, the “heaven and earth”. I have cooked it at home, both in its classic form and, more often, as a rearrangement of its ingredients.

Sometimes I slice the apples and brown them in butter rather than make them into a sauce. On another night, I will cook all three elements in the same shallow pan – a black pudding, potato and apple fry-up. I remember, too, a red apple and new potato salad with hot slices of pudding straight from the pan.

Home from Austria and on the chilliest of nights, I had a go at a heaven and earth-inspired dinner. I added celeriac to the potatoes and worked them into a creamy, mustard-freckled mash and roasted the apples whole. I kept the mash on the soft, velvety side by using a substantial amount of butter, folding the fluffy flesh from the baked apple through it with my fork as I ate.

There is precious little locally grown fruit about right now, but many varieties of pear are still in fine fettle. They poach sweetly, either in white wine or, as I prefer, in orange juice with a few sweet spices. Blood oranges are particularly good here. I poached some Comice pears this week, their cooking liquor spiced with cinnamon, a little sugar and cloves – winter scents – and made a sparkling amber granita from the juice.

Black pudding, baked apples and celeriac mustard mash

Food to keep the cold out. If black pudding isn’t your thing, try fat, herby butcher’s sausages instead, but cooked whole rather than in slices.

Serves 4
black pudding 500g
dessert apples 4, small butter a little
For the mash:
celeriac 750g
potatoes 350g
lemon 1
bay leaves 3
parsley a small bunch
butter 60g
grain mustard 1 tbsp

Set the oven at 180C/gas mark 4. Peel the celeriac, discarding the whiskery roots at the base. Cut the flesh into large pieces then put them in a saucepan and cover with water. (A squeeze of lemon juice will prevent the celeriac discolouring.)

Peel the potatoes, cut them into similar-sized pieces to the celeriac and add them to the celeriac. Bring to the boil, add the bay leaves and a decent pinch of salt then lower the heat and leave to cook at a gentle boil for about 20 minutes till tender.

Score the apples around the middle, cutting just under the skin, then put them in a roasting tin. Place a knob of butter on each and bake for 15 minutes. Slice the black pudding into 4 and place the slices into the roasting tin next to the apples with a knob of butter over each. Return to the oven for a further 15 minutes until the black pudding is sizzling and the apples are fluffed up.

Meanwhile, chop the parsley. Drain the vegetables then tip them into the bowl of a food mixer fitted with a beater attachment. Add the butter then beat till soft, light and creamy. Fold in the parsley, the grain mustard and a seasoning of black pepper.

Put generous scoops of the celeriac and potato mash on warm plates, place a slice of black pudding and an apple on each and serve.

Pears, clove and orange granita

Heart warmer: pears, clove and orange granita.
Heart warmer: pears, clove and orange granita. Photograph: Jonathan Lovekin for the Observer

A refreshing dessert for a crisp winter’s day, scented with sweet spices. The timing is tricky, with pears taking anything from 15-50 minutes to soften. Check them regularly with a skewer as they cook – they are at their most delicious when on the edge of collapse and so tender they require a careful hand to transfer them to the serving plate.

Serves 4
orange juice 1 litre
caster sugar 100g
cloves 4
cinnamon ½ stick
pears large 2

Pour the orange juice into a nonreactive saucepan, then add the caster sugar, place over a moderate heat and leave until the sugar has dissolved, stirring occasionally. Add the cloves and cinnamon stick and bring almost to the boil.

Peel the pears, slice each in half from stem to base, then scoop out the cores using a teaspoon or a melon baller. Lower the pears into the juice and simmer gently until soft. Ripe pears will take about 20 minutes, hard fruit considerably longer. They are ready when they will easily take the point of a knife or skewer.

Lift the pears carefully from the pan with a draining spoon and place on a plate. Spoon over a little of the orange juice to keep them moist, then cover and refrigerate. Chill the juice as quickly as possible. (Pouring it into a bowl then resting it in a larger bowl of ice cubes will speed matters up.) When the juice is cold, remove the cloves and cinnamon, pour into a shallow plastic freezer box and freeze for at least 4 hours.

When the juice is almost frozen, pull the tines of a table fork through it, roughing up the surface, then do it again digging a little deeper, making large ice crystals in the process. Take care not to mash the crystals, leaving them as large as possible. Put the granita back into the freezer.

To serve, put a pear half on each dessert plate, pile some of the granita into the centre and serve immediately. You should have some granita over for the next day.

Email Nigel at nigel.slater@observer.co.uk or follow him on Twitter @NigelSlater

The weekend cook: Ken Yamada’s recipes for cod teriyaki and miso lamb

Spectacular Japanese main courses you can make at home

This is my final column standing in for Tommi, and I hope you’ve enjoyed it as much as I have. To mark the occasion, here are a couple of heavyweight dishes.

Teriyaki is now as well known outside Japan as sushi or ramen, and it’s one of my favourite ways to cook. The key ingredients, as with so many Japanese dishes, are soy, sake and mirin, and they combine here to make a sauce that goes as well with meat and veg as with fish. I always make a big bottle and keep it in the fridge, because that way it’s easy to knock up a fab supper in minutes.

Teriyaki sauce

Double or even triple the amount of sauce, and keep what you don’t use in the fridge, ready for the next time a teriyaki craving hits you. It gets me at least once a week, so I get through pints of the stuff. It’s dead easy to make, too. Makes about 325ml.

10g fresh ginger, peeled and cut into 2mm-thick slices (I use a mandoline)
100ml soy sauce
100ml mirin
100ml sake
80g sugar
15cm x 15cm sheet kombu (optional)

Put everything in a pan and heat gently, stirring, until the sugar dissolves. Turn off the heat, leave to cool, then pour into a clean, sterilised glass bottle. (If you use kombu, make sure to squeeze this into the bottle, too.) It will keep in the fridge for about a month.

Cod teriyaki

The quantities given are per person, so just multiply them up, depending on how many you’re feeding.

1 tsp cooking oil
150g piece skin-on cod fillet
30ml sake
50ml teriyaki sauce (see previous recipe)

To garnish
100g spring onions, just the green part
20g cress (any you can get hold of, though I like pink-stem radish cress)

First prepare the garnish. Finely chop the onion tops (keep the white parts for another use), wash and drain. Mix with the cress and refrigerate.

Heat a nonstick frying pan on a medium heat, add a teaspoon of oil and lay in the cod skin side down. Do not even think about touching it for the first two minutes, so the skin gets a chance to crisp up. After two minutes, gently lift the fish to check that the skin isn’t burning, then carry on cooking until you notice it taking on a golden brown colour. Leaving the fillet skin side down, pour the sake over the fish and cover the pan. After another two minutes, once the sake has all but evaporated, pour in the teriyaki sauce, cover again and leave for three minutes.

Transfer the fish skin side up to a serving plate. On a medium heat, reduce the sauce in the pan until it thickens and starts to bubble, then pour over the fish, top with a heap of the salad garnish and serve.

Chilli miso lamb cutlets

Ken Yamada’s chilli miso lamb cutlets.
Ken Yamada’s chilli miso lamb cutlets. Food styling: Emily Kydd. Prop styling: Jennifer Kay. Photograph: Louise Hagger for the Guardian


Miso is another central ingredient in Japanese cooking. It’s made by fermenting soybeans with salt and koji (a fungus), along with various other ingredients that differ from one region of Japan to another. The enzymes and bacteria in miso act as brilliant tenderisers of meat or fish. Gochujang is a fiery, fermented soybean paste from Korea: buy it in large supermarkets or Asian stores. Please don’t trim the meat off the lamb bones – it goes all crisp when cooked, and is the best bit. If you can brave the cold, barbecue your lamb over charcoal: there’s something gloriously decadent about setting light to a barbecue in winter, though you may get odd looks from the neighbours. Serves two.

For the chilli miso marinade
40ml mirin
15g sugar
100g miso
15g gochujang chilli paste

For the chilli miso sauce
80g chilli miso marinade (see above)
20ml sake

For the lamb
4 lamb cutlets
1 tbsp chilli miso sauce (see above)

First make the marinade. Heat the mirin and sugar in a small saucepan until the sugar dissolves, take off the heat, and mix in the miso and chilli paste. Rub 80g of the marinade (the rest will go into the sauce) into the lamb, and refrigerate overnight.

Now make the sauce: gently heat the sake in a small saucepan until the alcohol has evaporated, leaving only the liquid behind, then stir in the rest of the marinade and leave to cool.

The next day, heat the oven to 200C/390F/gas mark 6. Lay the cutlets on a rack, so the hot air in the oven can circulate all around them, and roast for eight minutes for medium rare with nicely charred edges (cook for longer if you prefer your lamb more well done). Serve with a big dollop of the miso sauce and a mound of the following pickle.

Namasu salad

We Japanese love our pickles, and this very simple one is a delicious introduction to how we make them. Makes enough to fill a small jam jar, and it will keep for up to a month.

100ml rice vinegar
10g salt
30g sugar
200g daikon (aka mooli or white radish)
200g carrots
1 red chilli, deseeded and cut into very thin slices

Gently stir the vinegar, salt and sugar in a small saucepan until the salt and sugar dissolve, then turn off the heat and leave to cool.

Peel the daikon and cut it first into 8cm chunks and then into 1cm-thick slices. Peel the carrots and cut into 8cm-long pieces. Set a mandoline to its thinnest setting (ie, about 0.5mm), and cut both into long, thin strips.

Put all the sliced daikon, carrots and chilli into a sterilised jar or Tupperware pot, pour over the cold vinegar mix, seal and leave to cure at least overnight. Serve cold.

Ken Yamada is executive chef/co-owner of Tonkotsu, Tsuru and Anzu.

Rachel Roddy’s take on a classic cheese and onion pie recipe

A childhood spent pulling pints in an Oldham pub while Granny and her sister baked food for the punters gave me a recurring hankering for a proper cheese and onion pie, favourite jukebox hits and a glass of old-fashioned bitter

By the age of eight, I could pull a pint of bitter. I needed to stand on a chair and then to use all my weight, almost dangling from the pump in order to pull it down and release the deep amber liquid into the dimpled pint pot. Granny or Uncle Colin would be behind me, telling me to go steady and watch the head, catching the pump as it lurched back, putting a hand under the glass just in case.

I was better at dropping lemon quarters in an inch of gin, its fierce juniper scent making my nose twitch. I was better still at impaling cocktail cherries on toothpicks for Babycham, or my own tame snowball, which I would drink sitting up at the bar with my brother, wreathed in cigarette smoke, legs swinging from the high stool in time to songs we didn’t really understand: “If you want my body, and you think I’m sexy, come on sugar let me know...”

A good slice of my childhood was spent at my granny’s pub, The Gardeners Arms: a large, red-brick Robinson’s pub at the bottom of Durham street in Oldham, in Greater Manchester. For years it had been a troubled local, a succession of landlords who hadn’t settled in, giving the brewery a real headache, but then Alice came along. She was quite a woman, Alice Jones.

At first glance she seemed delicate, dainty even, but she wasn’t. Born in Manchester, the youngest of five girls, Alice was brought up by her sisters after her father died from war injuries and her mother went back to work. She was strong and hardworking, with a capacity to clean, the likes of which I have never seen since. She had also spent her 20s working in the accounts office at Kellogg’s and reading books and papers. This combination of hardworking hands, a head for accounts and knowledge, along with creamy Lancome beauty and charm, made her quite the landlady.

I remember her both in her housecoat buffing the brass tables and flushing out the pipes – good bitter comes from a clean cellar and clean pipes – then, later, when regulars had taken their place, coming down the stairs ready for the night. “You look a million dollars Al,” my grandpa Gerry would say, Bob Seger curling out of the juke box in agreement: “She was looking so right, in her diamonds and frills...”

By the time we three grandkids arrived in the 1970s, you were safe in The Gardeners Arms, the convivial heart of that part of town. It was regulars only and everybody knew everyone’s name, game – darts, billiards, cribbage or chat – drink and business.

Alice had also started serving food, her sister May at the stove. May was even smaller and tougher than Alice: I remember her frying, shouting at my uncle Frank or cracking her 30-a-day laugh. May’s specialty was “steak Canadian” – a strip of steak, flash fried with onions stuffed in large white rolls called oven-bottom cakes. There were also bacon or tongue sandwiches; and pies: meat and potato or cheese and onion – both served with peas.

On Sunday, once the pub had closed after the lunch service and the last customers swayed away, bottles clinking in their pockets, we would push the brass tables together and lay for our Sunday lunch, a roast and all the trimmings on the side, a tangle of family relations, and as many coins as we wanted for the jukebox.

Later, when she left the pub, Alice continued to make pie and peas. She was an inveterately particular and good pastry maker, and it is her voice, specific and firm, I hear when I make pastry: “You want cold hands. Run them under cold tap, then work quickly, rubbing until it looks like breadcrumbs, and use iced water.”

I miss her voice, with its soft Manchester lilt. It is the same lilt I hear and love in Simon Hopkinson’s writing: his stories and recipes from his Lancashire mum; familiar, and therefore comforting. His recipes are also full of common sense and good taste, so unbeatable. Today’s is his recipe.

Cheese and onion pie is just that: cheese and onion – nothing more, nothing less. It is a straightforward, smashing pie, a soft filling encased in short, crumbling pastry, meaning you need to chase the last few crumbs amount the plate with a finger tip. I find all lard pastry a bit hard to handle, and so prefer half-lard, half-butter, which makes for a short, but manageable pastry.

You start the white onions in butter then add a cup of water, which creates a steamy braise. Once all the water has been driven away by cooking, and the onions are soft, they are ready. The cheese should be Lancashire: its fluffy texture, creamy flavour and the fact that it melts, but doesn’t pull into strings, make it ideal.

It is is near impossible to find Lancashire cheese in Rome, so I made do with a mix of young pecorino and caciocavallo, which worked well enough. Make sure you seal the edges of the pie well, pinching and pressing. After baking, let the pie rest before turning it out of the tin, otherwise you might have a mishap.

Cheese and onion pie cries out for a dab of English mustard or piccalilli. I had neither. I am not sure what Auntie May would have said about the frilly-edged tin or pink radicchio – plenty I imagine. I wished for a pint of Robbies bitter with my slice, and to be transported, for a moment, to The Gardeners Arms, with everyone there; to put another coin in the jukebox baby, “cum on feel the noize, girls grab the boys, we get wild wild wild...”

Simon Hopkinson’s cheese and onion pie

Serves 4-6
250g self-raising flour
60g cold butter, diced
60g cold lard, diced
Salt
2–3 tbsp iced water
3 medium onions
25g butter
250-300g cheese, ideally Lancashire, but cheddar or young pecorino romano works too
Black or white pepper
Milk, for sealing and glazing

1 You will need a loose-bottomed tart tin, about 20cm wide x 4cm deep. Make the pastry by rubbing the fat into the flour with your fingertips, or pulsing with a food processor, until the mix resembles breadcrumbs. Add a pinch of salt and enough iced water – gradually and cautiously – to make a ball of dough, neither too sticky, nor too firm. Wrap the dough in clingfilm and chill for at least 30 minutes.

2 Peel, half and slice the onion into half moons. In a frying pan, melt the butter over a low flame, then add the onions and a pinch of salt and cook, stirring for a few minutes. Add a small glass of water and then cook, stirring occasionally, for about 15 minutes until the water has been driven away and the onion is very soft. Remove from the heat and allow to cool. Grate the cheese.

3 Preheat the oven to 180C/350F/gas mark 4. Roll out ⅔ of the pastry and use it to line the base and sides of the tin, so it overhangs slightly. Do not trim yet, but prick the base with a fork. Make a layer with half the onion, grind over a little black pepper, then make a layer using half the cheese. Repeat. Paint the edges of the dough with milk. Roll the remaining dough into a circle a little larger than the tin, lay it over the filling and then press it firmly into the edges. Trim the excess dough away. Make three short slashes in the middle of the pie to let steam escape. If you you like, use the non-blade side of a knife to make a faint lattice.

4 Sit the pie on a preheated baking sheet and bake for 40-50 minutes, or until golden and the cheese is bubbling gently through the slashes. Allow the pie to sit for 30 minutes before turning it out.

  • Rachel Roddy is a food writer based in Rome and the author of Five Quarters: Recipes and Notes from a Kitchen in Rome (Saltyard) and winner of the André Simon food book award @racheleats. Recipe from Simon Hopkinson’s book, The Good Cook – out now.

Rachel will be back on Tuesday next week.

Yotam Ottolenghi’s Taiwanese recipes

Ready, steady, wok… Create a stir in the kitchen with a Taiwanese feast

Iwould love to feast the night away at one of Taipei’s many food markets. Freshly made dumplings, bowls of hot noodles, fried chicken, sticky rice, Chinese tea eggs, oyster omelette, fermented tofu, mochi balls… I’d be the one arriving very early and leaving very late. But I recently experienced the next best thing when my friend Garry Bar-Chang (whose mum is Taiwanese) cooked a bunch of chilli-, ginger- and garlic-heavy Taiwanese dishes for the Ottolenghi team. We were all expecting steamed buns, but instead we got a beef soup with an unbelievably deep flavour and three lip-smacking (and burning) stir-fries. He shared his kitchen secrets with me; get frying.

Quick sea bass with ginger and garlic

Have everything prepped before you start cooking, because it all happens very quickly once you do. Serves four with some steamed rice.

2 tsp rice-wine vinegar
6cm piece fresh ginger, peeled and cut into thin julienne strips, plus 1 tsp finely grated ginger
8 garlic cloves, peeled: 6 finely sliced, 2 finely grated
2 tbsp sunflower oil
4 skin-on sea bass fillets
1½ red chillies, cut in half lengthways, deseeded and cut into julienne strips
4 spring onions, trimmed and cut on an angle into 3mm-thick slices
2½ tbsp light soy sauce (Kikkoman is my go-to brand for this)

Mix the vinegar, grated ginger and grated garlic, and set aside.

Put the oil in a large saute pan on a high heat. Once hot, lay in two fish fillets skin side down, cook for a minute, then flip and cook for 30 seconds more. Transfer to a plate and repeat with the remaining fish (you should have enough oil left in the pan). Once cooked, transfer to the plate and leave the pan on the heat. Fry the julienned ginger for 30 seconds, stirring continuously, then add the sliced garlic and chilli, and stir-fry for another minute, until golden. Add the spring onion, stir-fry for a minute, then stir in the rice vinegar mixture, soy sauce and 75ml cold water. Return the fish to the pan, just to warm through, and serve.

Beef noodle soup

Beef noodle soup is ubiquitous in Taiwan. Everyone has their own version and everyone thinks theirs in the best; Garry’s is based on the recipe he learned from his mum, Mei-Hui Li. A pressure cooker will cut the cooking time dramatically: add the spring onion before you close the lid, then, once the cooker is hissing, steam for 15 minutes. Take off the heat and leave to stand for 30 minutes, until the pressure drops and it’s safe to open. Serves six.

8 star anise
5g dried liquorice sticks (if you can’t get hold of any, up the star anise to 12)
2 tsp Szechuan peppercorns
½ tsp fennel seeds
50ml sunflower oil
1.2kg beef shin, boned, cut into 5cm chunks and patted dry
6cm piece fresh ginger, peeled and cut into 2mm slices
10 large garlic cloves, peeled and roughly crushed with the flat of a knife
2 red chillies, cut in half lengthways and deseeded
200ml Chinese rice wine
60ml premium dark soy sauce
150ml light soy sauce (again, Kikkoman for preference)
3 tbsp demerara sugar
2.8 litres boiling water
6 spring onions, trimmed and cut in half widthways
250g dry udon noodles

Put the first four ingredients in muslin and tie into a bundle.

In a 30cm-wide and very deep pot for which you have a lid, heat the oil on a high flame. Once it’s very hot, add the beef (take care, because the oil will spit) and saute for about three minutes, stirring frequently, until the meat is browned (depending on the size of your pan, it may be better to do this in two batches). Add the ginger and stir-fry for three minutes, then add the garlic, chilli and muslin bundle, and stir-fry for six minutes more. Don’t worry if things start sticking to the base of the pan, because it will be deglazed later by the liquids.

Add the rice wine, both soy sauces, the sugar and boiling water, and stir to combine. (If your pan struggles to accommodate all that in one go, hold back some of the water and add it later, once some of the liquid in the pan has evaporated.) Bring to a boil, cover, turn the heat to medium and leave to cook for 90 minutes. After this time, add the spring onions, cover and cook for another hour.

When the soup is nearly ready, cook the noodles as per the packet instructions, then divide between six bowls, top with the soup (discard the muslin bundle) and serve.

Stir-fried cabbage with garlic and chilli

You can buy Japanese-style flat cabbages in Chinese and Middle Eastern supermarkets. They are much sweeter than normal white cabbage and cook far more quickly, too. You could use regular cabbage here, but you’ll need to cook it for a bit longer and it won’t go quite as crisp. This is a lovely accompaniment to stir-fried pork and sticky rice. Serves four as a side dish.

3 tbsp sunflower oil
6 garlic cloves, peeled and roughly sliced
2 red chillies, deseeded, and cut widthways into 2cm pieces
5 spring onions, trimmed and cut on an angle into 3cm pieces
½ Japanese-style flat white cabbage (see introduction), leaves separated and roughly torn in half)
¾ tsp salt

Heat the oil in a large saute pan on a high flame. Once hot, stir-fry the garlic and chilli for a minute, until golden, then add the spring onions and stir-fry for two minutes. Add the cabbage in stages (it will wilt and shrink down as it cooks), and the salt and cook, stirring, for 10 minutes, until the cabbage is cooked and soft, but still retains some bite. Leave to rest for five minutes before serving.

Pork and preserved vegetable stir-fry

Yotam Ottolenghi’s pork and preserved vegetable stir fry.
Yotam Ottolenghi’s pork and preserved vegetable stir fry. Photography: Louise Hagger. Food styling: Emily Kydd. Prop styling: Jennifer Kay

The inspiration for this dish came from Garry’s love of the savoury, crunchy preserved vegetable topping that’s sprinkled on top of noodle soup. He’s essentially converted that topping into the star turn of a main course dish. These preserved vegetables are not the easiest ingredient to find, granted, but that’s a perfect excuse for a trip to Chinatown (or for an online shop). I used the Fish Well brand’s preserved mustard greens; feel free to experiment with other preserved vegetables. You can buy sprouted mung beans from healthfood shops and some supermarkets, but they’re also very easy to sprout at home: soak about 100g mung beans in water overnight, drain, then leave for two days in a bowl covered with a clean tea towel. Rinse them once or twice a day, adding a little water, and they’ll sprout before too long. Make more than you need for this, because they’re lovely sprinkled over all kinds of salads. Serves four with some sticky rice.

20g cornflour
2 tsp premium dark soy sauce
40ml light soy sauce (Kikkoman, ideally)
500g pork loin fillet, cut into 3-4mm-thick slices
320g Chinese preserved mustard greens or other preserved vegetables (see introduction)
75ml sunflower oil
2 red chillies, deseeded, cut in half lengthways and then into 2cm pieces
6 large garlic cloves, peeled and thinly sliced
6 spring onions, cut into 2cm pieces
200g sprouting mung beans

In a medium bowl, combine the cornflour, dark soy sauce and two teaspoons of the light soy sauce, to make a thin paste. Toss the pork in the paste, making sure it’s covered all over, then leave to marinate for at least 30 minutes. (After marinating, separate the pork slices, because they may have clumped together.)

Wash the preserved vegetables in cold water, drain and set aside.

Heat two tablespoons of oil in a wok or large frying pan on a high flame. Once the oil is very hot, add the pork, spreading out the pieces so they don’t overlap, and leave to fry for 30 seconds. Turn over the pork, again making sure the slices don’t overlap, and fry for another 30 seconds, until golden-brown. Transfer the pork to a plate, wipe clean the pan and return to a high heat.

Heat another three tablespoons of oil in the pan and, once very hot, stir-fry the chilli and garlic for 30 seconds. Add the spring onions, stir-fry for a minute, then add the preserved vegetables and stir-fry for another two minutes. Return the pork to the pan, add the final two tablespoons of light soy sauce, and stir-fry for three minutes. Take off the heat, stir in the sprouting beans and serve at once.

Yotam Ottolenghi is chef/patron of Ottolenghi and Nopi in London.

Nigel Slater’s chicken and broccoli recipe

Something suitably sizzling to light up a gloomy winter evening

The recipe

Put 2 tbsp of groundnut oil into a large mixing bowl, stir in 2 peeled and finely crushed cloves of garlic, 35g of grated ginger, 1 tbsp of soft brown sugar, 3 tbsp each of light soy sauce, rice wine and white miso paste. Mix thoroughly.

Place 450g of chicken meat into the marinade and toss briefly, then set aside for at least 30 minutes. Toss the meat and marinade every 15 minutes or so. Set the oven at 200C/gas mark 6.

Tip the chicken into a roasting tin, leaving behind most of its marinade, and roast for 25 minutes or until it is golden and sizzling.

Cut 250g of broccoli into short lengths. Roughly chop a couple of spring onions, then finely chop a red chilli and 2 cloves of garlic. Heat 2 tbsp of groundnut oil in a wok then add the garlic, onion and chilli. Fry briefly – the garlic should just start to turn nut brown – then add the broccoli and cook for 3 minutes till crisp and tender.

Toss the roasting chicken pieces with the sizzling greens and serve. Enough for 2-3.

The trick

Get the marinade made, then add the chicken and leave it to one side for anything up to 24 hours. Drain the meat of most of its marinade before roasting, then, once the chicken is cooked, remove, pour the reserved marinade into the roasting tin and bring to the boil, then use it to dress the chicken and broccoli.

The twist

I used tenderstem broccoli, but there is some very fine-looking purple sprouting about, too – it needs a little more care when frying as the florets can break up. Alternatively, use cavolo nero, cut into short lengths.

Email Nigel at nigel.slater@observer.co.uk or follow him on Twitter @NigelSlater

Thomasina Miers: the ultimate roast chicken and six other easy recipes

The chef and former MasterChef winner is happiest cooking at home. In an exclusive extract from her new book, she shares her favourite starters and main courses

Over the years, I have spent thousands of happy hours – as a child, student, twentysomething singleton and now a mother of three – in the company of those I love, sitting around a kitchen table. I have thrown last-minute parties for 40 people to celebrate my birthday, dinners that have grown from six to 14 in the space of a day, and breakfasts when neighbours have just popped in for some eggs, pancakes and company. It’s how I nurture those closest to me: having a house of happy, well-fed people makes me happy, too.

These dishes are achievable for any home cook. I write not as a chef or entrepreneur, nor as a MasterChef winner, but as a busy working woman. These recipes should not only satisfy (and sometimes impress), but also fill your kitchen with great smells and a sense of adventure. It’s amazing how a few spices can transform a simple recipe; equally, sometimes all you want is a perfect poached egg to make yourself feel whole.

I want to inspire you, not put pressure on you. Much of the food we see on television or on Instagram is not about real life. The secret to great simple food is simple organisation. Mrs Beeton had it right: order in the kitchen is key. That hasn’t always come easily to me – I am more of a fly-by-the-seat-of-my-pants person, and guests at my house often find themselves mucking in. In the early rounds of MasterChef, John Torode would shake his head at my chaotic approach; the show taught me that preparation saves both time and stress. Now I lay out ingredients before I start cooking (sometimes in the right weights), and have a bowl on my work surface for trimmings, which saves me untold numbers of trips to the bin.

I advise always making extra of every dish, so that you’re well stocked for the week ahead. It’s such a relief to come home midweek and find you’ve already done most of the work towards a meal. Sometimes, the prospect of making dinner can feel a total chore: maybe I’ve got home from work late, or my daughters are in a bolshie mood, or I’m feeling run down. But I am always glad once I start; it has become my form of mindfulness, a precious opportunity to disconnect and live in the moment. It gets the necessary done (feeding myself and my family, and eating healthily), while fulfilling the need to chill out and switch off.

Cooking with friends and family has provided me with some of my favourite memories: that gentle lull between courses, the contemplative end of a long meal, the va-va-voom that a bottle of mescal plonked on the table lends to a weekend dinner. I hope these recipes deliver some of that for you. Enjoy.

Corn and double cheese muffins

Corn and double cheese muffins
Thomasina Miers’ corn and double cheese muffins. Photograph: Louise Hagger for the Guardian. Food styling: Emily Kydd. Prop styling: Jennifer Kay

Californians eat variations on cornbread with everything from rich meat braises to light salads and eggs. This basic cornbread recipe was developed from a recipe in an old Chez Panisse cookbook. The quantities given can be baked as a single loaf in a buttered 900g loaf tin; the addition of feta, cheddar and herbs, then baking the mix as separate muffins, turns it into a top-notch breakfast, with or without a few rashers of bacon. Feeds four.

For the basic cornbread mix
100ml whole milk
240ml buttermilk
3 eggs
165g sweetcorn kernels, frozen and defrosted (or cut from a fresh cob)
100g plain flour
180g fine polenta
30g soft brown sugar
1 tsp fine salt
1 tbsp baking powder
80g butter
3 spring onions, halved lengthways and very finely sliced

For the muffins
50g cheddar, grated
50g feta, crumbled
4 fresh thyme sprigs, picked
1 pinch cayenne pepper

Heat the oven to 180C/350F/gas mark 4. Blend together the milk, buttermilk, eggs and 100g of the sweetcorn. Put the flour, polenta, sugar, salt and baking powder in a large bowl and whisk to combine. Melt the butter in a pan and add to the dry ingredients, along with the egg mixture, spring onions and remaining sweetcorn. Mix briefly just to bring everything together.

At this stage, it’s ready to be poured into a buttered bread tin and baked for about 45 minutes, or until a skewer comes out clean; leave to cool in the tin for 30 minutes, then turn out on to a rack to cool completely.

Alternatively, to make the muffins, simply add the cheeses, thyme and cayenne to the basic mix, pour into muffin trays lined with paper cases, and bake for 25-30 minutes.

Salmon ceviche with roast beetroot, pumpkin seeds and tarragon

Salmon ceviche with roast beetroot, pumpkin seeds and tarragon
Thomasina Miers’ salmon ceviche with roast beetroot, pumpkin seeds and tarragon. Photograph: Louise Hagger for the Guardian. Food styling: Emily Kydd. Prop styling: Jennifer Kay

Cut 800g peeled, trimmed beetroot into slender wedges and toss in two tablespoons of olive oil, salt and pepper. Roast in a preheated 180C/350F/gas mark 4 oven for an hour, until tender. Meanwhile, toast 40g pumpkin seeds.

When the beetroot is cooked, toss it in a tablespoon of cider vinegar, a big handful of chopped tarragon and the pumpkin seeds. Cut two organic salmon fillets into wafer-thin slices and dress with lemon juice, finely chopped green chilli and a slick of pumpkin seed oil. Serve with the beets on the side. Feeds four.

Sichuan aubergines

Sichuan aubergines
Thomasina Miers’ Sichuan aubergines. Photograph: Louise Hagger for the Guardian. Food styling: Emily Kydd. Prop styling: Jennifer Kay

I find Sichuan food intoxicating: it’s the vibrant combination of fried garlic, ginger, dried chilli and Sichuan pepper. It has become so popular in recent years that the ingredients are now easy to find in larger supermarkets or online, so invest in a few dried chillies, a small packet of Sichuan peppercorns and a bottle of Shaoxing rice wine. Aubergines are the perfect sponge for these gutsy flavours. Rather than deep-frying them, I prefer roasting, which uses less oil and makes less mess. The result is a soft, silky heap of aubergines doused in a deeply fragrant sauce. If you like, scatter 150g crisp, wok-fried minced pork on top before serving. Feeds four.

For the aubergines
4 large aubergines (about 1.2kg), topped and tailed
100ml vegetable oil
400g fat udon noodles
4 spring onions, trimmed and finely sliced
1 small bunch coriander, leaves picked and roughly chopped

For the sauce
3 tsp cornflour
3 tbsp vegetable oil
2 tbsp Sichuan chilli bean paste
2 large dried red chillies, crumbled (you can use Sichuan, Mexican chile de árbol, Italian peperoncino or chilli flakes)
2cm piece fresh ginger, peeled and finely chopped
3 garlic cloves, peeled and finely chopped
250ml chicken or vegetable stock
2 tbsp Shaoxing wine (or manzanilla)
1-2 tbsp soft light brown sugar
1 tbsp brown-rice vinegar

Cut the aubergines into 1-2cm-thick rounds, then cut each round in half across the middle. Sprinkle with a little fine sea salt, put in a colander and leave to drain in the sink or on the draining board for at least 30 minutes, to draw out excess water.

Heat the oven to 220C/425F/gas mark 7. Tip the aubergines into a roasting tin, toss them in the oil and roast for 40-50 minutes, until temptingly golden on the outside and completely soft within.

Meanwhile, get the sauce ready. Mix the cornflour with two tablespoons of water. Heat the oil in a large wok and, when hot, add the chilli bean paste. As soon as it starts sizzling, add the chillies, ginger and garlic, and stir-fry for a minute or so, taking care not to burn the chillies and garlic (if necessary, take the wok off the heat briefly).

Pour in the stock and cornflour paste, cook for a few minutes, until the sauce thickens, then add the rice wine, sugar and vinegar, and simmer for a few minutes, to give the flavours a chance to meld.

Meanwhile, cook the noodles according to the packet instructions, then transfer to warmed shallow bowls. Top with the aubergines and sauce, scatter on the spring onions and coriander, and serve.

Simple Moroccan fish stew

Simple Moroccan fish stew
Thomasina Miers’ simple Moroccan fish stew. Photograph: Louise Hagger for the Guardian. Food styling: Emily Kydd. Prop styling: Jennifer Kay

I spent the third year of my Spanish degree in Santiago, Chile, where I befriended a bunch of locals. One weekend, we met a Moroccan fisherman who cooked for us in a huge oil drum over a fire. He kept adding layer upon layer of garlic, onion, spices, herbs, potatoes, fish and shellfish, and the result was extraordinary: a stew fresher than anything I had ever tasted, and alive with the sea. All coastal cultures have their own version of it: France has bouillabaisse, with tomato, fennel and anise; Kerala has red fish curry, with coconut milk and tamarind; Mexico’s fish stew is made with crab and smoky chillies. Prepare the base early, then put in the seafood at the last minute. Feeds four.

For the stew
3 tbsp olive oil
2 onions, peeled and finely sliced
3 garlic cloves, peeled and finely sliced
1 tbsp coriander seeds
1-2 pinches chilli flakes
1 tsp dried oregano
½ tsp saffron threads, soaked for at least half an hour in boiling water
1 preserved lemon, pulp scraped away, rind finely chopped
800g tinned plum tomatoes (ie 2 cans), drained, rinsed and chopped
600g floury potatoes, peeled and cut into walnut-sized chunks
250ml white wine
600g cod loin, skinned, cut into 3cm chunks (or red mullet or gurnard)
500g mussels, scrubbed and debearded

To finish
1 small handful fresh dill or coriander leaves (or both), finely chopped
Greek yoghurt
2 tbsp extra-virgin olive oil mixed with 2 tbsp rose harissa (shop-bought or homemade)
Crostini (optional)

On a medium heat, warm the oil in a large frying pan for which you have a lid, then gently saute the onions, garlic, coriander, chilli, oregano and a good pinch of salt for eight to 10 minutes, until everything is very soft. Turn up the heat to medium-high, stir in the soaked saffron and its water, then add the preserved lemon, tomatoes, potatoes and wine. Simmer for 12 minutes, stirring occasionally to prevent sticking, until the sauce has thickened slightly, then season to taste. Turn down the heat to low.

Lightly season the fish, then very gently fold it into the stew. Scatter the mussels over the top and clap on the lid. Leave to cook on a low heat for four to five minutes, then check to see if the mussels have opened: if they have not, replace the lid for another few minutes, until they’ve all opened (discard any that don’t).

Spoon the stew into bowls and scatter over the herbs. Serve at the table with the yoghurt, harissa oil and crostini or fresh crusty bread.

Grilled broad bean and jamón salad

This is one for spring, when early broads come into season. Heat a griddle pan on a high flame. Top and tail 250g young broad bean pods, cut the pods in half lengthways and toss with a tablespoon of olive oil, a quarter-teaspoon of chilli flakes and half a crushed garlic clove. Sprinkle the pods with water, then griddle on both sides until they blacken slightly. Remove from the pan, squeeze over the juice of half a lemon and season. Transfer to a bowl and mix with 300g warm shelled cooked broad beans, 100g thinly sliced Serrano ham, two tablespoons of shredded mint leaves, one peeled and finely sliced banana shallot, three tablespoons of good sherry vinegar and six tablespoons of extra-virgin olive oil. Feeds two to four.

Simple spiced dal with spinach and yoghurt

Simple spiced dal with spinach and yoghurt
Thomasina Miers’ simple spiced dal with spinach and yoghurt. Photograph: Louise Hagger for the Guardian. Food styling: Emily Kydd. Prop styling: Jennifer Kay

Lentils and dried peas used to have a reputation for being a bit dull, but once you’ve tasted the richly spiced dals of India, you realise they can be the base for magnificent mains. This recipe uses the classic Indian technique of tempering spices: heating seeds, leaves or chilli flakes in hot fat to release their flavours, then scattering them over the dal before serving. Feeds four.

For the dal
400g yellow split peas
4 garlic cloves, peeled: 2 left whole, 2 finely sliced
A few bay leaves (fresh, ideally)
2 Kashmiri, árbol or other dried red chillies, 1 left whole, 1 crumbled into flakes
A little vegetable stock (if needed)
200g spinach leaves, washed
A squeeze of lemon juice, to taste
Chapatis and natural yoghurt, to serve

For the temper
6 tbsp vegetable oil
1 large onion, peeled and finely chopped
2 tsp black mustard seeds
1 small handful fresh curry leaves
1 tsp garam masala
½ tsp ground coriander
½ tsp ground turmeric
2 ripe tomatoes, chopped (or 2 drained and rinsed canned plum tomatoes)

Put the split peas in a sieve and run under cold water until it runs clear. Put in a pan with the whole garlic cloves, bay leaves and whole chilli, and add enough water to cover by 5cm. Bring to a boil and cook for 40-45 minutes, until tender and falling apart, skimming the water occasionally. Discard the bay and chilli, then use a stick blender or potato masher to create a smooth-ish texture. Season to taste.

Heat the oil for the temper in a frying pan on a medium flame. When hot, add the onion and fry for five minutes, until it turns translucent. Increase the heat a fraction and add the mustard seeds. The moment they pop, add the curry leaves and fry for just a moment, until they turn translucent. Add the sliced garlic and crumbled red chilli, fry for a couple of minutes more, until the garlic starts to colour, then stir in the garam masala, coriander and turmeric. Cook for 30 seconds, until the spices begin to smell fragrant, then add the tomatoes and leave to sizzle for a minute.

Warm up the split peas; add a ladle of water or vegetable stock, if they need loosening. Stir in the tempered spices and the spinach, then season to taste. Add a squeeze of lemon juice and serve with chapatis and yoghurt. This dal is also good topped with a fried egg or as an accompaniment to other curries.

My ultimate roast chicken

Roast chicken
Thomasina Miers’ ultimate roast chicken. Photograph: Louise Hagger for the Guardian. Food styling: Emily Kydd. Prop styling: Jennifer Kay

Lunches or dinners at home are often last-minute arrangements, where we are suddenly expected to feed a mass of people but have next to no time to shop and cook. Roast chicken is my fallback for any such occasion, mainly because you can always be creative with how you cook it. Given that the chicken is the star of the show, I’d advise getting a bird of good quality from the butcher or farmer’s market, or a top-notch online seller such as fossemeadows.com. If possible, buy one with its gizzards and livers inside; stash the livers in the freezer until you have enough to make a pate and use the gizzards for a stock. Feeds four to six.

For the chicken
1 whole chicken, about 1.6kg
½ lemon
8 sprigs thyme or 2 sprigs rosemary
4 bay leaves
2 white onions, peeled and halved
5 garlic cloves
1 tbsp olive oil

For the potatoes
1kg baby new potatoes, scrubbed and halved
5 garlic cloves
1 handful fresh thyme sprigs (or oregano or rosemary), leaves picked
4 tbsp olive oil

For the gravy
½ chicken stock cube
1 tbsp plain flour
150ml dry white wine

Heat the oven to its highest setting. Season the chicken inside and out, then stuff it with the lemon, half the herbs and half an onion. Roughly slice the rest of the onions, spread them over the base of a roasting tray, then scatter over the garlic and the remaining herbs. Rub the chicken with the oil and season generously.

Pull the legs slightly away from the body, then sit the chicken breast side down on top of the onions and transfer to the oven. Immediately turn down the heat to 190C/375F/gas mark 5 and cook for just over an hour (30 minutes per kilo, plus 15 minutes for good measure). The chicken is cooked when the juices from the thickest part of the thigh run clear when pierced with a skewer (if in doubt, cut the thigh away from the body to see if it is cooked in that crevice). For the most succulent meat, it’s essential to rest the bird in a warm place, covered in foil, for 15 minutes while you make the gravy.

When the chicken is in the oven, pop the potatoes into a large baking tray with the garlic and herbs, pour over the oil, season well and give everything a good toss. Roast in the same oven as the chicken, stirring occasionally and adding a little oil if they look a bit dry. They will be crisp and golden in about an hour.

For the gravy, skim off most of the fat from the chicken tray, leaving only a few tablespoons behind, then put the tray on the hob over a medium heat. Crumble in the stock cube and whisk in the flour, and leave to bubble for a few minutes, to cook out the raw flavour in the flour. Pour in the wine a little at a time, letting it bubble for a minute between each addition, then boil for a few moments before adding enough boiling water to thin the mix to your desired consistency (anything between 200ml and 400ml, depending on how thick you like your gravy). Simmer for five to 10 minutes, and check for seasoning; I like lots of salt and pepper in my gravy.

Pick out and discard the herbs, but save the delicious onions and garlic to serve with the chicken. Pour the gravy through a sieve into a warm jug (though if it’s just family, I don’t bother), carve the bird and dish up.


This is an edited extract from Home Cook, by Thomasina Miers, published next week by Guardian Faber at £25. To order a copy for £17.50, go to bookshop.theguardian.com or call 0330 333 6846.

Next week: brunch, cake and puddings

Set design assistants: Charlie Speak and Hannah Gill. Hair and makeup: Oonagh Connor. Sky dress, simplybe.co.uk. Jewellery, stylist’s own. KitchenAid Artisan, from Lakeland and independent stockists nationwide. Special thanks to John Lewis, Little Red Rooster, Hackney Carpets, fab.com and eastlondonmanwithvan.com